APA Posted February 7, 2021 Share Posted February 7, 2021 From a tiny Tilly to the behemoth of the Tortoise. I'm not a fan of 'What ifs' but I think a possible is ok. This is going to be set somewhere in Northern Europe in the late 1940's. The build is initially a swift one with the only issue of the requirement for about 5 sets of hands to assemble the boggy sets. After the first couple I got the hang of it and they all went on ok and look flat(ish) on the ground. The barrel was a little warped from the box but some gentle bruit force sorted it out and with a one piece mould it scrubbed up nicely. Hopefully it won't take too long to finish the beast off and get to the painting. I've got the Eduard PE kit which isn't too OTT like some so most of that will end up on here. Cheers all A 18 Link to comment Share on other sites More sharing options...
Cerberus Posted February 7, 2021 Share Posted February 7, 2021 A beast of a kit, only the British could do something this bonkers, this and the Churchill Toad mine flail have a very strange appeal, no plastic kits of the Toad yet though I think, only resin conversions, Meng do the Toad! Matt 1 Link to comment Share on other sites More sharing options...
M3talpig Posted February 7, 2021 Share Posted February 7, 2021 13 minutes ago, Cerberus said: only the British could do something this bonkers, I reckon the U.S did sumit equally bonkers with the doom turtle T28 3 Link to comment Share on other sites More sharing options...
Cerberus Posted February 7, 2021 Share Posted February 7, 2021 19 minutes ago, M3talpig said: I reckon the U.S did sumit equally bonkers with the doom turtle T28 That's a very good point yes, the American T28 was bonkers with a heavy dose of madness piled on top, but looks very cool indeed Matt 2 Link to comment Share on other sites More sharing options...
Courageous Posted February 7, 2021 Share Posted February 7, 2021 I built this monster years ago when it was first released. Can't remember anything of the build but you're making good strides with it. I'd like this in 1/72 but I'll be waiting a long time me thinks. Stuart 1 Link to comment Share on other sites More sharing options...
Andy Moore Posted February 8, 2021 Share Posted February 8, 2021 Nice start on the beast. It's one of Meng's best kits. If you're building it as a production vehicle, don't forget to sand off the moulded triangle on front right of the casemate. It was a warning plate fitted to prototypes to indicate they were built from mild steel instead of armour plate. Andy 3 Link to comment Share on other sites More sharing options...
APA Posted February 8, 2021 Author Share Posted February 8, 2021 Hi Andy Yes I was aware of that 👍 there is also the large cast plaque on the rear of the casemate. This, I think, is also a prototype thing however I have plans to hide that bit 😉 I've been thinking of how it would change in production. There would be hundreds of eyelets to hang stuff plus more storage areas. Plenty to get my teeth into and no one can say I am wrong 😜 A 2 Link to comment Share on other sites More sharing options...
badger Posted February 18, 2021 Share Posted February 18, 2021 On 07/02/2021 at 22:52, Courageous said: I built this monster years ago when it was first released. Can't remember anything of the build but you're making good strides with it. I'd like this in 1/72 but I'll be waiting a long time me thinks. Stuart Cromwell make one in resin - I picked it up from Matador Models at the last show I was able to attend before Covid. 1 Link to comment Share on other sites More sharing options...
robw_uk Posted February 18, 2021 Share Posted February 18, 2021 beast.... personally EVERYTHING looks better in Caunter 1 Link to comment Share on other sites More sharing options...
APA Posted February 18, 2021 Author Share Posted February 18, 2021 1 hour ago, robw_uk said: beast.... personally EVERYTHING looks better in Caunter Well there is that or what if in 1948 the ussr decided to invade Malta 😳 😜 A Link to comment Share on other sites More sharing options...
Hamden Posted February 18, 2021 Share Posted February 18, 2021 Nice start I'll follow along if you don't mind? Stay safe Roger Link to comment Share on other sites More sharing options...
APA Posted February 18, 2021 Author Share Posted February 18, 2021 1 hour ago, Hamden said: Nice start I'll follow along if you don't mind? Stay safe Roger Sure, more the merrier 👍something might happen this weekend 🤞 Andrew 1 Link to comment Share on other sites More sharing options...
Courageous Posted February 18, 2021 Share Posted February 18, 2021 5 hours ago, badger said: Cromwell make one in resin Thanks Ben but I can't see it in Matador's catalogue... Stuart Link to comment Share on other sites More sharing options...
Whitewolf Posted February 18, 2021 Share Posted February 18, 2021 First came across this monster in Bovington Tank Museum a few years back. Painted in Bronze Green it looked pretty impressive! 2 Link to comment Share on other sites More sharing options...
badger Posted February 18, 2021 Share Posted February 18, 2021 15 minutes ago, Courageous said: Thanks Ben but I can't see it in Matador's catalogue... Stuart Hi Stuart It may be that they only take them to shows sadly. Could be worth trying to contact them, but I've never found Matador the easiest company to deal with online I'm afraid 1 Link to comment Share on other sites More sharing options...
Kingsman Posted February 18, 2021 Share Posted February 18, 2021 All other prototypes except the mild steel one at Bovington had a spent case/reloading hatch on the left of the casemate towards the rear. AFV Modeller used to do a resin one. I believe the "plaque" on the back of the casemate is supposed to be the casting marks. I did a "what if" MkIICS version a couple of years ago. 4.5" gun, rangefinder, 20mm Polsten, Brownings in the cupola, stowage boxes, reduced side skirts. I always though this was more assault gun than tank destroyer and the 32pdr an odd choice for the role. The US found the 155mm M12 to be their best bunker-buster. 6 Link to comment Share on other sites More sharing options...
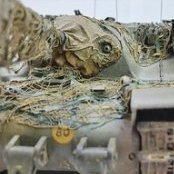
APA Posted February 18, 2021 Author Share Posted February 18, 2021 45 minutes ago, Das Abteilung said: All other prototypes except the mild steel one at Bovington had a spent case/reloading hatch on the left of the casemate towards the rear. AFV Modeller used to do a resin one. I believe the "plaque" on the back of the casemate is supposed to be the casting marks. I did a "what if" MkIICS version a couple of years ago. 4.5" gun, rangefinder, 20mm Polsten, Brownings in the cupola, stowage boxes, reduced side skirts. I always though this was more assault gun than tank destroyer and the 32pdr an odd choice for the role. The US found the 155mm M12 to be their best bunker-buster. Funny you should post this because I was going to quote your build as an inspiration. I've used a few of your ideas, particularly the lack of track covers. I was pondering the shell hatch and might have to attempt a scratch. I'll keep the gun and will be doing a hunter 😊 How did you do the camo net? Andrew Link to comment Share on other sites More sharing options...
Kingsman Posted February 19, 2021 Share Posted February 19, 2021 Camo net is Old Skool. Plasterers scrim soaked in diluted white glue and sprinkled with tea leaves after placing. PM me your address and I'll send you a couple of feet of scrim if you like. It's hard to find now, really only being used in historic restoration work, and only comes in lifetime-sized rolls. Link to comment Share on other sites More sharing options...
APA Posted February 21, 2021 Author Share Posted February 21, 2021 Not a great deal to show but quite a bit of work done over the last couple of days. 90% of the kit parts are either assembled or fettled. In addition a few dents and dings in the storage at the rear, the fenders have been bent a bit, the prototype triangle removed (Post this pic) and the side skirts have had the central inspection covers removed. This is to emulate what they did on Churchills. Yes the knife did slip when cutting the cover out 😩 The skirts have been thinned down to a suitable thickness as well. Next is all the replacement handles, pipework, bits and bobs detailing, PE and tracks. Oh and some of the return rolles which I was hoping not to bother putting in but now I've removed the track covers they will be on show. I'll have to scratch build a barrel for the hull gun as it went ping early on! The overall effect is going to be lots of camo netting draped over it, some wire mesh hanging over the removed track covers (To stop the camo netting getting tangled up) and a canvas covering for the mantlet. Cheers All Andrew 14 Link to comment Share on other sites More sharing options...
vytautas Posted February 21, 2021 Share Posted February 21, 2021 Great build, I watch with pleasure. I think It’s nice when the tank doesn’t look just off the factory Vytautas 1 Link to comment Share on other sites More sharing options...
Jasper dog Posted February 22, 2021 Share Posted February 22, 2021 Hi Andrew, this looks a fascinating project, be really interesting to see it come together. Nice work on the damage too. Atb Darryl 1 Link to comment Share on other sites More sharing options...
APA Posted February 22, 2021 Author Share Posted February 22, 2021 Thanks both. Nice to have a bit of freedom with a what if. I'm interested to see how it comes together to 😂 Andrew 1 Link to comment Share on other sites More sharing options...
Courageous Posted February 22, 2021 Share Posted February 22, 2021 A big mother... Stuart 1 Link to comment Share on other sites More sharing options...
APA Posted March 9, 2021 Author Share Posted March 9, 2021 Quick update. Struggling for time at the mo but have managed to finish all the kit parts and all of the PE. I must stop getting obsessed about PE aftermarket kits. As good as they are they do seem to be rather excessive and unnecessary. Half of the PE parts are either pointless or too thin compared to the kit. I did a selected amount or those that I could be bothered to do. The aftermarket shell ejector hatch is very nice, with very little clean up, arrived promptly, went on well and at a reasonable price to boot. What's not to like! I also added my first 'What if' adaptation. A mesh covering for the, I assume, air intake. I'm sure there would have been many such additions to a full production model, the prototypes being very paired down. I was a little worried about using the kit external pipe work however it worked well. I cut all the sprues well back just to free them from the main spru. This allowed them flexibility. Then a close cut to free them properly. A quick scrape with the knife and they went on. A drop or two of extra thin glue took what little seams were there and job done. Next is a little clean up along the skirting and add the bolt holes, add wire rails around the top (To hang all the camo netting from), hooks to hang the mesh over the skirting gaps and a mantel canvas cover as was the fashion of the time. Thanks for watching as usual. Andrew 11 Link to comment Share on other sites More sharing options...
Dads203 Posted March 9, 2021 Share Posted March 9, 2021 Starting to come together now mate, very tidy build and some great details 1 Link to comment Share on other sites More sharing options...

Recommended Posts
Create an account or sign in to comment
You need to be a member in order to leave a comment
Create an account
Sign up for a new account in our community. It's easy!
Register a new accountSign in
Already have an account? Sign in here.
Sign In Now