APA Posted February 6, 2021 Share Posted February 6, 2021 (edited) Or.......... "Right then Jenkins there's a thousand pound Jerry bomb ticking ominously in Mrs Perkins basement. Here's a stirrup pump, a tub of vaseline and a jam jar. Best of luck" Joking aside that's not far from what they actually used but more of that later. The Bomb Disposal Service caught my eye so I went for it. I then went down the rabbit hole of their equipment. I needed a beak from the mega build Dorchester so went for something really nice and quick. What could be better than a two spru Tilly. Really nice easy Tamya style. I wasn't going to do much fussy stuff. Well I did re do all the side cleats and loops for the canvas support. I wanted stuff in the back so didn't put the cover on. The big issue I had was with the black and red. I brushed it and cocked it up big style. Really thick and lumpy. Had to rub it down but still not good. WIP here: Note the brass Spade. Fascinating subject the BDS. They used brass and copper tools to prevent sparks. The Stevens Stopper, which is the box of tricks in the rear looks like this If you thought I was joking about young Jenkins then read the contents If you want more on the Stevens Stopper here's a brief explanation: http://www.rafbdassociation.com/wartime-equipment.html My absolute respect to the guys of the Bomb Disposal Service. Especially at the beginning of the war when they were effectively making it up as they went along! Thanks for watching 😁 A Edited February 6, 2021 by APA 42 1 Link to comment Share on other sites More sharing options...
vytautas Posted February 6, 2021 Share Posted February 6, 2021 Looks great Very nice detailing, they will add a lot of realism to the model! That is an excellent piece of work. And the question - how did you make the labels on the lid of the toolbox? Vytautas 1 Link to comment Share on other sites More sharing options...
diablo rsv Posted February 6, 2021 Share Posted February 6, 2021 Lovely work A. Your hard work with the accessories has paid off, especially your Stevens Stopper it gives the model some life. Wayne 1 Link to comment Share on other sites More sharing options...
APA Posted February 6, 2021 Author Share Posted February 6, 2021 Thanks both. The labels were printed on Rizla cigarette paper. Taped it to an A4 to print. 😉 A Link to comment Share on other sites More sharing options...
Greg Moss Posted February 7, 2021 Share Posted February 7, 2021 Wow - that’s, awesome. The timber in particular looks very realistic. 1 Link to comment Share on other sites More sharing options...
Ernst Posted February 7, 2021 Share Posted February 7, 2021 Wow, that's a lovely vehicle. Fantastic details, paintjob and as mentioned before, the wood just looks real. Apologies for being curious but how did you do that? Cheers, Ernst. 1 Link to comment Share on other sites More sharing options...
Bullbasket Posted February 7, 2021 Share Posted February 7, 2021 Brilliant job A. You've done an excellent job on it. I hope you got as much enjoyment out of that kit as I did out of mine, as it's a nice kit. John. 1 Link to comment Share on other sites More sharing options...
Hairtrigger Posted February 7, 2021 Share Posted February 7, 2021 Brilliant result.... Total respect to those guys - nerves of steel... 1 Link to comment Share on other sites More sharing options...
APA Posted February 7, 2021 Author Share Posted February 7, 2021 Thanks everyone. The wood inside the Stevens Stopper case was: All acrylics. Base of Buff lightened with white use a feather brush to almost dry brush the grain with Hull Red and neat Buff Dry brush a grey + White + Buff mix to lighten it up if you want. A couple of washes using the Hull Red to change the overall wood colour to taste. Use white and black pigments to weather if you want. (One trick I've found is use greys and whites in wood. If you look at real untreated woods what have weathered in anyway they turn grey. In this case not so much as it's the internals of a case.) Finally a quick dusting of the earth colour of your choice. Cheers all A 4 2 Link to comment Share on other sites More sharing options...
Kingsman Posted February 7, 2021 Share Posted February 7, 2021 That's exceptional. Love the attention to detail with the gear. What is the durability of cigarette paper? It has often struck me as a useful modelling material, but isn't it impregnated with something? Speaking as one who wore an EOD patch on my forearm, if only for a year or so with 217 Sqn, it's nice to see EOD getting some attention. The tools for dealing with WW2 German bombs actually haven't advanced much, largely because the bombs of course haven't changed at all. Although defusing would be a last resort today. 1 Link to comment Share on other sites More sharing options...
f matthews Posted February 8, 2021 Share Posted February 8, 2021 Spectacular! I love the load and the tailgate detail is sublime. 1 Link to comment Share on other sites More sharing options...
s.e.charles Posted February 8, 2021 Share Posted February 8, 2021 is that a smiley-face on the pump gauge? 1 Link to comment Share on other sites More sharing options...
APA Posted February 8, 2021 Author Share Posted February 8, 2021 5 hours ago, s.e.charles said: is that a smiley-face on the pump gauge? Err yes it does look like it doesn't it 😏. Could do with a set of random dial decals. No one mentioned the nasty streak on the windscreen though. Right at the end I forgot the windscreen was in as I was putting the side glass and pocked a dolop of superglue on it 😳😬 A Link to comment Share on other sites More sharing options...
APA Posted February 8, 2021 Author Share Posted February 8, 2021 11 hours ago, Das Abteilung said: That's exceptional. Love the attention to detail with the gear. What is the durability of cigarette paper? It has often struck me as a useful modelling material, but isn't it impregnated with something? Speaking as one who wore an EOD patch on my forearm, if only for a year or so with 217 Sqn, it's nice to see EOD getting some attention. The tools for dealing with WW2 German bombs actually haven't advanced much, largely because the bombs of course haven't changed at all. Although defusing would be a last resort today. Thank you. Good question on the fag paper. Well it's lasted 48 hours so. 😅 I did give them a lick of white paint on the rear to stop them going transparent when glued. And my utmost respect to you and your ilk 👏👍 A Link to comment Share on other sites More sharing options...
robgizlu Posted February 8, 2021 Share Posted February 8, 2021 Fabulous job - exquisite detail - one of my Favourite models this year Rob 1 Link to comment Share on other sites More sharing options...
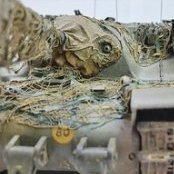
Kingsman Posted February 8, 2021 Share Posted February 8, 2021 5 hours ago, APA said: And my utmost respect to you and your ilk 👏👍 I must clarify. All members of RE EOD squadrons wear the red and yellow bomb patch on the left forearm in recognition of the work done by the Bomb Disposal Squads in WW2. I was in the signals team in squadron HQ. Well away from anything that might go boom! The Bomb Disposal Officer's qualification badge is a similar design but on green and is worn on the upper arm. Black versions are worn on combats. The grubby reality of WW2 EOD. A great deal of debris shifting, digging and shoring - by hand - before the BDO could get at it to work his black magic. The heavy bombs could be tens of feet below ground. And of course no-one knew until the bomb was exposed what size and type it was, what fuse type was fitted and therefore whether it was time-delay. And would the works to expose the bomb cause it to detonate, as many did? Some bombs had to be moved or turned in order to expose the fuse pockets. The 2 holes in the left photo are the fuse pockets. I think that is an SC500 general purpose 500kg bomb - with about 220kg of explosive fill. That would be a 1km radius exclusion safety zone today! The big one on the right looks like a PC1000 or PC1400 armour-piercing bomb, which had 160 or 300kg fills. Very heavy cases on the PC bombs, which were most commonly with short time delay fuses that sometimes malfunctioned. Many of the BDS men were conscientious objectors: let no-one say they lacked bravery. 2 1 Link to comment Share on other sites More sharing options...
APA Posted February 8, 2021 Author Share Posted February 8, 2021 6 hours ago, robgizlu said: Fabulous job - exquisite detail - one of my Favourite models this year Rob Thank you very much Rob. Really nice of you to say that. Much appreciated, checks in the post etc 😉👍 A Link to comment Share on other sites More sharing options...
APA Posted February 8, 2021 Author Share Posted February 8, 2021 4 hours ago, Das Abteilung said: I must clarify. All members of RE EOD squadrons wear the red and yellow bomb patch on the left forearm in recognition of the work done by the Bomb Disposal Squads in WW2. I was in the signals team in squadron HQ. Well away from anything that might go boom! The Bomb Disposal Officer's qualification badge is a similar design but on green and is worn on the upper arm. Black versions are worn on combats. The grubby reality of WW2 EOD. A great deal of debris shifting, digging and shoring - by hand - before the BDO could get at it to work his black magic. The heavy bombs could be tens of feet below ground. And of course no-one knew until the bomb was exposed what size and type it was, what fuse type was fitted and therefore whether it was time-delay. And would the works to expose the bomb cause it to detonate, as many did? Some bombs had to be moved or turned in order to expose the fuse pockets. The 2 holes in the left photo are the fuse pockets. I think that is an SC500 general purpose 500kg bomb - with about 220kg of explosive fill. That would be a 1km radius exclusion safety zone today! The big one on the right looks like a PC1000 or PC1400 armour-piercing bomb, which had 160 or 300kg fills. Very heavy cases on the PC bombs, which were most commonly with short time delay fuses that sometimes malfunctioned. Many of the BDS men were conscientious objectors: let no-one say they lacked bravery. Very interesting stuff. Never knew they were often conscientious objectors. Thanks for that. I did try making a badge decal for a helmet but it was just an orange fuzz 😁 So you never got to operate a Stevens stopper then? 😂 A Link to comment Share on other sites More sharing options...
TEXANTOMCAT Posted February 8, 2021 Share Posted February 8, 2021 Superb well done! 1 Link to comment Share on other sites More sharing options...
karly Boy Posted February 8, 2021 Share Posted February 8, 2021 Looks great now its finished, really enjoyed your thread 👍 1 Link to comment Share on other sites More sharing options...
THEscaleSHOW Posted February 8, 2021 Share Posted February 8, 2021 A really nice model 👍 I like the theme. It shows respect to the men who risked their lives in other ways. The tools and red fenders make it unique! MD 1 Link to comment Share on other sites More sharing options...
Del Boy Posted February 16, 2021 Share Posted February 16, 2021 Just stunning A, simply stunning! I particularly like the way you have taken what could be seen as a very simple subject and absolutely knocked it outa the park! Also appreciated the background to Bomb Disposal, true courage eh. Trying to remember all your tips along the way too! Derek 1 Link to comment Share on other sites More sharing options...
Buzby061 Posted February 16, 2021 Share Posted February 16, 2021 Would look really great in a dio. Some fantastic detail in there & great modelling. Pete 1 Link to comment Share on other sites More sharing options...
Carius Posted February 16, 2021 Share Posted February 16, 2021 Brillant job indeed, love the attention to details 1 Link to comment Share on other sites More sharing options...
APA Posted February 17, 2021 Author Share Posted February 17, 2021 14 hours ago, Del Boy said: Just stunning A, simply stunning! I particularly like the way you have taken what could be seen as a very simple subject and absolutely knocked it outa the park! Also appreciated the background to Bomb Disposal, true courage eh. Trying to remember all your tips along the way too! Derek Thanks Derek much appreciated and yes it's nice to elevate something simple like this. These little Tilly were invaluable. Also I love the various sidetrack in builds. Never thought I would be doing a Stevens stopper when I started 😂 13 hours ago, Buzby061 said: Would look really great in a dio. Some fantastic detail in there & great modelling. Pete Thanks Pete. Dioramas are not my thing but yes would be cool. Pondering doing a matador as it's big brother 😊 13 hours ago, Carius said: Brillant job indeed, love the attention to details Thanks carius 👍 I do try 😏 A Link to comment Share on other sites More sharing options...

Recommended Posts
Create an account or sign in to comment
You need to be a member in order to leave a comment
Create an account
Sign up for a new account in our community. It's easy!
Register a new accountSign in
Already have an account? Sign in here.
Sign In Now