British Army Platforms Posted February 2, 2021 Share Posted February 2, 2021 I have ordered this bad boy! Will complete after Apache build (please check it out) - Will discuss some possible paint schemes in the mean time. 6 Link to comment Share on other sites More sharing options...
Stef N. Posted February 2, 2021 Share Posted February 2, 2021 Just bought one of these as well and it looks to be a great kit. Thinking of a dark green training ground special as I want to attempt mud effects. Good luck on your build and I will follow along closely.👍 1 Link to comment Share on other sites More sharing options...
ERK Posted February 2, 2021 Share Posted February 2, 2021 1 hour ago, Stef N. said: Just bought one of these as well and it looks to be a great kit. Thinking of a dark green training ground special as I want to attempt mud effects. Good luck on your build and I will follow along closely.👍 I cant say enpough about these RFM kits they are so nice and seam so accurate, and like I have said before the addional PE is a welcome addition, I was going to (try) to get the Accurate Armour Oshkosh 1070F tank transporter but they are out of stock and taking enquires from interested buyers, and none around anywhere else. That would make one lovely dio. Erk. 2 Link to comment Share on other sites More sharing options...
ivan-o Posted February 3, 2021 Share Posted February 3, 2021 You could try this😀 https://ukdefencejournal.org.uk/british-army-show-off-next-generation-tank-camouflage/ Ivan 1 3 Link to comment Share on other sites More sharing options...
British Army Platforms Posted February 3, 2021 Author Share Posted February 3, 2021 10 hours ago, Stef N. said: Just bought one of these as well and it looks to be a great kit. Thinking of a dark green training ground special as I want to attempt mud effects. Good luck on your build and I will follow along closely.👍 Yea I’m liking dark green as an idea too. Have ordered some weathering bits too so I can give it a good go once she’s done! Good luck with yours, will you have a topic going for your build of it? 1 Link to comment Share on other sites More sharing options...
British Army Platforms Posted February 3, 2021 Author Share Posted February 3, 2021 2 hours ago, ivan-o said: You could try this😀 https://ukdefencejournal.org.uk/british-army-show-off-next-generation-tank-camouflage/ Ivan It is tempting 😂😂I think I would give it a go if I didn’t have to buy so many different paints for it. 1 2 Link to comment Share on other sites More sharing options...
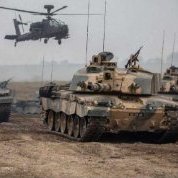
British Army Platforms Posted February 3, 2021 Author Share Posted February 3, 2021 A mean looking CR2, possible scheme 1 - i like the matt like colours in the dirt. 3 Link to comment Share on other sites More sharing options...
British Army Platforms Posted February 3, 2021 Author Share Posted February 3, 2021 1 minute ago, British Army Platforms said: A mean looking CR2, possible scheme 1 - i like the matt like colours in the dirt. Here's another gorgeous tank in some photos from the International Armoured Vehicles Conference 2021. Glad we will soon have our hands on the 8x8.... little hint as what model I may consider in the future... (anyway i think the scheme looks better here as it is darker) 1 Link to comment Share on other sites More sharing options...
British Army Platforms Posted February 3, 2021 Author Share Posted February 3, 2021 Some more possible themes, I did not intend to choose one from each T56 Regiment but there you go aha! particularly drawn to the RTR's black and super dirty tank with the groovy white stripes. 3 Link to comment Share on other sites More sharing options...
Stef N. Posted February 3, 2021 Share Posted February 3, 2021 2 hours ago, British Army Platforms said: Yea I’m liking dark green as an idea too. Have ordered some weathering bits too so I can give it a good go once she’s done! Good luck with yours, will you have a topic going for your build of it? I may do at some point but I have a few projects I have queued up before I start this one. There's far too many good kits in my stash. 😀 1 Link to comment Share on other sites More sharing options...
British Army Platforms Posted February 3, 2021 Author Share Posted February 3, 2021 4 minutes ago, Stef N. said: I may do at some point but I have a few projects I have queued up before I start this one. There's far too many good kits in my stash. 😀 Aren't there just, there's so many sets I would like to complete 😂😂😂 2 Link to comment Share on other sites More sharing options...
British Army Platforms Posted February 3, 2021 Author Share Posted February 3, 2021 More pictures of the number one paint scheme so far, also some hints to what paint scheme I'm planning for a potential GTK Boxer build... 2 Link to comment Share on other sites More sharing options...
ivan-o Posted February 3, 2021 Share Posted February 3, 2021 9 hours ago, British Army Platforms said: More pictures of the number one paint scheme so far, also some hints to what paint scheme I'm planning for a potential GTK Boxer build... That is the very old scheme that lasted for years before some oik thought it was too ‘warry’🙄 The tank there has the new Rheinmetall turret and 120mm smoothbore gun. Ivan 2 Link to comment Share on other sites More sharing options...
British Army Platforms Posted February 4, 2021 Author Share Posted February 4, 2021 19 hours ago, ivan-o said: That is the very old scheme that lasted for years before some oik thought it was too ‘warry’🙄 The tank there has the new Rheinmetall turret and 120mm smoothbore gun. Ivan Oh right, so its using new tech but sporting old colours. I definitely think this or the black and white striped RTR paint job are best looking that are achievable with my skill. Have you some experience with the platform or just very knowledgeable about the CR2? 1 Link to comment Share on other sites More sharing options...
ivan-o Posted February 4, 2021 Share Posted February 4, 2021 Nope can’t claim any of the above😀just a general interest with what’s going on. 2 Link to comment Share on other sites More sharing options...
British Army Platforms Posted February 9, 2021 Author Share Posted February 9, 2021 Here's some pictures from the start I made on the kit. 6 Link to comment Share on other sites More sharing options...
British Army Platforms Posted February 9, 2021 Author Share Posted February 9, 2021 Made some more progress this morning: For those who have the kit and wish for there to be more suspension action; first observe this tab which slots into the suspension bogie then how it is removed: In gluing only the sprue that connects to the centre support inside the hull, the torsion of this sprue creates a suspension like spring. Do not glue the part where the tab used to be, as then the suspension bar wont move at all: 7 1 Link to comment Share on other sites More sharing options...
British Army Platforms Posted February 10, 2021 Author Share Posted February 10, 2021 Made allot of progress with late night track building last night and allot of small details such as the hooks and hinges near the exhaust ports today. Also allot of photo-etch which was very welcome too. The tracks are held together by a dud link I made so they can be removed for painting easily. 7 Link to comment Share on other sites More sharing options...
Stef N. Posted February 10, 2021 Share Posted February 10, 2021 How were the tracks to build? They look complicated on the sprue but the reviews have been pretty positive. 1 Link to comment Share on other sites More sharing options...
vytautas Posted February 10, 2021 Share Posted February 10, 2021 Nice work, looks really great 👍 Vytautas 1 1 Link to comment Share on other sites More sharing options...
British Army Platforms Posted February 10, 2021 Author Share Posted February 10, 2021 38 minutes ago, Stef N. said: How were the tracks to build? They look complicated on the sprue but the reviews have been pretty positive. Not too bad actually. The link rods are best kept in their sub-sprues of 7 and to place them in. If you are careful with removing them from the sprue then there’s really no clean up. Once you get a flow it’s pretty easy. :) be careful with cement obviously if you want it to flow. 1 1 Link to comment Share on other sites More sharing options...
ERK Posted February 10, 2021 Share Posted February 10, 2021 Really impressive build (they are superb kits) I am doing my tracks more or less last. Erk. 1 Link to comment Share on other sites More sharing options...
British Army Platforms Posted February 11, 2021 Author Share Posted February 11, 2021 Have finished the main build with rather a few parts let over. Am going to check for further instruction points that I may have missed. Some certainly does seem optional, ie a variation of a piece there is only one place for. Ready to order paint but haven't decided which colour scheme I want to do yet! 😂 I do rather like the gold and grey look without paint aha, if I could convince myself that realism doesn't matter then I would save money not buying paint. There are a few things I may adjust, ie length of cable and adding the optional skid plate under the tank. We shall see. 10 Link to comment Share on other sites More sharing options...
British Army Platforms Posted February 13, 2021 Author Share Posted February 13, 2021 In purchasing some colours to paint my now complete CR2, I have fallen into the trap of good deals. Having found some good eBay listings, I am hoping to expect both the TES, and KFOR versions too. A convoy is coming.... might even use this as the base for a Street Fighter model.... might have to give it a miss though as I don’t want to go up against this amazing competition! http://ptearsenal.blogspot.com/2020/03/challenger-ii-street-fighter.html?m=1 3 Link to comment Share on other sites More sharing options...
British Army Platforms Posted February 13, 2021 Author Share Posted February 13, 2021 On 10/02/2021 at 18:58, British Army Platforms said: Not too bad actually. The link rods are best kept in their sub-sprues of 7 and to place them in. If you are careful with removing them from the sprue then there’s really no clean up. Once you get a flow it’s pretty easy. be careful with cement obviously if you want it to flow. @Stef N., having just naughtily ordered the Tes version, if I happen to get the tracks before you do yours, I will document the process in more detail for help on this page. 1 1 Link to comment Share on other sites More sharing options...

Recommended Posts
Create an account or sign in to comment
You need to be a member in order to leave a comment
Create an account
Sign up for a new account in our community. It's easy!
Register a new accountSign in
Already have an account? Sign in here.
Sign In Now