Lightpainter Posted February 22, 2021 Author Share Posted February 22, 2021 The photographs in the instructions in the Nimrod kit are mine too 😅 I shared them with Lukasz for the development of this kit. You can see my name is mentioned on the page : Glijn Van Driessche 2 Link to comment Share on other sites More sharing options...
galgos Posted February 22, 2021 Share Posted February 22, 2021 Excellent Glijn, well done! 😀 You’re the expert to turn to for advice then. Max 1 1 Link to comment Share on other sites More sharing options...
Lightpainter Posted February 22, 2021 Author Share Posted February 22, 2021 7 hours ago, galgos said: Excellent Glijn, well done! 😀 You’re the expert to turn to for advice then. Max Euh... if you say so, we will see 😅 1 Link to comment Share on other sites More sharing options...
crobinsonh Posted February 23, 2021 Share Posted February 23, 2021 Wow great work and on a beautiful aircraft 1 Link to comment Share on other sites More sharing options...
Lightpainter Posted February 23, 2021 Author Share Posted February 23, 2021 7 hours ago, crobinsonh said: Wow great work and on a beautiful aircraft Thank you for your kind words 😃 Link to comment Share on other sites More sharing options...
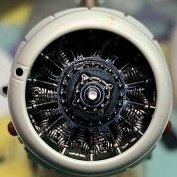
Lightpainter Posted April 12, 2021 Author Share Posted April 12, 2021 Hi here is the third part of my Nimrod build. I did not get very far because I made a mess of things on the underside and got too much into small details where I made scratch build versions of PE and 3D parts. I used slow setting CA glue to glue the body together working in small parts at a time. But I missed a beat on the front just behind the radiator. I thought that I held the part long enough but it changed position and I had a step. And just at a place littered with raised rivets of course. So, I needed to make a new part. Then I noticed on the photographs that there was a fairing behind the radiator so I made that too. The chin radiator is also on a spot with raised rivets but fairing it in without damaging the rivets is not possible so they had to go… The bathtub radiator under the body is not so easy to fit without any help to see where it is just in the middle. Think I got it a fraction out of center.. The louvres in the front need to be thinned, so that was next. The bottom wings were next to get messed up.. I cleaned the left wing attachment just a bit too good, when it was glued I noticed that it was out of alignment but not before the glue dried… out came the saw and I sawed it off and put in a little plastic triangle that corrected the problem… resin kits always fun 😉 So, what did I do with the details. I noticed that under the nose there are parts of the engine bearing that stick out, but at first I did not want to make them while I was still thinking of building the kit OOB… but since it is a prominent detail I could not let it be so I cut two holes under the nose based on my photographs and made the little bearing pieces, both in aluminum, 3mm long and build out of 14 pieces. In the mean time I also used the PE panels without too much problems, my new ZAP Z-Poxy works wonders. The Aldis gunsight provided in the kit is nice but I wanted it a bit slimmer based on my photographs so I made it in brass. In reality it sits in tubes sticking out on top of the body so I put in a couple of tubes on top and the sight fits right in. I can drop it in after painting so that is better. Of course when pushing in one of the tubes in a just too small hole a gap formed … repair and sand once again. The bead sight is provided as PE but I thought it was a bit flat, so I scratch build a new one to be closer to the photographs. Took me a couple of hours for something so small. Build out of 9 individual parts and to join the two long parts together I soldered two brass rings together, they are made from 0,7mm brass tubes and are 0,3mm long. I think using superglue would not have worked because they are so tiny. Kit PE part Reality My scratch build part, looks better in reality than enlarged so much in a photograph, it is only 5 mm long.. Dry fitted the sight parts, I will only glue them in at the end, they can simply be dropped in. I mocked up the tail hook pieces, I wanted to drill the two attachment points out to get a better fit for the brass pieces. Drilling with a small drill went ok but I needed to widen the hole and while using a bigger drill got to close to the border and then the part broke… you would have thought that I learned but no… Wanting to drill a hole in the hook part were the two long brass parts could go in it broke too. So in the end I scratch build the entire tail hook piece with the exception of the hook itself.. I soldered the two long parts together of course. The soldered pieced are not yet attached to the two attachments, I will only do that after painting! Not on the photographs but the lower wings were attached too. What takes a lot of time too is the cleaning of the 3D parts, if you do not do it you will see the ridges under the Silver paint, but if you clean them up you run the risk of sanding down the very nice raised details Lukasz made... so its up to the modeller to make a decision... So that's it for the moment :-) Keep safe! 8 Link to comment Share on other sites More sharing options...
Marklo Posted April 12, 2021 Share Posted April 12, 2021 Beautiful work. Must add another Fury family build to the collection sooner rather than later. 1 Link to comment Share on other sites More sharing options...
bigbadbadge Posted April 12, 2021 Share Posted April 12, 2021 Some great scratch work, I like the sight parts, amazing. Chris 1 Link to comment Share on other sites More sharing options...
galgos Posted April 12, 2021 Share Posted April 12, 2021 Beautiful work Glijn, great attention to detail. Max 1 1 Link to comment Share on other sites More sharing options...
Lightpainter Posted April 13, 2021 Author Share Posted April 13, 2021 21 hours ago, Marklo said: Beautiful work. Must add another Fury family build to the collection sooner rather than later. Thank you 😀 Yes the Fury and the Nimrod must be some of the most beautifull biplanes around! 21 hours ago, bigbadbadge said: Some great scratch work, I like the sight parts, amazing. Chris Thanks Chris they came out ok! 1 Link to comment Share on other sites More sharing options...
Lightpainter Posted April 13, 2021 Author Share Posted April 13, 2021 (edited) 20 hours ago, galgos said: Beautiful work Glijn, great attention to detail. Max Thanks Max, I like to scratch those little details! 😀 Edited April 13, 2021 by Lightpainter Link to comment Share on other sites More sharing options...
Lightpainter Posted May 22, 2021 Author Share Posted May 22, 2021 Hi Guys here is part 4 of my Lukgraph Hawker Nimrod MK I build. I had lots of self inflicted problems with the struts being a bit heavy handed, while cleaning the ridges away I broke several of the legs of the N struts away. The material is hard but brittle and gluing them back together is not so easy because the contact area is so small. I also glued the struts to the lower wing but I struggled with finding the right glue. Almost all came loose several times and at least one of the N struts came loose 3 times by just touching it. I finally used a gel type CA glue and that seems to have done the trick. But I made a mess of it by having to reglue each time so I am not happy with that… it shows in my eyes on the wing contact points but I will see what it gives when I put primer on it. I had to leave the work on the kit itself for a while because I got disappointed with the build. So I concentrated more on the details for now. I replaced the tailplane struts with brass struts for strength. The fork pitot is provided in PE but as with the rest I choose to replace it by a scratch build part made out of 8 parts since it looked too flat. My scratch build part The tail antenna is provided as a 3D part but I wanted it more detailed so I scratched it. The little ring on top for the antenna wire is made out of a brass ring of 0,6mm and a height of 0,3mm since I soldered it to a nickel silver wire of 0,33mm. The little pointed part on the rear is in fact aluminium tube but i filled it with solder at the back so I could file it in the correct form without gaps appearing. The antenna is small but also made from 9 parts. The kit part: My scratch build part The fin is slightly offset to port to counteract the engine torque and the gap between the fin and the tailplane was created too. Ofset fin I replaced the single PE triangle on the underside of the ailerons with some scratch build parts too. Still a bit crazy creating all those details and no one will see what effort was made to do those things once finished. So that is the small update, see you later. Keep safe! 8 Link to comment Share on other sites More sharing options...
bigbadbadge Posted May 22, 2021 Share Posted May 22, 2021 Wow, fantastic scratch details there, they look wonderful, you will be able to see a lot of what you have done. You have done a cracking job. Chris 1 Link to comment Share on other sites More sharing options...
Lightpainter Posted May 22, 2021 Author Share Posted May 22, 2021 1 hour ago, bigbadbadge said: Wow, fantastic scratch details there, they look wonderful, you will be able to see a lot of what you have done. You have done a cracking job. Chris Thank you Chris that is nice from you to say that! 1 Link to comment Share on other sites More sharing options...
woody37 Posted May 22, 2021 Share Posted May 22, 2021 Those scratch built details really add to the build, loving your progress 1 Link to comment Share on other sites More sharing options...
Lightpainter Posted May 23, 2021 Author Share Posted May 23, 2021 21 hours ago, woody37 said: Those scratch built details really add to the build, loving your progress Thank you, I hope it will all come together! Link to comment Share on other sites More sharing options...
Lightpainter Posted July 28, 2021 Author Share Posted July 28, 2021 (edited) Changed posting to ready for inspection. Edited July 28, 2021 by Lightpainter 1 Link to comment Share on other sites More sharing options...
Chaotic Mike Posted May 28, 2022 Share Posted May 28, 2022 Hello, I am doing one of these, if I get a quarter of the way to your results I'll be happy! Can I ask how you rigged it? Mike 1 Link to comment Share on other sites More sharing options...
Lightpainter Posted June 28, 2022 Author Share Posted June 28, 2022 (edited) On 28/05/2022 at 12:39, Chaotic Mike said: Hello, I am doing one of these, if I get a quarter of the way to your results I'll be happy! Can I ask how you rigged it? Mike Hello Mike I just saw your message sorry I was absent from Britmodeller for a while. Preparing a renovation of our house. that said I used nylon fishing wire. For this I drilled holes in the appropriate places in the lower wings but not entirely thru the wing. I drilled holes right thru the upper wing. I should mention that I had painted the lower wing and the underside of the upper wing before attaching the wires. I then glued one end of the wires in the lower wing with some superglue, when that was I pulled the wire thru the holes on the upper wing, attached weights to the wires to pull them tight and filed the holes with the wires with superglue. After drying I cut of the rest of the wire and sanded the superglue flush with the wing, then I painted the upper wing. Hope this helps! Edited June 29, 2022 by Lightpainter Link to comment Share on other sites More sharing options...

Recommended Posts
Create an account or sign in to comment
You need to be a member in order to leave a comment
Create an account
Sign up for a new account in our community. It's easy!
Register a new accountSign in
Already have an account? Sign in here.
Sign In Now