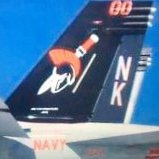
Jfgred1 Posted November 16, 2020 Share Posted November 16, 2020 (edited) Hello All. Here it is the closure of the phase 1 project that I am working on that will be dedicated to my son. He served in the US Navy for 4 years with that squadron, and became to be one of the crew chief of the squadron. Choose this plane in particular, because the CAG of the group ordered to paint the names of all the people that was part of the squadron on the folding sections of the wings, and happens to be that the name of my son was on it. Lucking me that Two Bobs issued a decal set of that same plane, and if you squint the eyes good enough, or have a good magnifier, you can read the names. So, here is the list of what was used so far: 1- Hasegawa 1/48 F/A-18E PT39. 2- Two Bobs F/A-18E Argo's On Cruise 48-240 3- Eduard F-18E Big Ed for Hasegawa BIG4869. 4- Aires F/A-18E/F Super Hornet Exhaust Nozzles-Closed 4636. 5- Reskit F/A-18E Wheels. 6- Eduard Brassin GBU-12 LGB 648 155. - Added the thermal protective coating. 7- Eduard Brassin GBU-38 Thermally Protected JDAM. 648 386. - Transformed into a GBU-54 Laser JDAM. 8- Phase Hangar F/A-18E/F/G Super Hornet Weapons Pylons no Dog Ears 48067. Plus bits and pieces of: 9- Hobbydecal Dry Transfers Set STxx062V1. 10- Airscale Decal Set AS48DAN. 11- Fightertown Decals Set 48087. 12- Reheat Models Set RH131. 13- Evergreen Plastic rods and sheet in different sizes. 14- UMM Lead Wire in different sizes 15- Infini Medium Black Lycra Rigging 0.121 mm. Paints: 16- Grey Main Colors came from HATAKA set HTK-CS44. 17- Black Gloss and Gloss Coat from MCW Enamel Paints. 18- Humbrol Enamels for Cockpit and Exhaust Nozzles colors and clear red. 19- Tamiya Paints white Primer decanted. Clear Blue. Panel Line Accent Colors and Weathering Pastels. 20- Gunze Mr.Color for the Orange Color when needed (own made mixture). 21- Tamiya Clear Blue. 22- Molotow Liquid Chrome for the Landing Gear pistons. 23- Sakura Micron Pigma Pens black (003) and red (005). And loads and loads of patience. You see, this is the first model that I have completed in about 7 years, so a lot of the techniques used were rusty (to say the least..), so a lot of problems were encountered during the two years that took to make this model. Must say that after my retirement this year, the construction pace took a turn for the better, but nevertheless, still took some time. You can read some of the adventure in the WIP section under "F-18E. VFA-147 Argo Combat Cruise 2011 - CAG Plane. Hasegawa 1/48th." (still have to figure out how to insert the link for the other topics in the forum. Figured out how to insert the WIP link... Last but not least, sorry for the poor quality of the pictures. This is the first time that I am trying to do something like this, and the results show that I have to find a better lighting set, as well as to learn how to play with the camera settings. Anyway, enough of chat and lets go to the pictures: This is the subject to be modelled, and with the same load configuration (in as much as possible...) And this the reason of the build. AMAN Garciafreites E. (number 12 in the third column). And here is the result: And the reason for the build... Number 12 in the third column... Appreciate any comment and constructive criticism. As said initially, this closes phase 1 of the project. The phase 2 is now the construction of a small section of the aircraft carrier deck and some accessories, where the model will be chained to it. Yes chained, as per they do in the carriers. As always, thanks for looking, have a good one and keep safe. Edited November 29, 2020 by Jfgred1 Add the WIP link 35 Link to comment Share on other sites More sharing options...
billn53 Posted November 16, 2020 Share Posted November 16, 2020 That’s one super Super Hornet! 1 Link to comment Share on other sites More sharing options...
Alan P Posted November 16, 2020 Share Posted November 16, 2020 That's a great result, your rusty skills are pretty sharp! Really good looking jet, would love to have a go at it in 1/32. Looking forward to Phase 2, sounds like an interesting project. Alan 1 Link to comment Share on other sites More sharing options...
swralph Posted November 16, 2020 Share Posted November 16, 2020 Excellent work all round.😀 1 Link to comment Share on other sites More sharing options...
Jfgred1 Posted November 16, 2020 Author Share Posted November 16, 2020 12 hours ago, billn53 said: That’s one super Super Hornet! Thanks a lot. Hopefully, the destined owner will have the same opinion. 8 hours ago, Alan P said: That's a great result, your rusty skills are pretty sharp! Really good looking jet, would love to have a go at it in 1/32. Looking forward to Phase 2, sounds like an interesting project. Alan Thanks Alan, it has been a step re-training curve... Will start phase 2 today, and since it is a section of the carrier, I think will have to be published in the Diorama section of the forum???... Anyway, small detail... 7 hours ago, swralph said: Excellent work all round.😀 Thanks a lot swralph. 1 Link to comment Share on other sites More sharing options...
VolkerR. Posted November 17, 2020 Share Posted November 17, 2020 This is first class modelling. I admire your devotion to detail and accuracy. Looking foreward to see the Hornet on a carrier deck! Volker Link to comment Share on other sites More sharing options...
Stephen Posted November 17, 2020 Share Posted November 17, 2020 Superb work. Link to comment Share on other sites More sharing options...
Vultures1 Posted November 17, 2020 Share Posted November 17, 2020 That's an outstanding Super Hornet om every respect. And great to have your son's name and service honoured in this way. Link to comment Share on other sites More sharing options...
jimmyg352 Posted November 17, 2020 Share Posted November 17, 2020 That's a cracking build, the undercarriage is off the map! Well done! Link to comment Share on other sites More sharing options...
Jfgred1 Posted November 18, 2020 Author Share Posted November 18, 2020 On 11/17/2020 at 3:39 AM, VolkerR. said: This is first class modelling. I admire your devotion to detail and accuracy. Looking foreward to see the Hornet on a carrier deck! Volker Thanks Volker. Very much appreciated. Started to work on it, and today will publish the first entry in the diorama forum. Touching wood, hopefully will come out good... On 11/17/2020 at 4:28 AM, Stephen said: Superb work. Thank you very much Stephen. It was a trying one... The model was about to fly out of the window several times... 21 hours ago, Vultures1 said: That's an outstanding Super Hornet om every respect. And great to have your son's name and service honoured in this way. Thank you very much Vultures1. Very much appreciated. And yes, I am very proud of him too, so hopefully the whole project will come out good. 19 hours ago, jimmyg352 said: That's a cracking build, the undercarriage is off the map! Well done! Thank you Jimmy. Thank you. The landing gear and specially the wheel wells are one of the weakest points of the Hasegawa model, so tried to give some "life" to those parts of the kit. The wheel wells on the Revell kit are way better out of the box. Link to comment Share on other sites More sharing options...
SAT69 Posted November 18, 2020 Share Posted November 18, 2020 Wonderful build! Many congratulations are due you. 1 Link to comment Share on other sites More sharing options...
Jfgred1 Posted November 19, 2020 Author Share Posted November 19, 2020 On 11/18/2020 at 9:30 AM, SAT69 said: Wonderful build! Many congratulations are due you. Thanks SAT69. After all the frustrations during the build, feel now good.... Link to comment Share on other sites More sharing options...
ZHOU Kun Posted November 20, 2020 Share Posted November 20, 2020 Neat and clean build, love it! Link to comment Share on other sites More sharing options...
Gary Brantley Posted November 21, 2020 Share Posted November 21, 2020 Very well done, that's a great looking Hornet! And a fabulous tribute to your son's service too. 🍺 I just know he's stoked by that beautiful model! Thanks for sharing her with us. Link to comment Share on other sites More sharing options...
exdraken Posted November 21, 2020 Share Posted November 21, 2020 Great result! Looks realistic! Link to comment Share on other sites More sharing options...
Stinger 9 Posted November 21, 2020 Share Posted November 21, 2020 Absolutely brilliant. Superb work Link to comment Share on other sites More sharing options...

Recommended Posts
Create an account or sign in to comment
You need to be a member in order to leave a comment
Create an account
Sign up for a new account in our community. It's easy!
Register a new accountSign in
Already have an account? Sign in here.
Sign In Now