Dubz Posted April 22, 2021 Author Share Posted April 22, 2021 Thanks Niall, that is indeed a common mistake but not in my case, hehe, it's more that i measured to "hard" compared to some colleagues. I re-measured more softly today and the sizes seems more comparable 🙂 cheers Dirk Link to comment Share on other sites More sharing options...
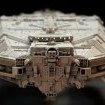
Dubz Posted April 22, 2021 Author Share Posted April 22, 2021 Black is beautiful ... cheers Dirk 4 Link to comment Share on other sites More sharing options...
ArnoldAmbrose Posted April 25, 2021 Share Posted April 25, 2021 On 4/23/2021 at 5:06 AM, Dubz said: Black is beautiful ... I dunno, a black eye on one's adversary is beautiful, one's own black eye seen in the mirror is not. 😁 Gidday Dubz, in the case of your model here then yes, black is definitely beautiful. I've said it before but this ship has very graceful lines. Regards, Jeff. 1 Link to comment Share on other sites More sharing options...
Dubz Posted April 27, 2021 Author Share Posted April 27, 2021 Thanks Arnold & the likes 🙂 Handrail and bulkheads completed. cheers Dirk 6 Link to comment Share on other sites More sharing options...
Dubz Posted May 3, 2021 Author Share Posted May 3, 2021 I'm now working on the small details of the Schooner Polotsk. There were also details to add in the rudder area 🙂 And a view from the front. cheers Dirk 8 Link to comment Share on other sites More sharing options...
dnl42 Posted May 3, 2021 Share Posted May 3, 2021 Excellent joinery work! 1 Link to comment Share on other sites More sharing options...
Dubz Posted May 13, 2021 Author Share Posted May 13, 2021 Thanks for the nice comments & the likes 🙂 Time for a little update. At the moment I am working on the Polotsk dinghy. Master Korabel was kind enough to laser all the parts in pear for me 🙂 Better than any clunky plank bending soldering iron. A hotfix applicator. The Russians rightly love this thing and it costs nothing. I just turned the brass top round to be able to work even better 🙂 cheers Dirk 5 Link to comment Share on other sites More sharing options...
ArnoldAmbrose Posted May 14, 2021 Share Posted May 14, 2021 Gidday Dirk, that boat is a very good model in it's own right. 👍 Regards, Jeff. 2 Link to comment Share on other sites More sharing options...
Dubz Posted May 14, 2021 Author Share Posted May 14, 2021 Thanks Jeff 🙂 I continue with the dinghy for my Russian schooner Polotsk. Most of the time is spent carefully removing all traces of laser char (I find it an unspeakable bad habit NOT to do this, unfortunately it is spreading ...). The hotfix applicator is really a great help 🙂 Later, of course, the boat is watered so that the planks swell up and the last gaps close 😛 cheers Dirk 5 Link to comment Share on other sites More sharing options...
dnl42 Posted May 14, 2021 Share Posted May 14, 2021 Outstanding work at very small scale! You should show that relatively massive Euro coin to demonstrate this... 1 Link to comment Share on other sites More sharing options...
Dubz Posted May 14, 2021 Author Share Posted May 14, 2021 Thanks 🙂 I made these later today. cheers Dirk 6 Link to comment Share on other sites More sharing options...
beefy66 Posted May 14, 2021 Share Posted May 14, 2021 How big are those delightful boats amazing work there Dirk Stay Safe beefy 1 Link to comment Share on other sites More sharing options...
Dubz Posted May 15, 2021 Author Share Posted May 15, 2021 😄 More progress 🙂 cheers Dirk 7 Link to comment Share on other sites More sharing options...
Dubz Posted May 17, 2021 Author Share Posted May 17, 2021 More small details added. Greetings Dirk 7 Link to comment Share on other sites More sharing options...
Dubz Posted May 19, 2021 Author Share Posted May 19, 2021 Thanks for the likes guys 🙂 So, I think I can call the dinghy ready for service 🙂 On board. cheers Dirk 5 Link to comment Share on other sites More sharing options...
Dubz Posted May 19, 2021 Author Share Posted May 19, 2021 And another update with correct rope for trailing. cheers Dirk 5 Link to comment Share on other sites More sharing options...
Dubz Posted May 20, 2021 Author Share Posted May 20, 2021 Built a small anchor, fiddly stuff ... 😄 cheers Dirk 5 Link to comment Share on other sites More sharing options...
dnl42 Posted May 20, 2021 Share Posted May 20, 2021 These stunning beauties are worthy of their own WIPs! 1 Link to comment Share on other sites More sharing options...
Dubz Posted May 21, 2021 Author Share Posted May 21, 2021 I hope I'm not spamming you 😄 I've optimised the anchor a little (flukes) and put a small water barrel on board. Maybe a small mast with sail will be added too later 😛 In fact, this is a building phase that is always a lot of fun for me 🙂 cheers Dirk 8 Link to comment Share on other sites More sharing options...
dnl42 Posted May 21, 2021 Share Posted May 21, 2021 Not spamming at all! Keep it coming! Please! Ooh, I just noticed the eye splice on the line. For the flukes, it looks like you flattened the wire, and then filed to shape. The process is very clear on the boat hooks where there's a step at the base of the fluke. I use this process too. But there's little sign of it on the anchor fluke, where the wire is round right up to the base of the fluke and then smoothly transitions to the wedge-shaped fluke. How did you form the wedge? Did you solder the fluke onto the wire? 1 Link to comment Share on other sites More sharing options...
Dubz Posted May 21, 2021 Author Share Posted May 21, 2021 I tried two different ways which you can see on the boats hook. Just flattening the wire (what I then finally did for the anchor) or in this case gluing a a small triangle cut out of brass with scissors on the flattened part, what I felt could be a little oversized for the anchor. cheers Dirk 1 Link to comment Share on other sites More sharing options...
Dubz Posted May 22, 2021 Author Share Posted May 22, 2021 What now? 😄 Built a smaller anchor, fixed the rudder and the boat got a compass 🙂 cheers Dirk 6 Link to comment Share on other sites More sharing options...
Dubz Posted May 23, 2021 Author Share Posted May 23, 2021 So, I think that's really it 🙂 The boat got its rig. cheers Dirk 10 Link to comment Share on other sites More sharing options...
Liizio Posted May 24, 2021 Share Posted May 24, 2021 Very impressive work, plus your photography is superb! 1 Link to comment Share on other sites More sharing options...
Richard E Posted May 24, 2021 Share Posted May 24, 2021 Awesome Now I just need to remind myself that that's just one small detail on your model not a finished project in its own right, 1 Link to comment Share on other sites More sharing options...

Recommended Posts
Create an account or sign in to comment
You need to be a member in order to leave a comment
Create an account
Sign up for a new account in our community. It's easy!
Register a new accountSign in
Already have an account? Sign in here.
Sign In Now