Sabrejet Posted October 30, 2020 Share Posted October 30, 2020 Another detailed Pocher build: not too much navel-gazing, just get on with it! Nice one. Link to comment Share on other sites More sharing options...
rjfk2002 Posted November 1, 2020 Author Share Posted November 1, 2020 Thanks Sabre. I have some more progress to share shortly Dinky do you have any recommendations on heat gun and temperature? I plan to start with a hairdryer but suspect it will not hot enough to do much. I know it’s a fine line between fixing and melting plastic... Link to comment Share on other sites More sharing options...
Codger Posted November 1, 2020 Share Posted November 1, 2020 (edited) 24 minutes ago, rjfk2002 said: Thanks Sabre. I have some more progress to share shortly Dinky do you have any recommendations on heat gun and temperature? I plan to start with a hairdryer but suspect it will not hot enough to do much. I know it’s a fine line between fixing and melting plastic... Well wait to hear Dinky's method but I have used heat gun on Pocher plastic. I have a Milwaukee gun with 500 and 1000 degree settings. Using only 500, I just varied the distance to the part, moved it frequently and had no mishaps. Best to rest part on a vise pad or anvil or similar. Practice on a plastic spoon (s) would help. EDIT: Also used hot water method to good advantage and result. Heat water in pot just large enough for part to 185F (small bubbles just before boil) dip and hold a bit and bend to desired using gloves. Place under cool running sink water to set. Edited November 1, 2020 by Codger 2 Link to comment Share on other sites More sharing options...
Dinky Posted November 1, 2020 Share Posted November 1, 2020 I used a heat gun for other parts that are much thinner, the gun was borrowed and ì only remember that the heat was low as possible Codgers post has real good info, water works very well indeed but your part is too think for water I believe Try the heat gun and keep patience, just go slow and use gloves. As you mentioned yourself there is a fine line between repair and destroying items. The spoon tip from Codger is a good suggestion. And if you want to test the Pocher plastic, the plate above the battery and completely in the nose are probably warped / curved also. Just curious are the injector rails for the engine fine, or are the pins missing also? 2 Link to comment Share on other sites More sharing options...
rjfk2002 Posted November 3, 2020 Author Share Posted November 3, 2020 Thanks for the suggestions. I will certainly practice first. Also I need to get a heat gun. As for the hot water I do have a sous vide wand and wonder if that will get water to 185 and hold it there... I have a few potential avenues ahead of me The injector rails were not missing any pins. That is an odd defect that you ran into. Can you scratch the pins using 1mm brass rod? 1 Link to comment Share on other sites More sharing options...
Dinky Posted November 4, 2020 Share Posted November 4, 2020 Good yours are fine, mine were missing both some pins but I was able to repair them with some thin styrene tube with a metal core. 1 Link to comment Share on other sites More sharing options...
Dinky Posted November 5, 2020 Share Posted November 5, 2020 Something you might want to check also. This is something that cannot be solved with hot water or a heat gun 😉 1 Link to comment Share on other sites More sharing options...
Codger Posted November 5, 2020 Share Posted November 5, 2020 Man. for an $800 USD kit, you lads have been given a small trainwreck... 1 Link to comment Share on other sites More sharing options...
Dinky Posted November 5, 2020 Share Posted November 5, 2020 Hate so say it but you are so right 😉 1 Link to comment Share on other sites More sharing options...
Mark_1984 Posted November 11, 2020 Share Posted November 11, 2020 Nice work so far. The biggest issue I found was the engine was off centre. One of the screw holes was about 2.5mm offset. I enlarged the hole, then the air intakes and exhaust all fitted much better. That’s where my model stalled for various reasons. I’m fairly sure it’s a problem with the kit rather than my assembly. now following with great interest! Link to comment Share on other sites More sharing options...
Dinky Posted November 11, 2020 Share Posted November 11, 2020 True I had the same thing indeed, like the engine is sligtly twisted in the frame Link to comment Share on other sites More sharing options...
rjfk2002 Posted November 12, 2020 Author Share Posted November 12, 2020 Oh dear it sounds like I'll have some additional road bumps ahead. I have started on the engine but don't have any pics at the moment. I have packed the build up as my work space will be moving next week. I do have a few pics to backfill from the interior. This is before I discovered the warped fire wall... First up are two pics of the dashboard. Getting the red button painted on the wheel involved some tricky masking. In the future when doing a complicated mask, I will seal with clear before painting to minimize any bleed under the tape. It was hard to burnish down the tape given the size and angles. I was able to touch up by spraying black paint into the cap and using a brush along the edge to insure color match. The decals were a nightmare. They are about 1mm across in size and there are no duplicates with the exception of the center console. The part comes with decals already on it, and Pocher gives you a second set on the decal sheet in case you repaint the center. I did lose one in the process so I used one those duplicate to give the illusion of buttons. There is no NAV button on the real thing... Here is the full dash. The dash is factory painted but there is a giant seam line that needs to cleaned up (as well as some minor seem lines around the vents). After cleaning the part it was primed and resprayed. The bottom half of the stitch line isn't molded very well so I skipped painting it green to match the seats. I thought about doing a two-tone dash but I couldn't find the right shade of green to match the exterior. Additionally I realized that if I were to be the owner of the 1:1, I wouldn't want the two-tone interior, way too loud to me. The hulk green exterior is just flashy enough! Here's the cockpit in a happier time when I didn't know about the warping! 3 Link to comment Share on other sites More sharing options...
Codger Posted November 12, 2020 Share Posted November 12, 2020 Yes, ignorance is bliss - until you have to take it all apart again... But you've got nice looking results so far. 1 Link to comment Share on other sites More sharing options...
Pouln Posted November 13, 2020 Share Posted November 13, 2020 Agree with Chas. Eventually, you will get there. 1 Link to comment Share on other sites More sharing options...
Dinky Posted November 19, 2020 Share Posted November 19, 2020 Just continue with it, its not that bad and now you now know all the flaws 🙂 You can always put it aside for a short while, thats what works for me. I just built the Eaglemoss DB5 and it is so easy to assemble that there is actually little fun and satisfaction when its completed. Link to comment Share on other sites More sharing options...
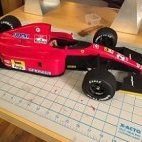
rjfk2002 Posted January 1, 2021 Author Share Posted January 1, 2021 A Small Update Happy New Year! The build has not been abandoned, I just moved my work space and it took some time to get it set back up again. I contacted Hornby and by some small miracle they sent me a new floor pan! Here is a comparison pic to show how distorted the original one was. I was able to get the interior finished up and am doing some work on the engine now. I will post more pics in the coming days 5 1 1 Link to comment Share on other sites More sharing options...
silver911 Posted January 2, 2021 Share Posted January 2, 2021 Well...at least that's sorted...credit to Hornby for that replacement Look forward to seeing work on the engine begin. HNY Ron 1 Link to comment Share on other sites More sharing options...
Dinky Posted January 2, 2021 Share Posted January 2, 2021 Good to see you got replacement part and able to continue. Indeed credits to Hornby, they also got me my replacement shipped parts except for one. Happy new year and bring on the updates! Link to comment Share on other sites More sharing options...
rjfk2002 Posted January 2, 2021 Author Share Posted January 2, 2021 That’s great news Dinky. It took them a while to respond to my email but then the part shipped quickly after. On Facebook they said they are releasing another car and will post news on Jan 5. Maybe the pocher brand is not completely dead... thanks for the support Ron. I will get an update out shortly 1 Link to comment Share on other sites More sharing options...
Pouln Posted January 3, 2021 Share Posted January 3, 2021 That’s a massive difference indeed. Great that that they replaced it. Link to comment Share on other sites More sharing options...
Fozz Posted January 4, 2021 Share Posted January 4, 2021 Hi All, Fozz here. I am new to this forum, having reached the closing stages of my Huracan Verde mantis. I also had deformed rear cockpit bulkhead and battery panel, but not too bad thankfully. The biggest problem was a deformed RH door and window trim. The supplied double sided adhesive is useless which caused the trim and windows to fall off. I resorted to hand cutting new adhesive to hold all in place. Has anyone checked the rear light lenses. Mine have proven impossible to fit and seem at least 1mm too long - both sides. Not sure how this can be resolved unless Pocher have tooled a fix. Assembly has been challenging with wrong references and errors in the manual. The steering rack is impossible to fit as instrucred. Fit the gear early on but check the gear and rack run smoothly. I had to file the teeth extensively. Leave the LH side rack fixing loose until after the subframe is fitted. You can fiddle the gear onto the rack with a thin screwdriver and fix the rack mounting last. Make sure the wheel and rack are central before fixing. Has anyone had similar issues? Link to comment Share on other sites More sharing options...
Dinky Posted January 4, 2021 Share Posted January 4, 2021 On 1/2/2021 at 6:36 PM, rjfk2002 said: It took them a while to respond to my email but then the part shipped quickly after. On Facebook they said they are releasing another car and will post news on Jan 5. Maybe the pocher brand is not completely dead... Took me from September till December 31, 10+ emails and 5 phone calls to get 4 parts, all shipped separately instead of together... I guess that's easier 🙂🙂 Must say I'm happy I got everything except of the bonnet which they cannot deliver anymore but Ill get it resprayed. 2 hours ago, Fozz said: The biggest problem was a deformed RH door and window trim. Has anyone checked the rear light lenses. Mine have proven impossible to fit and seem at least 1mm too long - both sides. The steering rack is impossible to fit as instructed. Fit the gear early on but check the gear and rack run smoothly. Welcome, one of my window trims was deformed also, I think it was also right side. Reshaped it with some heat. The whole rear is a pain, I guess it first perfect fine when there is no paint on the body. I sanded the rear lights at the white lines, removed a part of the black plastic trim and removed the paint where the lights go in at the blue arrows, Also the trim is to wide for the body in my case, I attached some metal which is bend behind the body because there was to much tension. You can fit the steering screw if you turn to left and put it in from the side instead of the top. I do remember I made the whole in the bottom a little bigger for the pinion shaft but I haven't done anything else. Just curious, how do your front and rear windows look? Both of mine were still in the protection foil and it looks like the foil affected the surface of the clear, they have stains / clouds in them. 1 Link to comment Share on other sites More sharing options...
Codger Posted January 4, 2021 Share Posted January 4, 2021 I must say I feel for all you affected builders. This is a near $800 USD (last time I looked) kit, still in production - I think. These type of quality issues are terrible as such. Pocher classics of 4 decades ago are subject to warping but much less fit issues. The passage of time and storage by owners caused the most issues. But here, you are finding huge problems right out of box. Shame on Hornby... 1 Link to comment Share on other sites More sharing options...
silver911 Posted January 4, 2021 Share Posted January 4, 2021 6 minutes ago, Codger said: I must say I feel for all you affected builders. This is a near $800 USD (last time I looked) kit, still in production - I think. These type of quality issues are terrible as such. Pocher classics of 4 decades ago are subject to warping but much less fit issues. The passage of time and storage by owners caused the most issues. But here, you are finding huge problems right out of box. Shame on Hornby... I totally agree Mr C This is not modelling in any sense of the word...indeed...I would class this as nothing short of highway robbery. Personally...I would explore the possibility of a full refund ! Just sending out replacement parts is covering their back (Hornby's) and is not true customer service...more like crossing your fingers...and hoping it will go away. I also feel sorry for those who spent even more on upgrades and the like along with this pile of junk...shame on Hornby indeed. Ron Link to comment Share on other sites More sharing options...
Dinky Posted January 4, 2021 Share Posted January 4, 2021 My issues with the front and rear window are because they have been in protection foil for 4 years. But the overall quality is very poor for the price of these kits. And the baddest thing is that customer support is the worst of all. Im sure Hornby doesnt do anything with the feedback they get, its the same with the Ducati bikes. Everyone was complaining about screws that were too long in the first model and broke when putting them in. The second Duc came with the same screws and im sure the third one will also have these screws. Link to comment Share on other sites More sharing options...

Recommended Posts
Create an account or sign in to comment
You need to be a member in order to leave a comment
Create an account
Sign up for a new account in our community. It's easy!
Register a new accountSign in
Already have an account? Sign in here.
Sign In Now