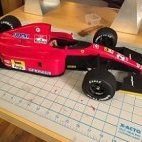
rjfk2002 Posted September 12, 2020 Share Posted September 12, 2020 After a bit on an absence from the bench, I am ready to dive back into it. I'm going to tackle the Huracan. I plan to add some extra details using Paul Koo's excellent DVD as a guide. Here's the obligatory box shot I have been working on this build for a bit so I'll do some catch up posting to get current. 3 Link to comment Share on other sites More sharing options...
silver911 Posted September 12, 2020 Share Posted September 12, 2020 Great to have you back mate Ron Link to comment Share on other sites More sharing options...
Pouln Posted September 12, 2020 Share Posted September 12, 2020 Great. A Huracan. Not seen much here on BM. I will follow you. 1 Link to comment Share on other sites More sharing options...
rjfk2002 Posted September 16, 2020 Author Share Posted September 16, 2020 Thanks gents! Center Console I decided to follow the manual build order and start with the cockpit. The center console comes prepainted with looks flashy out of the box. Unfortunately the colors and some other details are off. First up are the switches. The kit finger guards looked too thin to me and were the wrong color (should be gloss black not bare metal). I decided to make my own with some wire. The pic below shows the kit wire and two test pieces. I decided to go with the wire on the right. It may be a little out of scale but I liked the look and fit of it. It completely fills the hole. Fast forward a bit and here's the repainted part. The pic isn't great so I'll describe what I did. I painted the area matte black and the hazard light button red. This wiped out the factory applied markings, but fortunately Pocher included an extra set on the decal sheet. I removed some of the molded detail above the switches that doesn't exist on the real car. Lastly I sprayed the whole housing gun metal. In reference pics the housing is not silver but more a gray/graphite color. Light gun metal was the closest match I had so I went with that. To preserve all the details on the buttons I masked with aluminum foil and used Tamiya yellow tape to hold it down (using a tooth pick I got the tape into the trenches along the side). And finally here's the completed assembly. If you squint you can see the decals I replied to the switches. They are about 1mm in size each and an absolute nightmare to apply. Fortunately I got them all on without losing one 11 1 Link to comment Share on other sites More sharing options...
silver911 Posted September 17, 2020 Share Posted September 17, 2020 Nicely done mate...a worthwhile improvement for sure...colour is much better Ron Link to comment Share on other sites More sharing options...
Mr Mansfield Posted September 18, 2020 Share Posted September 18, 2020 Huge improvement. Nicely done Link to comment Share on other sites More sharing options...
Dinky Posted October 24, 2020 Share Posted October 24, 2020 Nice start, looking forward to your updates. Im close to completing my Huracan Link to comment Share on other sites More sharing options...
Pouln Posted October 24, 2020 Share Posted October 24, 2020 3 hours ago, Dinky said: Nice start, looking forward to your updates. Im close to completing my Huracan Ah, did you take pictures and will you create a WIP? Link to comment Share on other sites More sharing options...
Dinky Posted October 25, 2020 Share Posted October 25, 2020 I have loads of pictures but no current WIP here. My "old" Huracan wip is somewhere on this forum, but that box had so many missing and damaged parts that after waiting months for replacement parts I returned it. The new one is better, but that also contains issues. Since March I'm waiting for Hornby for replacement parts. Ill dig up my notes and share them here, maybe they can be used by others for your own builds! Link to comment Share on other sites More sharing options...
Dinky Posted October 25, 2020 Share Posted October 25, 2020 I hope the majority of these things only happened to me - Missing pins on the injector rails, were the rubber cables go on. - Missing holes in rear chassis, someone or something forgotten to drill them - Many screws are just a little bit to long - Holes in certain things for pipes and hoses are too big, there is just to much space so it just don't fit nice. I made spacers for all kind of things. - Left rubber part of the seat is molded wrong, so never fitted the back part. I made the back part much smaller because I dont see replacement parts coming. - Right front wheel knuckle is bended during molding - Huge play on front wheel knuckles - Scratches in the windows - Front springs are way to long, I cut them to lower the front - The thick layer of paint on the body is the biggest issue with the Huracan I believe, it makes everything fit extremely difficult. - Paul Koo DVD is a nice addition but check it very carefully, its not always consistent. And don't cut your front radiator hoses as he suggests in the DVD, that's not how it should be. I will see of I can share a picture how it has to be done @ rjfk2002 I don't want to hijack your topic by the way! 1 Link to comment Share on other sites More sharing options...
Pouln Posted October 25, 2020 Share Posted October 25, 2020 1 hour ago, Dinky said: I have loads of pictures but no current WIP here. My "old" Huracan wip is somewhere on this forum, but that box had so many missing and damaged parts that after waiting months for replacement parts I returned it. The new one is better, but that also contains issues. Since March I'm waiting for Hornby for replacement parts. Ill dig up my notes and share them here, maybe they can be used by others for your own builds! Yes, I remember your first build and the way it ended. Maybe start a WIH (work in hind-sight)😉 Link to comment Share on other sites More sharing options...
rjfk2002 Posted October 25, 2020 Author Share Posted October 25, 2020 Dinky I am glad you have joined in and welcome your comments/thoughts. I recall you having some problems with a version of the kit but glad to hear you are back at it I will post an update soon. I have most of the interior complete but the firewall is warped and needs to be redesigned Link to comment Share on other sites More sharing options...
rjfk2002 Posted October 26, 2020 Author Share Posted October 26, 2020 Painting Stitches I decided to paint on the stitch lines. Fortunately the rubber seats have very well molded features that allow one to do this without too much grief (though very time consuming). At first I tried a Tamiya acrylic paint but it was way too thin. I had much better luck a thicker acrylic from a tube. I used a combination of a toothpick and a very thin brush to paint on the green. Any overflow I wiped away with a damp q-tip. In some cases it took a few tries to fill in the stitches. When done I wiped the black areas off with ISO on a q-tip to make sure there was no lingering paint. The rubber looks streaky under direct light and the iPhone lens. It is not streaky to the eye. This was a messy operation, I think I used a whole box of q-tips. Additionally I first tried painting while the seats were attached to the plastic shell (not pictured). That was a mistake as paint found its way onto those too. Fortunately that was an easy fix - ISO to remove the acrylic and another spray of black to restore the finish. 5 Link to comment Share on other sites More sharing options...
Dinky Posted October 27, 2020 Share Posted October 27, 2020 On 10/25/2020 at 1:28 PM, rjfk2002 said: Dinky I am glad you have joined in and welcome your comments/thoughts. Thanks Rjfk2002, the seats look amazing. I like what you did to the seats, the stitches look really nice. Good that you did not fill the small seem between the stitch lines! I tried doing the same with red but it's looking less bright so I ended up making the seats sand color. Link to comment Share on other sites More sharing options...
silver911 Posted October 27, 2020 Share Posted October 27, 2020 Very nicely done Rich...well worth the time and effort Ron Link to comment Share on other sites More sharing options...
Dinky Posted October 27, 2020 Share Posted October 27, 2020 The DVD from Paul is nice but don't cut the radiator hoses as he suggesting, the pipes have to go on the side (In the red circle) instead of the back. The pin is to small but if you use a small tube its perfect. I used the tubes almost everywhere, the make life much easier. I used these 3 sizes for the whole car, approx. 25 cm length is more as enough. 5mm outside, 3mm inside 4mm outside, 2mm inside 1,2mm outside with 0.8mm metal core inside I added some thin carpet on the back of the cabin were the engine is, this is much better when the engine and the other things are mounted This is how my interior looks now. This depends on your preference. I don't like the stance of the model, the front is just sitting to high so I decided to cut the springs. The green is an example from the internet, the red one is mine. I completed the brakes basically but I'm now stuck and waiting for replacement parts from Hornby. Their customer support is consistent, it still as bad as 4 years ago 🙂 Looking forward to your updates! 4 Link to comment Share on other sites More sharing options...
Dinky Posted October 27, 2020 Share Posted October 27, 2020 I would also cut a small edge of the air filter box pipes, they are slightly to long and push the rear panels upwards, Because of that they don't line up nicely with the small window as seen at the white arrow in the picture. On both sides of the rear body you need to take a small part away in the circle and the inside were the blue arrow is need to be cleaned completely from paint with the Dremel, the is a thick layer of paint on the inside which prevents the body to fit correctly . The mesh on both of these panels need to be glued but it comes of easily when fitting so I cut the small bumps and used some small screws Well I guess I contaminated your topic enough for now, but hopefully you can use the info 😉 3 Link to comment Share on other sites More sharing options...
rjfk2002 Posted October 28, 2020 Author Share Posted October 28, 2020 This is fantastic! Thanks for the treasure trove of tips and pics. It is so incredibly helpful! I do have some follow up questions that I would love to pick your brain if you don’t mind. Let me collect my thoughts (and pics) and will come back Rich Link to comment Share on other sites More sharing options...
Dinky Posted October 28, 2020 Share Posted October 28, 2020 You are welcome and just let me know if you have questions! Link to comment Share on other sites More sharing options...
rjfk2002 Posted October 29, 2020 Author Share Posted October 29, 2020 I wanted to ask you how the firewall sits in the interior. Mine is badly warped. Here are a few pics to illustrate I have positioned the door sill on the floor pan and you can see the firewall is way off in terms of shape There is some give in the plastic but it is really quite minor. When I tried to install the floor pan you can the firewall is no aligned in the back or the sides From one of your pics I can see that the rear lines up the rear window frame. How are the sides - do they line up with the door sill? Also the ledge in the back, does that line up with the bottom edge of the door sill or is it in front of the piece? Any pics that you may have of this assembly would be very helpful as I'm trying to figure out what shape the wall should be. Does it trace the edge of the door sill in my first picture or is it actually inside and sandwiched by the sills? I am playing around with some styrene sheets to see if I can scratch a new wall but it has been really slow progress... Your ride height looks perfect. Do you recall how spring you cut down? I need to study the hose issue you pointed out. I'm not nearly that far in the build yet! 2 Link to comment Share on other sites More sharing options...
silver911 Posted October 29, 2020 Share Posted October 29, 2020 Hi Rich...I found this guy on Youtube...there are 8 video's...but this one (part 5) covers the interior...hope it helps mate........ Ron Link to comment Share on other sites More sharing options...
Dinky Posted October 29, 2020 Share Posted October 29, 2020 Whoops, that looks really warped. You should use a heatgun to get it better. Mine was not warped that bad. I do remember that mine had something similar and didnt reached the metal on the back and the top of the cabin. Mine was also pretty angled from the side but not as bad as yours Let me try to explain what I did, on the back of the black part there is a small round thing, where I removed a few mm's off. It aligns with the hole in the back of the cabin like you need to put a screw in. I did not used a screw becasue it did not go high enough for the space above it, so I added a piece of foam under the bottom between the plastic bottom and metal bottom that pushes the platsic upwards and closes most of the gaps. This is what I cut off the springs on the front but I made a small piece of styrene to avoid the spring to skew in the top part if that makes sense? 1 Link to comment Share on other sites More sharing options...
Dinky Posted October 29, 2020 Share Posted October 29, 2020 (edited) This is were I put the layer of foam Edited October 29, 2020 by Dinky Link to comment Share on other sites More sharing options...
rjfk2002 Posted October 30, 2020 Author Share Posted October 30, 2020 Thanks Ron for the video. There are some good shots of the interior showing how the parts fit together. Dinky thanks again. This is all brilliant advice! You are right my part is really warped. I thought about using a heat gun but was worried about making the problem worse. I had never thought about using the foam to help prop up the firewall. That is a great idea. I don’t need the firewall to be perfectly angled, just close enough that I can close the gap by pressing into place from below Link to comment Share on other sites More sharing options...
Dinky Posted October 30, 2020 Share Posted October 30, 2020 19 hours ago, silver911 said: Hi Rich...I found this guy on Youtube...there are 8 video's...but this one (part 5) covers the interior...hope it helps mate........ Check some of his video's I shared a lot with him also via Insta. Also about trimming the inner door panels to make the doors close nicely No problem rjfk2002, the foam pushes the plastic up and closes the gap on top complete and make the gaps on side negligible in my case. Just try it, with the wonderfull Hornby customer support it will take another pandemic before you have an replacement 🙂 Link to comment Share on other sites More sharing options...

Recommended Posts
Create an account or sign in to comment
You need to be a member in order to leave a comment
Create an account
Sign up for a new account in our community. It's easy!
Register a new accountSign in
Already have an account? Sign in here.
Sign In Now