zaxos345 Posted September 5, 2020 Share Posted September 5, 2020 Good evening guys, new summer, different work place, a bit difficult times with this new virus. Well i try to overcome with my favourite hobby with new subject, this time a jet one from the cold era, the very good revell 1/48th scale F-86D. First of all ihave to thank a member here in the forums, Duncan a.k.a. ''Sabrejet''. for his valueable help, explaning details, providing info and clarifiying things regarding this beautiful aircraft and my build specifically. I was going to build this model OOB in order to test an approach to Bare Metal Finish, but...... Here is the profile i want to build, is one provided with the kit... which in fact is a F-86D-35. Revell provides an instrument panel correct only for models D-1 to D-5. So i turned to eduard and i was lucky enough to find the aftermarket Also i needed new wheels, different rim pattern on my profile for the nose wheel and of course better detailed...eduard again... And i always prefer the resin seats to the plastic ones, so i got a true details one... So much for the OOB build, hahahaha Anyway, cockpit first...be aware that the kit provides the seat frame with the catapult triggers up, in fact untill D-35 models there was only one trigger to the right. That means that the seat has entered into the ejection sequence which is wrong. A minor detail of course, only for rivet counters hahaha. I added some levers and painted the cockpit carefully and it really turned out very beautiful i think. Good thing that eduard provides the instrument panel unpainted, i never liked the painted ones, bad thing that it does not provide a painted film for the instruments. Instead it provides a printed one, so i added a thin transparent film to the sandwich! I added some stencils, as you can see, to the fuselage sides and i glued the two halves. I am happy to report that if you are careful with the gluing procedure you are going to need no filler!! I cut off the plastic portion of the dashbord and added a PE one from eduard. Here i painted from the inside the anticollision light, added chrome and i glued it on the fuselage as, according to Duncan, this is a clear panel!! Here i dealt with the wheels and the rocket launcer I glued the wings, flaps, slats, pylons and masked and painted the wheel wells... and last for this post, the canopy, i tried to enhance it masked and painted inside... Thats all for now lads, hope you like it, open to any comment, remark etc!! John 15 Link to comment Share on other sites More sharing options...
hopkp Posted September 5, 2020 Share Posted September 5, 2020 (edited) Love the cockpit.....the rest looks excellent too! Edited September 5, 2020 by hopkp 1 Link to comment Share on other sites More sharing options...
Retired Bob Posted September 5, 2020 Share Posted September 5, 2020 Great job with the cockpit, your painting is excellent. 1 Link to comment Share on other sites More sharing options...
Sabrejet Posted September 5, 2020 Share Posted September 5, 2020 Lovely job! Some good work there; one of the best Sabre kits too! 1 Link to comment Share on other sites More sharing options...
zaxos345 Posted September 6, 2020 Author Share Posted September 6, 2020 9 hours ago, hopkp said: Love the cockpit.....the rest looks excellent too! 7 hours ago, Retired Bob said: Great job with the cockpit, your painting is excellent. Thank you very much!!!! 7 hours ago, Sabrejet said: Lovely job! Some good work there; one of the best Sabre kits too! Thanks Dunkan!!! really appreciate your help and your kind words! John 1 Link to comment Share on other sites More sharing options...
dnl42 Posted September 6, 2020 Share Posted September 6, 2020 Bravo! All around outstanding work, particularly on the cockpit. 1 Link to comment Share on other sites More sharing options...
zaxos345 Posted September 6, 2020 Author Share Posted September 6, 2020 16 minutes ago, dnl42 said: Bravo! All around outstanding work, particularly on the cockpit. Thanks!!! Link to comment Share on other sites More sharing options...
Biggles87 Posted September 6, 2020 Share Posted September 6, 2020 A nice kit and you’re making a great job of it. John Link to comment Share on other sites More sharing options...
zaxos345 Posted September 6, 2020 Author Share Posted September 6, 2020 15 minutes ago, Biggles87 said: A nice kit and you’re making a great job of it. John Thanks John! Link to comment Share on other sites More sharing options...
LorenSharp Posted September 6, 2020 Share Posted September 6, 2020 Excellent job so far especially with the extra detail in the cockpit. I'm looking forward to how the build turns out. 1 Link to comment Share on other sites More sharing options...
corsaircorp Posted September 6, 2020 Share Posted September 6, 2020 Nice job John !! I love these '50s aircraft !! I'll follow if you don't mind it !! CC 1 Link to comment Share on other sites More sharing options...
zaxos345 Posted September 7, 2020 Author Share Posted September 7, 2020 17 hours ago, LorenSharp said: Excellent job so far especially with the extra detail in the cockpit. I'm looking forward to how the build turns out. Thanks!!! 17 hours ago, corsaircorp said: Nice job John !! I love these '50s aircraft !! I'll follow if you don't mind it !! CC I dont mind at all, i am honored!!! John 1 Link to comment Share on other sites More sharing options...
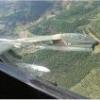
zaxos345 Posted October 13, 2020 Author Share Posted October 13, 2020 (edited) Good morning lads, Time to show some progress.... After checking everything for imperfections i polished thoroughly the kit plastic. I decided to use Ak xtreme meta for thiw build and i also decided not to prime the model and to spray the color on the polished plastic. I think that, even if the photoes really dont show the real thing, the outcome is really nice. Here i worked with the different shading of the metal. As Duncan a.k.a. ''Sabrejet'' has pointed out many times, this shading is due to the different way of threating aluminium panels. Hope i got it right somehow!!! Also i dealt with engine exhaust! I masked and painted all the walk lines, antiglare and radar cone.... And finally i started with the codes, letters and decals. First the dry tranfers followed by the very nice revell decals!! Thats all for now, hope you like it. I really look forward for your comments on my first bare metal try!!! John Edited October 13, 2020 by zaxos345 6 Link to comment Share on other sites More sharing options...
Jackson Duvalier Posted October 13, 2020 Share Posted October 13, 2020 That looks amazing. Clean work pays dividends. 1 Link to comment Share on other sites More sharing options...
Biggles87 Posted October 13, 2020 Share Posted October 13, 2020 I agree, pretty spectacular. What shades of AK Extreme did you use? John 1 Link to comment Share on other sites More sharing options...
zaxos345 Posted October 13, 2020 Author Share Posted October 13, 2020 (edited) 7 minutes ago, Biggles87 said: I agree, pretty spectacular. What shades of AK Extreme did you use? John Mostly aluminium, very little paneling with polished aluminium and mrp's duraluminium!! I think ak's duraluminium is a bit off!! What really surprised me is the seen of the aluminium on the gloss plastic, but you should spray it very light...not heavy!! Edited October 13, 2020 by zaxos345 Link to comment Share on other sites More sharing options...
Biggles87 Posted October 13, 2020 Share Posted October 13, 2020 Thanks, I might try that for my next NMF. 1 Link to comment Share on other sites More sharing options...
zaxos345 Posted November 3, 2020 Author Share Posted November 3, 2020 Good evening guys, My last update on this beautifull bird. After finishing all the stenciling i sprayed a highly thinned future on the model and i started weathering her with wash first. After that i played with oils, raw unthinned, in order to capture some wear of the aluminium. Dont know if i really succeded!! Last i sprayed a light, again highly thinned, hand of xtracrylics satin varnish to seal everything. None of the future or xtraclylics seems to alter the finish of the metallics!! I had no luck to my tests with alclad varnish or the ak's gauzy agent!! Hope you like it!! It is my first try on NMF and i would really apppreciate any comments!! John 2 Link to comment Share on other sites More sharing options...
Biggles87 Posted November 3, 2020 Share Posted November 3, 2020 Beautifully done. John 1 Link to comment Share on other sites More sharing options...
Quiet Mike Posted November 3, 2020 Share Posted November 3, 2020 That's really impressive, well done! 1 Link to comment Share on other sites More sharing options...
zaxos345 Posted November 3, 2020 Author Share Posted November 3, 2020 Thank you very much!! John Link to comment Share on other sites More sharing options...

Recommended Posts
Create an account or sign in to comment
You need to be a member in order to leave a comment
Create an account
Sign up for a new account in our community. It's easy!
Register a new accountSign in
Already have an account? Sign in here.
Sign In Now