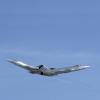
rossm Posted July 29, 2020 Share Posted July 29, 2020 A quick build for me, arriving just a few days before Christmas last year. Thanks are due to @canberra kid and others who answered my pleas for help along the way. It's probably as finished as it's going to get although there's one aspect I'm not happy with - see below. The only way to build a 1/72 RB-57D currently available is the High Planes kit, accurate and with nice surface detail but distinctly low tech mouldings and using some of their standard parts which leads to the phrase "Adjustment of parts and filling required" being printed on the box top! The instructions contain phrases like "trim the canopies at an early stage and test fit them before gluing. In this way the width of the fuselage can be easily adjusted". and "To fit the wings properly some plastic needs to be removed from the cutouts". I didn't do a WIP thread so here is how I got seam free intakes - removing the front of the nacelle from the lower wing after sanding the mating surfaces (a long job). Having overcome these issues and managed to create a fuselage from two half bananas I was feeling the kit wasn't too bad, even though I missed the instruction to shorten the exhausts. The wavy edge to the paint scheme was done by enlarging and printing the side view in the instructions and using that as a template to cut masking tape. The kit decals seemed to go on well, until the last few which silvered horrendously but settled down with repeated doses of Micro Sol over a 24 hour period. It was complete, painted and decalled before I fitted the undercarriage. Now I have a much lower opinion as the sit is completely wrong, even having shortened the main legs as much as practicable it is still all wrong, too much nose down and too high off the ground. Maybe the undercarriage was moulded in the no-load position? It's not helped by a complete lack of positive location for the main legs which were drilled and bits of paper clip inserted. Anyway, here it is while I wonder if I can live with the sit or if I need to do something really drastic...………….. Certainly I'll need to buy a new bottle of Talisker before tackling my other High Planes Canberra. For a clue what's next...……………………….. an even bigger Canberra! 34 1 Link to comment Share on other sites More sharing options...
stevehnz Posted July 29, 2020 Share Posted July 29, 2020 Aside from the sit, that looks great. I might not rush out & buy one all the same. Steve. Link to comment Share on other sites More sharing options...
SAT69 Posted July 29, 2020 Share Posted July 29, 2020 It does truly look great. I really like the finish. Superb paint work. Link to comment Share on other sites More sharing options...
Chrisj2003 Posted July 29, 2020 Share Posted July 29, 2020 Really very very nice Cranberry. (Is it still a Cranberry so far from the original?) shame about the sit; be good to see the F done as well. Link to comment Share on other sites More sharing options...
Wulfman Posted July 29, 2020 Share Posted July 29, 2020 Great build on a very difficult kit, excellent modelling ! Wulfman Link to comment Share on other sites More sharing options...
RMCS Posted July 29, 2020 Share Posted July 29, 2020 Fantastic Link to comment Share on other sites More sharing options...
GrahamS Posted July 29, 2020 Share Posted July 29, 2020 Apart from the aforementioned sit, absolutely lovely. I really love these counterfeit Canberras. Look forward to the next one! Graham Link to comment Share on other sites More sharing options...
woody37 Posted July 29, 2020 Share Posted July 29, 2020 I’d say that you won this battle, beautiful finish despite the angle. Link to comment Share on other sites More sharing options...
canberra kid Posted July 30, 2020 Share Posted July 30, 2020 Very nice it is too Ross, well done. John Link to comment Share on other sites More sharing options...
F-32 Posted August 4, 2020 Share Posted August 4, 2020 That's a stunning build, absolutely love it Link to comment Share on other sites More sharing options...
Doc72 Posted August 5, 2020 Share Posted August 5, 2020 Fantastic work and an attractive paint scheme. And good luck with the RB-57F (it is the Mach 2-kit?). Link to comment Share on other sites More sharing options...
rossm Posted August 5, 2020 Author Share Posted August 5, 2020 1 hour ago, Doc72 said: Fantastic work and an attractive paint scheme. And good luck with the RB-57F (it is the Mach 2-kit?). Thank you. The WB-57F is the Mach2 kit and it just needs detail painting like the anti-glare panels on fuselage and engines and then decals which I have to laser print as the kit ones are not right for the scheme I am doing - there were many variations over the years. I think it was an easier build than the RB-57D although it needed careful filling around the engines. Link to comment Share on other sites More sharing options...

Recommended Posts
Create an account or sign in to comment
You need to be a member in order to leave a comment
Create an account
Sign up for a new account in our community. It's easy!
Register a new accountSign in
Already have an account? Sign in here.
Sign In Now