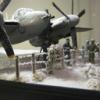
Suprastar3000 Posted June 3, 2020 Share Posted June 3, 2020 (edited) Hello modellers. Hurricane at the Workshop Finally finished this one after it sitting in both the bin and shelf for awhile. 1/48 Airfix Hurricane in scratch built shed and base. The hanger lights work and the old chap in the corner, has a working welding set. Thanks for looking. Edited June 3, 2020 by Suprastar3000 pictures didn't show 28 4 Link to comment Share on other sites More sharing options...
Ozzy Posted June 5, 2020 Share Posted June 5, 2020 Looks fantastic Link to comment Share on other sites More sharing options...
Suprastar3000 Posted June 5, 2020 Author Share Posted June 5, 2020 Thanks Ozzy Link to comment Share on other sites More sharing options...
GRK Posted June 7, 2020 Share Posted June 7, 2020 This is amazing! I've just started building this kit today and was wondering how to display it-great idea! Love all the details and that squadron sign is ace- how did you do the lettering on that?! Link to comment Share on other sites More sharing options...
Badder Posted June 7, 2020 Share Posted June 7, 2020 (edited) Hi Suprastar, I haven't seen you on here for a while. But as always it's great to see your dioramas. Fantastic work, as always. You say that the guy in the corner has a working welding set. I have some 1/35th scale sheets of mild steel that need to be lap welded. How much does he charge? Rearguards, Badder Edited June 7, 2020 by Badder 1 Link to comment Share on other sites More sharing options...
Suprastar3000 Posted June 7, 2020 Author Share Posted June 7, 2020 5 hours ago, GRK said: This is amazing! I've just started building this kit today and was wondering how to display it-great idea! Love all the details and that squadron sign is ace- how did you do the lettering on that?! Actually really please someone has spotted that sign. Thank you GRK, as from all the things I have scratch made, that came out the best. But it actually was made a couple of years ago and part of another diorama based on the 19 Squadron P51 Mustangs. Unfortunately the diorama didn't stand the tide of time very well and all eventually went in the parts bin. The sign now has a new home, admittedly not historically correct one. How i made the sign: Original plastic base was roughed up and wood grain scratched in, then added white base colour (think I sprayed hair spray over it for chipping later) Found some tiny stick on letters from a craft shop and carefully added the letters after working out the spacing on a computer. Painted blue very thick and let dry, carefully lifted off the letter masks. The rough raised edges give a real rustic feel to the effect. Then weathered with powders. Some of the details around the letters are missing but it kind of adds to the effect. Thanks you. Link to comment Share on other sites More sharing options...
Suprastar3000 Posted June 7, 2020 Author Share Posted June 7, 2020 42 minutes ago, Badder said: Hi Suprastar, I haven't seen you on here for a while. But as always it's great to see your dioramas. Fantastic work, as always. Thank you mate. Real life issues has meant not much time or patience for modelling (or at least not good enough to show here) but getting back into the swing of things. Thanks for remembering me lol. 42 minutes ago, Badder said: You say that the guy in the corner has a working welding set. I have some 1/35th scale sheets of mild steel that need to be lap welded. How much does he charge? Rearguards, Badder This dude is a slow worker. Im guessing well beyond retirement age. He was been working on this hanger for months and by the looks of that roof he's still not finished. Im sure a good storm will fetch off some of those roof panels. 😉 Here a vid. Hope it works. 4 Link to comment Share on other sites More sharing options...
Alpha Delta 210 Posted June 7, 2020 Share Posted June 7, 2020 Great diorama (and the video works!) Link to comment Share on other sites More sharing options...
Suprastar3000 Posted June 7, 2020 Author Share Posted June 7, 2020 Thanks Alpha Delta 😀 Link to comment Share on other sites More sharing options...
Badder Posted June 8, 2020 Share Posted June 8, 2020 Hi again, Just saw your vid, which is great, but I have to point out your flame needs to be blue-white rather than red-white as I assume he's not cutting or welding Lithium, or Calcium. I'm hoping it's not a big job to switch your light source over? Sorry to be such a pedant, but I thought it better to point it out now when the vid has had relatively few views. Rearguards, Badder Link to comment Share on other sites More sharing options...
dogsbody Posted June 8, 2020 Share Posted June 8, 2020 38 minutes ago, Badder said: Hi again, Just saw your vid, which is great, but I have to point out your flame needs to be blue-white rather than red-white as I assume he's not cutting or welding Lithium, or Calcium. I'm hoping it's not a big job to switch your light source over? Sorry to be such a pedant, but I thought it better to point it out now when the vid has had relatively few views. Rearguards, Badder Is he electric arc welding or using an acetylene flame to weld? When I was a kid, I've seen my Uncle Ray use the gas torch method. Chris Link to comment Share on other sites More sharing options...
Suprastar3000 Posted June 8, 2020 Author Share Posted June 8, 2020 9 hours ago, Badder said: Hi again, Just saw your vid, which is great, but I have to point out your flame needs to be blue-white rather than red-white as I assume he's not cutting or welding Lithium, or Calcium. I'm hoping it's not a big job to switch your light source over? unfortunately the lighting controller is buried under the model table and floor so not much hope of getting to those LEDs. The unit was from a model railway set so i didn't get a choice of colours. *scratch head! Im going to use the 'artistic license' card for the second time on this build. 2 Link to comment Share on other sites More sharing options...
Badder Posted June 9, 2020 Share Posted June 9, 2020 On 6/8/2020 at 11:28 AM, Suprastar3000 said: unfortunately the lighting controller is buried under the model table and floor so not much hope of getting to those LEDs. The unit was from a model railway set so i didn't get a choice of colours. *scratch head! Im going to use the 'artistic license' card for the second time on this build. You should be okay then, so long as the inspectors don't come around and find that your license is a forgery!😉 At the end of the day, it's still a nice effect. Rearguards, Badder 1 Link to comment Share on other sites More sharing options...
bedford Posted June 10, 2020 Share Posted June 10, 2020 Great diorama, I really love the mood. How did you the side and roof panels ? Link to comment Share on other sites More sharing options...
Suprastar3000 Posted June 10, 2020 Author Share Posted June 10, 2020 1 hour ago, bedford said: Great diorama, I really love the mood. How did you the side and roof panels ? Thanks Bedford - Appreciated. Combination of premade foil sheets the model railway guys use and pie tin bases from tesco. I have a tool that makes the foil into the little corrugated strips that I cut with scissors. Painting was simply different shades of aluminium and gun metal and sea salt crystals to mask the weathered marks and a lighter tone sprayed on top. The outer edge was also painted slight dark to add too the grime look. Then weathering powders. Lots of great tutorials on you tube. 1 Link to comment Share on other sites More sharing options...
is it windy yet? Posted June 14, 2020 Share Posted June 14, 2020 Nice layout, clean and easy to take in. Plus my favourite feature, not overcrowded with figures. Good job here. Link to comment Share on other sites More sharing options...
Suprastar3000 Posted June 17, 2020 Author Share Posted June 17, 2020 On 6/14/2020 at 4:33 PM, is it windy yet? said: Nice layout, clean and easy to take in. Plus my favourite feature, not overcrowded with figures. Good job here. Thank you. I had painted some figures for the model but as you say, decided not to include them as it looked too cluttered. The only guy is the old dude in the back you can hardly see. Link to comment Share on other sites More sharing options...
JagRigger Posted June 24, 2020 Share Posted June 24, 2020 Great work - but welding, in a hangar, next to an aircraft full of Avgas..... 🔥 Link to comment Share on other sites More sharing options...
Suprastar3000 Posted June 25, 2020 Author Share Posted June 25, 2020 On 6/24/2020 at 2:08 PM, JagRigger said: Great work - but welding, in a hangar, next to an aircraft full of Avgas..... 🔥 Thanks! Glad i removed the fuel barrels now! LOL Link to comment Share on other sites More sharing options...
Capri3 Posted June 28, 2020 Share Posted June 28, 2020 Great wee diorama. Like the 19 squadron 'blue toon' sign, nice detail. Link to comment Share on other sites More sharing options...
Suprastar3000 Posted June 29, 2020 Author Share Posted June 29, 2020 8 hours ago, Capri3 said: Great wee diorama. Like the 19 squadron 'blue toon' sign, nice detail. Thank you. Technically No. 19 Squadron used Spitfire's at Duxford until 44. Then based at Peterhead they had the Mustangs which is what the Sign was originally made for,... that diorama didn't go to plan and now the sign has found a new home. Link to comment Share on other sites More sharing options...

Recommended Posts
Create an account or sign in to comment
You need to be a member in order to leave a comment
Create an account
Sign up for a new account in our community. It's easy!
Register a new accountSign in
Already have an account? Sign in here.
Sign In Now