DWaz Modeler Posted May 7, 2020 Share Posted May 7, 2020 (edited) Hey Everyone,.. this is my 1st project here so i'll introduce myself a little im a 3D Modeler/Designer based in the u.k. I currently design RC Body shells decals and 3D Parts I stumbled across the 3D model of Cain on C.G. Trader a Few weeks ago and was blown away but the level of detail and accuracy to the movie version, I loved the Robo Cain as a kid growing up, i'd draw countless pictures of him and once tried to model him out of cardboard and tape,.. didn't go too well but for a 10yrs old it wasn't bad! so after doing a little research i've decided to go for it and take the plunge,.. i've only been at him for a few days so i'll try document and give a true depiction of my struggles, issues, resolves, hardware, and most importantly final product! Firstly to get the Download Files for Cain you'll need to get them from Robocop 2 Cain C.G. Trader currently $126.52 but there is the option to send a cheeky offer once your all downloaded your pretty much ready to go,.. My 3D printing Weapon of Choice in the Creality Ender 3 a nice low level FDM printer this was my introduction into the 3D printing world and from this i've learnt a great deal in modification! i.e. Quiet the bugger down!!!!! and get a glass bed for starters!!!! i've already started Printing and devised a system so I don't get lost with what I have/have not printed (this thing is going to take long enough to print as it is! So below are Screen grabs of additional hardware you'll from your included 37 Page instruction manual Edited May 8, 2020 by DWaz Modeler 4 Link to comment Share on other sites More sharing options...
DWaz Modeler Posted May 7, 2020 Author Share Posted May 7, 2020 (edited) so while given enough to go on there isn't much accuracy as to what and where to find your Hardware! so far this is what I have on order and where I obtained them,.. I'm based in the u.k. so most things i'll try source as local as possible! and I think a lot of this stuff is more American based I haven't found everything yet but but i'll modify the post as I do! 01 Cains LCD T.V. Screen, While given a vague insight into what you need after some research I think i've found it,.. while it looks like a 6th Generation Ipod Nano as I found Ipod Nano's cant play Video content (Mp4's) so,.. there is a cheap copy that can play .MP4's I bought from Amazon.co.uk for £10.20 Cheap Ipod Nano for MP4 Video now For the Content,.. You sort of have two options unless you wish to model and animate your own version then my suggestions are,.. Cain Face Screensaver for windows i'd use a screen capture program such as snagit to record your footage then convert to .Mp4 for your nano media player which holds about 4GB of storage, My option,.. I've used After Effects to modify the original content, i've also left the audio on there for now who knows I may install a micro speaker too Edited May 8, 2020 by DWaz Modeler Adding more content 2 Link to comment Share on other sites More sharing options...
DWaz Modeler Posted May 7, 2020 Author Share Posted May 7, 2020 (edited) 02 Stainless Steel Cap Head Bolts Ordered through Ebay.co.uk £20.67 03 Stainless Steel Socket head Screw or Hex Grub Screws as they are also known Ebay.co.uk £16.80 04 Stainless Steel Flat head Hex Screws Ebay.co.uk £3.74 05 Stainless Steel Washers Ebay.co.uk £3.47 06 Stainless Steel Hex Flange Nut Ebay.co.uk £2.71 07 Metal Beads you manuel recoments G-System Beads i've dropped them and Email to see what they can do and if the'll post to u.k. (China Based) 08 Gundam mini Metal Bolts now you can get these here Ebay Link to Screws 150 is a lot more needed so i've asked if I can just order slightly more than required lets see what happens, (Update they won't split the packs so either buy more than I need or Print them,..) 09 Kotobukiya MSG 117 Ebay Japan (Found this on Ebay for about £12 but toying with the idea of printing) 10 Metal Gundam parts Ver 2.0 Energy Pipes Still looking into this there are x2 sizes in the list and I can only find one size but you can find them on Ebay Japan found on Ebay Japan they come as a kit there are x2 different sizes listed that are needed but cant see the different sizes? may just print 11 Tamiya Plastic Beams a pack of these will set you back about £7 per pack but i'm sure a Styrene tubes will do the job just as well and at a fraction of the cost! Ebay.co.uk Currently have ordered 2-3-4-8-5-10mm Sizes far £11.15 no one seems to do a 7mm so if needs be i'll just make the hole slightly bigger and use an 8mm 12 wave plastic Pipe (Still to look into) 13 Brass Line Detail Parts (Still to look into) 14 Neodymium Magnets (Still to look into) 15 Black Spiral Conduit sleeve Ebay.co.uk 12mm ordered the did a 6.5mm but not 8mm it's a split tube so it should work! 16 Electric Wire (not using) 17 Open Clothing Electric Wire (not using) 18 Shrinkable Tube (not using) I'll just be using the 3D printable files for cabling 19 Gundam Spring Tube (Still to look into) 20 Hasegawa Modeling #PA-43 £9.80 Ireland found on Ebay.co.uk 21 Kotobukiya MSG Ball Joint D-720 this is literally one piece for one ball joint in the neck i'll print/fabricate something to make that part work! 22 Clear Plastic Plate (Still to look into think this is the base for him to stand not sure how big yet though) 23 5mm Stainless pole £3.32 Ebay.co.uk 24 Acrylic this just covers the light on his right shoulder a piece of acetate or anything from packaging will do! 25 Gundam Metal options i've no idea what this part is! closest I got was a Gundam Gun Barrel but couldnt find the same one!,.. i'll be 3D printing this part! Edited May 24, 2020 by DWaz Modeler 1 Link to comment Share on other sites More sharing options...
DWaz Modeler Posted May 7, 2020 Author Share Posted May 7, 2020 Where we are at so far 3 Days of 3D printing lots of sanding will be needed and clean up but that brings us up to where we are at the moment! i'll bring you some more updates shorty! 3 Link to comment Share on other sites More sharing options...
The Chief Smeg Posted May 7, 2020 Share Posted May 7, 2020 This looks like it is going to be a very interesting thread; just hit that follow button! welcome to Britmodeller Btw! 1 Link to comment Share on other sites More sharing options...
Sage the Owl Posted May 7, 2020 Share Posted May 7, 2020 Wow, this is going to be one to watch ! 3D printing is something that i know nothing about other than certain materials require a lot of sanding to remove the ridges caused by the printing process. However, i believe that you can also print in resin which doesn't have the ridge problem, was there a specific reason why you've not gone done this route ? Link to comment Share on other sites More sharing options...
Mikemc Posted May 8, 2020 Share Posted May 8, 2020 Hi Good job. Nice progres and I hope you gonna finish it. Check this out. Cheers https://www.gambody.com/3d-models/ed-209-robocop-1987 Link to comment Share on other sites More sharing options...
DWaz Modeler Posted May 8, 2020 Author Share Posted May 8, 2020 (edited) On 5/7/2020 at 11:12 PM, Sage the Owl said: Wow, this is going to be one to watch ! 3D printing is something that i know nothing about other than certain materials require a lot of sanding to remove the ridges caused by the printing process. However, i believe that you can also print in resin which doesn't have the ridge problem, was there a specific reason why you've not gone done this route ? this is true the SLA/DLP Printers give a much more crisp and clean look,.. the main reasons are,. I don't have an SLA printer,.. Yet!,.. and the SLA/DLP printers are still limited by build volume,. as in Mikemc's thread he's gone 1/8th on his but thats going to bring it's own complications I've always intended on doing the Screen face which would make things more difficult,.. and besides who doesn't want a menacing 1/6 Cane Edited May 10, 2020 by DWaz Modeler Link to comment Share on other sites More sharing options...
DWaz Modeler Posted May 8, 2020 Author Share Posted May 8, 2020 39 minutes ago, Mikemc said: Hi Good job. Nice progres and I hope you gonna finish it. Check this out. Cheers https://www.gambody.com/3d-models/ed-209-robocop-1987 😊 i've actually seen a much more highly detailed version of ED-209 but,.. I MUST STAY FOCUSED!!!!!! 😂 1 Link to comment Share on other sites More sharing options...
Gazmo Posted May 10, 2020 Share Posted May 10, 2020 Really interested in this just clicked the follow button 1 Link to comment Share on other sites More sharing options...
DWaz Modeler Posted May 10, 2020 Author Share Posted May 10, 2020 (edited) some small updates,.. We had our 1st failed print,.. 11 hours into a 13 hour print GUTTED!!,.. from what I can gather the SD card did not properly Eject from the mac and put an Error on the SD Card which caused the printer to just stop dead mid print!I I just used a different SD Card and reprinted, nearly all the Upper Body parts are printed now, i've not assembled anything apart from the closed head because non of the hardware has arrived yet I started to assemble the .STL Files in Maya (My 3D modeling program of choice) just to see how he all actually fits together It's there I realised that if the same part is used but just mirrored for the other side then that file isn't included you have to work out which parts you need to mirror and print which would have been a bugger coming to assembly and finding I only had one pipe ready when i needed two to go any further! Parts like the Gundam screw heads, energy pipes, Beads, MSG Parts, are proving either Expensive or difficult to find I think our Cane Modeler is of Chinese Origin as a lot of the sourced items are Chinese based, these do also come as 3D models in your downloadable files but states they should be SLA/DLP Printed (ie resin printed not FDM) so i've taken the plunge and pre ordered an SLA 3D Printer which will help me in my other work too a large chunk of what i'd be paying for those parts above I can count back against the cost of the printer,. i've done lots of research into what printer I think would suit me the best you have to treat them all with the respect they deserve (messing with resin printers can be very hazardous to your health and really mess up your immune system or worse!) so i've opted for the Elegoo Mars Pro which comes with a seal to keep bad resin smells contained and also prints slightly better than it's predecessor (the non pro version) Edited May 10, 2020 by DWaz Modeler 2 Link to comment Share on other sites More sharing options...
Schwarz-Brot Posted May 10, 2020 Share Posted May 10, 2020 Good start there. You'll love the Elegoo Mars. The Pro isn't really differently specced than the older version. It wasn't available a few weeks ago, when I ordered mine, so I went for the standard version after I compared the specs carefully, as I decided the updates were not worth the wait. Didn't regret it. Before you start printing, rub down the spindle with some Alcohol and oil it - it is hard to turn and may give you printing errors. If it spins easily, you'll hear a huge difference when moving the printing plate up and down. You'll not want to place this printer anywhere where you must avoid making a mess. Best would be a glass worktop or something else that is easily cleaned. It gets really messy with the resin - while at least the white elegoo resin doesn't stink too much. You really don't need a mask to work with fluid resin. You need it, when you rework the parts, as the dust is the dangerous stuff! You need lots of Isoprop Alcohol to clean anything you touch, your printer and your prints. I get me 5-Liter packages from ebay. 95% is good enough. You need lots of nitrile gloves. Don't use latex, resin diffuses through it. Get yourself photon file validator to avoid islands. Search Youtube for the workflow. 1 Link to comment Share on other sites More sharing options...
Schwarz-Brot Posted May 10, 2020 Share Posted May 10, 2020 While your first print is running, order some additional FEP film. You'll probably ruin the first quite soon and waiting for the new to arrive really isn't cool. Link to comment Share on other sites More sharing options...
DWaz Modeler Posted May 10, 2020 Author Share Posted May 10, 2020 Legend!,.. I use nitrile gloves in the Fiberglassing i do anyway (entire different type of work 😅) i have a basket full of bits to order and i'm on the Elegoo Facebook page to do plenty of research! I have a 4-5 week wait so plenty of time to stock up on bits i would have gone for the standard one but if i wasn't happy with the results it would have been in the back of my mind that perhaps it would have been better with the pro version even if in fact that wasn't the case! Link to comment Share on other sites More sharing options...
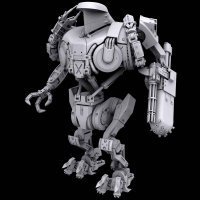
DWaz Modeler Posted May 24, 2020 Author Share Posted May 24, 2020 (edited) Let's give you People some updates since my last post i've been printing like mad,.. and it's been driving me and the Mrs mad so i bought a few upgrades for the printer a Bigtree E3 Dip board (Silent) added dampers to my stepper motors metal Extruder and uprated Bowden tube now we can get some sleep! this was a picture from about a week or so ago lots of parts printed and the Hardware had just started to show up 😃 I Started to crack on with the build and got the 1st few stages done in one go,.. because there are no written instructions your sort of left to interpret the instructions as you see them which sounds trait forward but the further into the build I have got the more i'm noticing that holes aren't where it says they are in the instructions for example there are two chest hoops that are supposed to screw into the back of Upper_03 but there are no holes,. i left mine sticking out because i didn't know better and thought they may play a part further down the line,.. no 2 holes here just the 1! so you have to get creative and get your drill out! for this part it shows that you are to attach your styrene tube to the back of the neck plate but again no holes so i drilled a hole roughly 45 Degrees and Super glued it into place! we had a little mishap here these were in tho options parts and are quite fiddly to get into place i got them into place then bloke it trying to push them into place! so rather than reprinting and probably doing the same again the part was hollow anyway i clipped down a picture nail fit it and super glued! stronger than before now! Ive had a go at printing some of the parts that it says should be sla/dlp printed only just to see if they could be done on an fdm printer here are the neck pipes which I think came out pretty well! I may try print these again on an SLA printer when it finally Arrives (Due about the 1st/2nd week of June) and the parts for the minigun I posted in my parts list that the closest I could find was a gundam Gun Barrel but wasn't the one pictured so i've be printed these in FDM may reprint in SLA it'll depend on their strength on install! to print these I slowed the print speed right down to get the detail and not risk knocking the parts hard enough to knock them over! Despite a few hiccups i'm enjoying the build! and this was him as of yesterday! Edited May 24, 2020 by DWaz Modeler 5 Link to comment Share on other sites More sharing options...
spruecutter96 Posted May 24, 2020 Share Posted May 24, 2020 (edited) This is coming along very nicely. Cain was a great character, played by Tom Noonan, IIRC. The only other films I remember seeing him in were Manhunter and The Last action Hero - he played a serial-killer in both! I remember the scene in which Cain climbs up the lift-shaft like a runaway train - very much the stuff of nightmares.... It's a shame the second Robocop was just a pale imitation of the first. Not great, considering it was made by the same director as The Empire Strikes Back (Irvin Kershner). Thanks for sharing with us. Chris. Edited May 24, 2020 by spruecutter96 Amending information. 1 Link to comment Share on other sites More sharing options...
DWaz Modeler Posted May 25, 2020 Author Share Posted May 25, 2020 you know your stuff!,.. i used to love the way cain moved and that upper body strength stature,.. if I can find my old pictures I used to draw of him i'll scan them in and put them up here for a laugh,.. I cant have been much older than 10 when I drew them, yep I remember all those films! the Star Wars ones i'd actually wear out! if someone gets the benafit from me or it inspires others to do the same then it's a pleasure to share! Link to comment Share on other sites More sharing options...
Plexi Posted May 25, 2020 Share Posted May 25, 2020 (edited) Nice work so far my friend. I understand what you are saying about having to drill a hole for the small chest plate. I have noticed that you said you had to also drill holes for the neck movement and some of your parts are hollow. What slicer are you using as a few options can fill in those holes by accident. Obviously Iove your build so far. Keep it up Edited May 25, 2020 by Plexi Link to comment Share on other sites More sharing options...
DWaz Modeler Posted May 25, 2020 Author Share Posted May 25, 2020 thank you I use Cura to slice but i've looked at the parts in 3D Maya as well but they are definitely not there!,. i have my printer set to hollow them out then i'll work out if i need to print any of the parts solid,.. i'm also anticipating breaking parts so i'll get him fully assembled then desasemble him for sanding and painting,.. i decided to do him all in black pla too i'd like to get a picture of him all soluetted before painting! Link to comment Share on other sites More sharing options...
DWaz Modeler Posted May 26, 2020 Author Share Posted May 26, 2020 (edited) So,.. Last night this happened i've collected a lot of high resolution images from the Chronicle Studios 1/6 Cain which any of you in the know used the original puppet to make molds from there's a bit about him here! Youtube VideoI from which i've notice some subtle differences,. the chast plate with the Toxic badge on his chest is actually embossed so I went about remodeling that part based off the original when this next batch print finishes it run a print and see how it fairs up! and i put the rivet detail back in! Edited May 26, 2020 by DWaz Modeler 2 Link to comment Share on other sites More sharing options...
Hunter Rose Posted May 26, 2020 Share Posted May 26, 2020 I always find the mysterious (to me!!) world of 3d printing fascinating! This is looking great 👍 1 Link to comment Share on other sites More sharing options...
DWaz Modeler Posted May 26, 2020 Author Share Posted May 26, 2020 it's great once you get over the 1st few nervous breakdowns! 😂 and i'm about to go at it all over again with a resin printer! 🤯 1 Link to comment Share on other sites More sharing options...
DWaz Modeler Posted May 26, 2020 Author Share Posted May 26, 2020 (edited) Todays deliveries brought us our Media Player and as you can see Fits like a glove! But there is a Belt clip you'll have to remove in order for it to fit into the head properly also when the Media player arrived there was no Mini USB Cable so you'll need one of those too,. I already had one! (don't mix up Micro usb with a mini USB Cable it's the Mini USB you want!) and of course I couldn't wait to try out the footage Where you can see Here! you'll have to convert your footage to .amv in order for it to work this took some research to find out! but once it did it works great (note I over layed the audio so in reality you cant hear anything unless you plug speakers or headphones in there) Edited May 26, 2020 by DWaz Modeler 2 Link to comment Share on other sites More sharing options...
The Chief Smeg Posted May 27, 2020 Share Posted May 27, 2020 £5.20 for a 1.8” video screen for models - what a find! Link to comment Share on other sites More sharing options...
DWaz Modeler Posted May 27, 2020 Author Share Posted May 27, 2020 (edited) 😎 nice find! do you have a link for anyone else looking? Edit: Arhh I see what your saying 😂 yep £5.20 for the screen and £5.00 postage (to the u.k. at least) it plays spot on too! as long as like I say you convert the footage to AMV I found if you converted your footage to .mp4 first I didn't get any issues! and this is the tutorial I followed to convert my footage to AMV Convert to AMV Youtube Tutorial Edited May 28, 2020 by DWaz Modeler Link to comment Share on other sites More sharing options...

Recommended Posts
Create an account or sign in to comment
You need to be a member in order to leave a comment
Create an account
Sign up for a new account in our community. It's easy!
Register a new accountSign in
Already have an account? Sign in here.
Sign In Now