JeroenS Posted June 1, 2020 Share Posted June 1, 2020 Nice work Paul! Great job on the underside and I like your door jambs very much as well. The give good depth to the area. 1 Link to comment Share on other sites More sharing options...
FunkyChiken Posted June 1, 2020 Share Posted June 1, 2020 Fantastic detailing! 1 Link to comment Share on other sites More sharing options...
Hamden Posted June 1, 2020 Share Posted June 1, 2020 Coming together nicely now the underside looks spot-on Stay safe Roger 1 Link to comment Share on other sites More sharing options...
Redstaff Posted June 2, 2020 Share Posted June 2, 2020 Looking good there mate, nice attention to detail as usual Every time I read an update and see what you have had to do to get this kit right, the more and more my kit gets pushed down the list of what to build next I knew the kit wasn't brilliant, but I didn't realise how much effort was required to get an accurate representation 🤔 Keep up the excellent work Ian 1 Link to comment Share on other sites More sharing options...
pau10wen Posted June 2, 2020 Author Share Posted June 2, 2020 7 hours ago, Redstaff said: Looking good there mate, nice attention to detail as usual Every time I read an update and see what you have had to do to get this kit right, the more and more my kit gets pushed down the list of what to build next I knew the kit wasn't brilliant, but I didn't realise how much effort was required to get an accurate representation 🤔 Keep up the excellent work Ian The kit has a fair few issues, it's fair to say Ian, lol. Have a play around and dry fit the suspension and wheels, see what you think? Maybe have a stiff drink at hand 😂😂😂 1 Link to comment Share on other sites More sharing options...
pau10wen Posted June 2, 2020 Author Share Posted June 2, 2020 Thanks jeroen, funky and Roger! I'm almost at the 'able to just enjoy building it' stage now 👍👍 Almost 1 Link to comment Share on other sites More sharing options...
Anteater Posted June 2, 2020 Share Posted June 2, 2020 Particularly impressed by your work on the doors, top stuff. There is a decent Escort fighting to get out, against the odds! 1 Link to comment Share on other sites More sharing options...
pau10wen Posted June 2, 2020 Author Share Posted June 2, 2020 1 hour ago, Anteater said: Particularly impressed by your work on the doors, top stuff. There is a decent Escort fighting to get out, against the odds! Thanks anteater, the battle has been uphill so far, lol Link to comment Share on other sites More sharing options...
chrisrope Posted June 3, 2020 Share Posted June 3, 2020 On 6/2/2020 at 6:29 AM, Redstaff said: I knew the kit wasn't brilliant, but I didn't realise how much effort was required to get an accurate representation That’s why I started mine pretty much immediately. If I kept reading how bad it was I’d never start it I do think replacement wheels are a must though. Having had the kit in my hands, the work going on here is epic, way above my skill set. 1 1 Link to comment Share on other sites More sharing options...
pau10wen Posted June 4, 2020 Author Share Posted June 4, 2020 On 03/06/2020 at 09:53, chrisrope said: That’s why I started mine pretty much immediately. If I kept reading how bad it was I’d never start it I do think replacement wheels are a must though. Having had the kit in my hands, the work going on here is epic, way above my skill set. Thanks Chris, very kind. It's my lockdown sanity tool, trying to worry about small pieces of plastic is a good escape for me. 👍 Link to comment Share on other sites More sharing options...
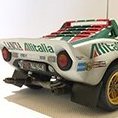
pau10wen Posted June 4, 2020 Author Share Posted June 4, 2020 Mini update, only done a bit today. Detailing the exhaust a little copying a stock photo to add the mounts on the rear section... More soon, stay safe 👍 7 Link to comment Share on other sites More sharing options...
Hamden Posted June 6, 2020 Share Posted June 6, 2020 Like your rendition of the exhaust mountings very realistic and painting will really bring them to life Stay safe Roger 1 Link to comment Share on other sites More sharing options...
pau10wen Posted June 6, 2020 Author Share Posted June 6, 2020 Thanks Hamden, I knew that hexagonal styrene strip wasn't too thick to be any use, and I'd use it one day 😂 1 Link to comment Share on other sites More sharing options...
pau10wen Posted June 9, 2020 Author Share Posted June 9, 2020 Boot details mocked up, using this photo as reference Plug leads mocked up using different sizes of plastic rod And improved details for front of engine block I'll use tape or something similar like this once it's all painted up... More to follow on the engine bay. Working out some details to build and add before painting starts. Hope everyone is well, stay safe and thanks for looking as always 👍 10 Link to comment Share on other sites More sharing options...
johnlambert Posted June 9, 2020 Share Posted June 9, 2020 Nice job, the tape is so much better than a moulded plastic cambelt. It's something I'd like to try on the next model engine I build. 1 Link to comment Share on other sites More sharing options...
pau10wen Posted June 9, 2020 Author Share Posted June 9, 2020 Thanks John. The black tape was handy to test with, but I think I'll go with something wider/thicker with the final belt. Not sure what I'll use but it'd be nice to not have to paint it 🙄😂 1 Link to comment Share on other sites More sharing options...
Hamden Posted June 10, 2020 Share Posted June 10, 2020 Great work on the boot area and engine. Are those carbs from the kit or after market? Stay safe Roger 1 Link to comment Share on other sites More sharing options...
Steve Noble Posted June 10, 2020 Share Posted June 10, 2020 Stunning detail work on this Escort, it will look fantastic once finished!! 1 Link to comment Share on other sites More sharing options...
Mr Mansfield Posted June 10, 2020 Share Posted June 10, 2020 Great work on those pulleys, now you’ve given the engine a face 😂 1 Link to comment Share on other sites More sharing options...
Alan R Posted June 10, 2020 Share Posted June 10, 2020 15 hours ago, pau10wen said: More to follow on the engine bay That is magnificent work. I have (on hold at the moment) on my work-bench the ESCI Zakspeed escort. I have modded the suspension to lower it as per a very old Scale Models Magazine article I bought at the time (How many years ago? I don't know). However, your engine bay mods I can use on my model as well, especially the headlights. I'll have to refer back to see how you did that! Your build is so very inspiring! Anyway, my questions are: What are the ignition leads and plug covers fabricated from? I didn't realise that the distributor was down the bottom like that! How did you make the crank pulley. It looks like a plastic tube of about 4mm dia. with a star shaped inner part. That looks cool. How did you make it? I want to replicate that on mine. Are the carburettors from the kit or a resin after market part? Sorry to be asking so many questions, but this might just revive my interest in getting this one re-started! I think that I might be looking for some wheels/tyres to make this look a bit better. The kit ones are a bit rubbish. Cheers, Alan. 1 Link to comment Share on other sites More sharing options...
Redstaff Posted June 10, 2020 Share Posted June 10, 2020 Looking good mate, love the pulleys, like you say though the belt needs to be a little thicker and wider, great idea though I need to get back into the saddle so to speak, haven't touched anything for a couple of weeks Ian 1 Link to comment Share on other sites More sharing options...
pau10wen Posted June 11, 2020 Author Share Posted June 11, 2020 On 10/06/2020 at 08:31, Hamden said: Great work on the boot area and engine. Are those carbs from the kit or after market? Stay safe Roger Thanks Roger, and yes they're aftermarket. They're from the scale production bda engine conversion kit I bought for the belkits mk1 escort. I've found some 1/24 scale replacements through an eBay seller in Australia to replace them so that I can use the ones I have now. I've also taken a mould of the piece, not sure how well that will come out yet though 😜 1 Link to comment Share on other sites More sharing options...
pau10wen Posted June 11, 2020 Author Share Posted June 11, 2020 (edited) On 10/06/2020 at 11:50, Alan R said: That is magnificent work. I have (on hold at the moment) on my work-bench the ESCI Zakspeed escort. I have modded the suspension to lower it as per a very old Scale Models Magazine article I bought at the time (How many years ago? I don't know). However, your engine bay mods I can use on my model as well, especially the headlights. I'll have to refer back to see how you did that! Your build is so very inspiring! Anyway, my questions are: What are the ignition leads and plug covers fabricated from? I didn't realise that the distributor was down the bottom like that! How did you make the crank pulley. It looks like a plastic tube of about 4mm dia. with a star shaped inner part. That looks cool. How did you make it? I want to replicate that on mine. Are the carburettors from the kit or a resin after market part? Sorry to be asking so many questions, but this might just revive my interest in getting this one re-started! I think that I might be looking for some wheels/tyres to make this look a bit better. The kit ones are a bit rubbish. Cheers, Alan. Thanks Alan! The headlights caused a fair amount of issues, mainly having to cut the under bonnet sides of the base and delete the detail on top, and re-create it all from scratch. Was a big job to be fair, but do-able with patience 👍 I'll try to answer in order, lol 1. Plug covers are 1mm plastic rod for the centre post through some 2mm rod/tube for the outer ring/base. The 1mm rod can then plug into a 1mm drilled hole in the engine block. The lead is just 0.5m plastic rod drilled into the 1mm rod at the join of the plug. I was going to go for an aftermarket wire lead, but quite like the plastic now. 2. I think the distributor is more towards the front right in a vertical position? The kit engine has a horizontal bump in the way at that position, so I improvised and made it up a bit 😁 3. The crank pulley is 4mm ish rod with 6 circular grooves sanded in it with some diamond grit dremel style bits I have. You can get cheap kits off ebay like this one https://www.ebay.co.uk/itm/193384322979 They're really handy for detailing, widening drilled holes anything you can imagine really. Then there's a section of plastic tube around the 4mm grooved rod and a piece of 1mm plastic rod through the middle for fitting to the block and detail on the front. 4. Yes the carburettors are from the scale production mk1 escort bda engine conversion kit. I've found a replacement from an Australian ebay seller so that I can use this one on this build. Birthday money and combined shipping have helped me buy a few items from him, lol Thanks for the questions! I really appreciate the interest, it keeps my interest in the build going too 👍 Wheels I'm still having issues deciding on. I thought I'd got it sorted, and then found some random 5 stud minilite wheels that I've converted to 4 stud. Now they look all cool, chunky and tarmac-y so I'm back to doing it 'wrong' and making a full 'too modern' tarmac car for the Roger Clark decals 🙄 I can't honestly see me building this kit again for a good while (I have 2 more in the stash I think) so I'm going to go with what makes me happiest, lol Interesting that you have an older article regarding the wheel fit and positioning for this kit, someone obviously wanted to move the wheels on it a while ago eh? Lol For wheels, I think motorbitz look fantastic. I just have so many bits and pieces lying around already that I keep playing with what I want it to look like when done. I still haven't decided and will have a look on there today i think. Thanks again matey, get building I say! All the best Edited June 11, 2020 by pau10wen 1 Link to comment Share on other sites More sharing options...
pau10wen Posted June 11, 2020 Author Share Posted June 11, 2020 19 hours ago, Redstaff said: Looking good mate, love the pulleys, like you say though the belt needs to be a little thicker and wider, great idea though I need to get back into the saddle so to speak, haven't touched anything for a couple of weeks Ian Cheers Ian, I couldn't figure a way to modify the kit pulleys and belt without breaking it, lol Sorry to hear that you're off building at the moment mate, hope all is OK and you get back to it soon? 👍 Link to comment Share on other sites More sharing options...
Redstaff Posted June 11, 2020 Share Posted June 11, 2020 4 hours ago, pau10wen said: Sorry to hear that you're off building at the moment mate, hope all is OK and you get back to it soon? 👍 Hi mate All's ok thanks, it's just being back at work I need weekends to catch up with other stuff as well as modelling Will be ok when I get used to having a normal routine again 1 Link to comment Share on other sites More sharing options...

Recommended Posts
Create an account or sign in to comment
You need to be a member in order to leave a comment
Create an account
Sign up for a new account in our community. It's easy!
Register a new accountSign in
Already have an account? Sign in here.
Sign In Now