Fastcat Posted May 6, 2020 Share Posted May 6, 2020 (edited) Hi sj, Great progress! Looking really good. I looked at some of my references yesterday and found the Harry Robinson plans. These attempt to detail the colour changes by the year and one of the photos of the cream version clearly shows the race number (3) under the starboard wing. Other numbers (15, 2 and 5) are said to be black. If you can get hold of these plans, they're quite useful. But if you keep on going at the current rate, you'll surely have finished by then! In fact, if you google Chester Jeep plans, you should find F. W. Kerke's plans which do pretty much the same thing at first glance. Good luck. Dave Edited May 6, 2020 by Fastcat Added a bit more. Link to comment Share on other sites More sharing options...
sjsald Posted May 6, 2020 Author Share Posted May 6, 2020 (edited) Hi Dave, thank you for the detailed response! I found the Kerke plans online and they are quite helpful! Though the ones I found show the 1935, and 1936 configurations but reference the 1934 version. It appears, if I understand it correctly, that in 1934 it was white flying surfaces, green fuselage with white nose bowl and white stripe under the wing with the racing number 15 in black. This corresponds well to the Brengun plans if we substitute cream for where yellow is called out. Also, another interesting aside, the Brengun plans show the small air intakes on the left side behind the engine but they are not actually on the model. I may try to add them Edited May 6, 2020 by sjsald Link to comment Share on other sites More sharing options...
Fastcat Posted May 6, 2020 Share Posted May 6, 2020 Hi sj, In general yes, Kerke calls out a light cream for the colour. For 1934 see here:Link And here at the Chicago Airshow:Link Link At the Thompson Trophy Note the Shell logo at Chicago and the aperture in the panel behind the pilot. Dave 1 Link to comment Share on other sites More sharing options...
sjsald Posted May 7, 2020 Author Share Posted May 7, 2020 Made some progress tonight on attaching the wings and airbrushing the cream color. I also spent quite a bit of time filing in really small imperfections that showed up after the primer coat. Next up is some masking to prepare for the green color! After I paint the green for the nose bowl and engine cowling I'll begin the process of removing the access panel to showcase the engine. I find the shape of the wings extremely cool btw. 4 Link to comment Share on other sites More sharing options...
sjsald Posted May 8, 2020 Author Share Posted May 8, 2020 Unfortunately my progress is a bit stalled since the green paint I ordered for the model has been delayed due to the situation. I'll try and mask the various surfaces but I don't anticipate a lot of progress this weekend Hope everyone is staying safe! Link to comment Share on other sites More sharing options...
sjsald Posted May 9, 2020 Author Share Posted May 9, 2020 Made a little progress tonight on masking the wings and elevators. I gave up on trying to mask the stripe on the side of the plane and instead will mask the opposite image once I paint it green. Still waiting on my paint 3 Link to comment Share on other sites More sharing options...
sjsald Posted May 12, 2020 Author Share Posted May 12, 2020 So the delivery man did not disappoint today! Both the paint and my copy of The Art Chester Story arrived today. I'll add some feedback on the book once I read it. Before reading the book I wanted to jump right in and spray some paint! Next up is probably another light coat to ensure it is properly even. 5 Link to comment Share on other sites More sharing options...
sjsald Posted May 12, 2020 Author Share Posted May 12, 2020 Thanks for the likes everyone! Quick book report, it was an awesome read and absolute must have reference material for this model. It details out all of the various changes over the years with both the mechanics as well as paint scheme. Furthermore, it is a must read for anyone with an interest in the genre as it details out quite a few races with other famous planes. At ~$10 on Amazon it is also a great deal Link to comment Share on other sites More sharing options...
sjsald Posted May 15, 2020 Author Share Posted May 15, 2020 Made a little progress tonight on the Jeep. I masked and painted the stripe along the side of the fuselage. Getting this masking right actually took way longer than I would have expected. Next up is cutting open the engine cowling to display the engine! 3 Link to comment Share on other sites More sharing options...
sjsald Posted May 16, 2020 Author Share Posted May 16, 2020 I guess before opening up the engine cowling I removed the masking tape to see anywhere it could have bled through. Luckily there were only a few spots by the engine cowling and it wasn't too hard to fix. Next I masked the windshield and painted it. Are there any tips for masking windshields because I found it to be a bit difficult. Although not shown, I also painted the wheel pants and wing spars. Now next up will be cutting the engine cowling open, mounting the canopy, and mounding the landing gear 3 Link to comment Share on other sites More sharing options...
fjaweijfopi4j48 Posted May 16, 2020 Share Posted May 16, 2020 1 hour ago, sjsald said: Are there any tips for masking windshields because I found it to be a bit difficult. You can combine "outlines" of tape strips filling the center with Maskol or similar liquid masks. Occasionally I have been able to use a generic masking resource that has diverse geometric shapes: https://www.scalemates.com/kits/maketar-mms014k-canopy-survival-kit--1103593 but not really much. It comes down to good ole practice. When I see an aftermarket set for the model I am building, I go for it, no second thoughts. It saves me a lot of time that I can then use elsewhere, to fight Martians, for example. I also have a set of Tamiya masking paper "strips" that come in 1 and 2 mm width. Proved useful many a time. Hope this helps. When in doubt, turn around and buy yet another kit 1 Link to comment Share on other sites More sharing options...
sjsald Posted May 16, 2020 Author Share Posted May 16, 2020 11 hours ago, Moa said: You can combine "outlines" of tape strips filling the center with Maskol or similar liquid masks. Occasionally I have been able to use a generic masking resource that has diverse geometric shapes: https://www.scalemates.com/kits/maketar-mms014k-canopy-survival-kit--1103593 but not really much. It comes down to good ole practice. When I see an aftermarket set for the model I am building, I go for it, no second thoughts. It saves me a lot of time that I can then use elsewhere, to fight Martians, for example. I also have a set of Tamiya masking paper "strips" that come in 1 and 2 mm width. Proved useful many a time. Hope this helps. When in doubt, turn around and buy yet another kit Thank you @Moa this is super helpful! 1 Link to comment Share on other sites More sharing options...
Bengalensis Posted May 16, 2020 Share Posted May 16, 2020 It's turning into a lovely little racer. Keep up the good work. 👍 1 Link to comment Share on other sites More sharing options...
sjsald Posted May 16, 2020 Author Share Posted May 16, 2020 9 minutes ago, Bengalensis said: It's turning into a lovely little racer. Keep up the good work. 👍 Thank you! Link to comment Share on other sites More sharing options...
sjsald Posted May 17, 2020 Author Share Posted May 17, 2020 Made some progress today on The Jeep. I installed the windscreen. This is my first such installation so I am reasonably happy with the result. Next I glued the wheel pants to the landing gear. After this I applied a clear coat and placed the decals. Due to my lack of skill the decals did not look particularly good so I painted over them. Next I glued the landing gear and wing struts to the main fuselage. I also cut apart the engine cowling to show the engine better. From my reference images in the previously mentioned book it appears that the engine cowling pieces were removed and not hinged. I plan to show the removed piece sitting next to the aircraft. Next I installed the exhaust pipes and now with the (nearly) fully assembled aircraft I applied a clear coat. Not shown, but I painted and clear coated the prop separately. Next up is installing the prop and placing the various decals! It is difficult to see with the lighting but the engine actually looks fairly great. 5 Link to comment Share on other sites More sharing options...
dnl42 Posted May 17, 2020 Share Posted May 17, 2020 That's looking fabulous! I use that canopy survival kit among other methods. It works well for me with Microscale Industries Micro Mask. Last time I used it was the P-51 "Bad Angel". 1 Link to comment Share on other sites More sharing options...
sjsald Posted May 17, 2020 Author Share Posted May 17, 2020 11 hours ago, dnl42 said: That's looking fabulous! I use that canopy survival kit among other methods. It works well for me with Microscale Industries Micro Mask. Last time I used it was the P-51 "Bad Angel". Thank you! And thank you for the tips - I'll check them out. Link to comment Share on other sites More sharing options...
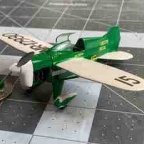
sjsald Posted May 17, 2020 Author Share Posted May 17, 2020 (edited) Finished off the Jeep today! I'll post a ready for inspection thread with more photos Overall I am super happy with the result! Especially for my first resin kit and one of my first aircraft kits in general. Special thanks again to @dnl42 for recommending the kit! Ready for inspection here: Edited May 17, 2020 by sjsald 6 Link to comment Share on other sites More sharing options...
dnl42 Posted May 17, 2020 Share Posted May 17, 2020 Outstanding!!! That's a fine build and a great looking subject! And that quarter really drives home the diminutive size of this in 1/48 scale! 1 Link to comment Share on other sites More sharing options...
sjsald Posted May 17, 2020 Author Share Posted May 17, 2020 3 minutes ago, dnl42 said: Outstanding!!! That's a fine build and a great looking subject! And that quarter really drives home the diminutive size of this in 1/48 scale! Thank you! I am looking forward to building more! Link to comment Share on other sites More sharing options...
billn53 Posted May 17, 2020 Share Posted May 17, 2020 Well done! 1 Link to comment Share on other sites More sharing options...
sjsald Posted May 18, 2020 Author Share Posted May 18, 2020 1 hour ago, billn53 said: Well done! Thank you! Link to comment Share on other sites More sharing options...
greggles.w Posted August 29, 2020 Share Posted August 29, 2020 Inspirational, beautiful result - ordered mine just now, using the old ‘combined shipping’ excuse! Link to comment Share on other sites More sharing options...

Recommended Posts
Create an account or sign in to comment
You need to be a member in order to leave a comment
Create an account
Sign up for a new account in our community. It's easy!
Register a new accountSign in
Already have an account? Sign in here.
Sign In Now