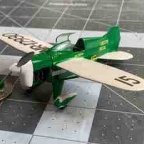
sjsald Posted May 3, 2020 Share Posted May 3, 2020 (edited) Hey Everyone, I am starting my first resin model kit build of the Chester Jeep - a golden age racing plane. This resin kit is made by Brengun in 1/48th scale. I chose this kit because of the very interesting subject matter (golden age aircraft are of tremendous interest for me) and because of a recommendation by @dnl42 in another thread that it would be a good first time resin kit. The kit comes in a nice (although very small) cardboard box with a printed label. The kit comes packaged in a nice zip-lock bag with a fairly detailed instruction sheet and decal sheet. It includes a reasonably accurate engine (I believe a Menasco C4-S, though I don't know how accurate it is since it doesn't appear to include the super charger) as well as interior detailing. I may elect to construct the model with the engine bay open to better see the engine (if it turns out ok). Anyways, would love to hear any tips or tricks people recommend as I progress though the build! Edited May 17, 2020 by sjsald 10 Link to comment Share on other sites More sharing options...
sjsald Posted May 3, 2020 Author Share Posted May 3, 2020 Also, I believe this is the first build log of this particular kit. If someone knows of a build log please let me know! 1 Link to comment Share on other sites More sharing options...
fjaweijfopi4j48 Posted May 4, 2020 Share Posted May 4, 2020 All the best for this fascinating endeavor. Looking forward to the build. 1 Link to comment Share on other sites More sharing options...
stringbag Posted May 4, 2020 Share Posted May 4, 2020 That's a great looking aeroplane and one of my favourites from that era so I'm looking forward to your build. 1 Link to comment Share on other sites More sharing options...
dnl42 Posted May 4, 2020 Share Posted May 4, 2020 Looking forward to this! Dang! You beat me to it! 1 Link to comment Share on other sites More sharing options...
sjsald Posted May 4, 2020 Author Share Posted May 4, 2020 @Moa thank you! It will be a very long while till my results are as good as yours though! @stringbag thank you! I personally find the Menasco (and other inverted inline engine powered) planes quite fascinating. It’s a look that has really fallen out of style. @dnl42 thank you! It showed up in the mail last night and I couldn’t help but get started on it 1 Link to comment Share on other sites More sharing options...
sjsald Posted May 4, 2020 Author Share Posted May 4, 2020 (edited) Opened up the packaging and got started in earnest on the kit this afternoon. Also, for anyone interested, the airplane has a fairly awesome history that is detailed out here: https://en.wikipedia.org/wiki/Chester_Jeep. A gentlemen out of IL made a full scale flying replica of it a few years ago as well: I'll actually be painting this model to show it's earlier markings in Yellow and Green though. First thing I did was wash all the parts in soapy water since you could clearly feel the mold release agent on the parts. After washing I set them all out on a paper towel to dry. They all come on fairly substantial mounts which makes it easier to avoid losing anything. Next I noticed that the main body section needed a small repair near the tail. Nothing a little putty and sandpaper can't fix though! Next I worked slowly and removed the bases from each set of parts with a razor saw and using sandpaper and a rotary tool to clean them up. The engine and seat have substantial detail in them! The molded in seatbelts are quite nice. Also, of note, the instructions mention painting the engine block grey as well as the cylinders. I believe, though please someone correct me if I am wrong, that Menasco engines usually were painted with the block and accessories painted blue and the cylinders painted black. Edited May 4, 2020 by sjsald Typo 7 Link to comment Share on other sites More sharing options...
sjsald Posted May 4, 2020 Author Share Posted May 4, 2020 Made some more progress this evening. Sanded the tail repair and it turned out ok. Probably going to have to take another pass with some putty and sanding. I also primed and airbrushed the interior grey, painted the seat, stick, and throttle/trim assembly. It is difficult to see, but the nobs on the ends of the throttle/trim assembly are painted red and look pretty cool! Next up I primed and painted the engine. I went with the black/blue scheme that was previously mentioned. Given that the engine actually doesn't look half bad I am going to try and have it on display. 6 Link to comment Share on other sites More sharing options...
dnl42 Posted May 4, 2020 Share Posted May 4, 2020 Nice recovery on the fin! That is one small aircraft in 1/48 scale. Link to comment Share on other sites More sharing options...
greggles.w Posted May 4, 2020 Share Posted May 4, 2020 Following with interest. This is one on my list which I have come just so close to buying several times myself. Thanks for the parts preview .. I suspect this thread is going to cause me to finally commit & make that purchase! Link to comment Share on other sites More sharing options...
sjsald Posted May 4, 2020 Author Share Posted May 4, 2020 9 hours ago, dnl42 said: Nice recovery on the fin! That is one small aircraft in 1/48 scale. Thank you @dnl42! And I know right - the real one (according to Wikipedia) was only 15 ft long. I think it will be good preparation for the 1/72nd scale work I am looking to do next. 3 hours ago, greggles.w said: Following with interest. This is one on my list which I have come just so close to buying several times myself. Thanks for the parts preview .. I suspect this thread is going to cause me to finally commit & make that purchase! @greggles.w although I am only a day into the build it has been a blast. Would highly recommend Link to comment Share on other sites More sharing options...
fjaweijfopi4j48 Posted May 4, 2020 Share Posted May 4, 2020 Good start! 1 Link to comment Share on other sites More sharing options...
sammy da fish Posted May 4, 2020 Share Posted May 4, 2020 Very nice start on this model into have one to build just thinking that to aid painting, leave the wings off until the fuselage is finished then add the wings. Good luck and I’ll be watching with great interest. keep safe Simon Link to comment Share on other sites More sharing options...
sjsald Posted May 4, 2020 Author Share Posted May 4, 2020 @Moa thank you! 2 minutes ago, sammy da fish said: Very nice start on this model into have one to build just thinking that to aid painting, leave the wings off until the fuselage is finished then add the wings. Good luck and I’ll be watching with great interest. keep safe Simon Thank you @sammy da fish This is a great suggestion! Link to comment Share on other sites More sharing options...
Roger Holden Posted May 4, 2020 Share Posted May 4, 2020 'I'll actually be painting this model to show it's earlier markings in Yellow and Green though.' Except that it wasn't 'yellow and green' , it was cream and green, as even the Wiki page states. Rather shocking research considering that all the plans made of the plane give the correct colours. Makes you wonder what they used. All Chester's planes, back to 1924, were painted in those 'trademark' colours. Green was also darker than shown on their model picture/decal sheet. There are other mistakes on the decal sheet, which seems to cater for the 1935 and'36 versions. The small lettering was also cream, like the wings and trim. The fuselage racing number was metallic gold, with black outline on both versions. Link to comment Share on other sites More sharing options...
sjsald Posted May 5, 2020 Author Share Posted May 5, 2020 2 hours ago, Roger Holden said: 'I'll actually be painting this model to show it's earlier markings in Yellow and Green though.' Except that it wasn't 'yellow and green' , it was cream and green, as even the Wiki page states. Rather shocking research considering that all the plans made of the plane give the correct colours. Makes you wonder what they used. All Chester's planes, back to 1924, were painted in those 'trademark' colours. Green was also darker than shown on their model picture/decal sheet. There are other mistakes on the decal sheet, which seems to cater for the 1935 and'36 versions. The small lettering was also cream, like the wings and trim. The fuselage racing number was metallic gold, with black outline on both versions. @Roger Holden thank you for this correction! I am not sure where I saw that other paint scheme written (clearly my research ability can improve!) Link to comment Share on other sites More sharing options...
Bengalensis Posted May 5, 2020 Share Posted May 5, 2020 Lovely choice of subject. You're making good progress, will be nice to follow. 1 Link to comment Share on other sites More sharing options...
sjsald Posted May 5, 2020 Author Share Posted May 5, 2020 @Bengalensis thank you! It’s been a fun build so far! Link to comment Share on other sites More sharing options...
Malc2 Posted May 5, 2020 Share Posted May 5, 2020 Nice, one of my favourite aircraft. Made my own rubber power flying model from the Aeromodeller 3 views. There is a good book about Art Chesters racing planes called 'The Art Chester Story' by Caler and Underwood, comes up on the bay quite often. Malc. Link to comment Share on other sites More sharing options...
Fastcat Posted May 5, 2020 Share Posted May 5, 2020 Hi sj, It's a nice little model and so tiny. A mistake, I think is that most of the period photos show two large outlets at the rear of the lower engine cowl and only on the left side. Both the green and cream versions show this. I think Brengun based their model on the replica which has louvres here. Another area to watch is that there are no wing or stabilizer locations. The wings can be located with a hole and a bit of wire but the horizontal stabilizers are really thin which makes them a bit tricky. From memory, I think it's also missing the racing number from under the starboard wing or maybe they gave it in solid black when it should be the same as the rest ie gold with black outline. Too much reliance on what's on view at the moment I think and not enough checking of original photos of which there are plenty of large pictures. Good luck with your build. Dave 1 Link to comment Share on other sites More sharing options...
sjsald Posted May 5, 2020 Author Share Posted May 5, 2020 7 hours ago, Malc2 said: Nice, one of my favourite aircraft. Made my own rubber power flying model from the Aeromodeller 3 views. There is a good book about Art Chesters racing planes called 'The Art Chester Story' by Caler and Underwood, comes up on the bay quite often. @Malc2 thank you! I'll search Ebay to see if I can track it down. 1 hour ago, Fastcat said: Hi sj, It's a nice little model and so tiny. A mistake, I think is that most of the period photos show two large outlets at the rear of the lower engine cowl and only on the left side. Both the green and cream versions show this. I think Brengun based their model on the replica which has louvres here. Another area to watch is that there are no wing or stabilizer locations. The wings can be located with a hole and a bit of wire but the horizontal stabilizers are really thin which makes them a bit tricky. From memory, I think it's also missing the racing number from under the starboard wing or maybe they gave it in solid black when it should be the same as the rest ie gold with black outline. Too much reliance on what's on view at the moment I think and not enough checking of original photos of which there are plenty of large pictures. Good luck with your build. @Fastcat this is great advice! I'll search for photos of the original plane to ensure my kit has a semblance of accuracy Link to comment Share on other sites More sharing options...
sjsald Posted May 5, 2020 Author Share Posted May 5, 2020 (edited) Hey Everyone, perhaps an aviation historian can fill me in on the coloring of this plane. I have seen some pictures of both a mostly green with cream accents version as well as how it sits now in the museum with mostly white with green accents. Also, Wikipedia states that it started out Green and Cream but didn't cite a source. Green with white: White with green: Does anyone have any recommended reading detailing out these changes? Stay safe everyone! Edited May 5, 2020 by sjsald 1 Link to comment Share on other sites More sharing options...
Fastcat Posted May 5, 2020 Share Posted May 5, 2020 Hi sj, Personally I'd ignore the museum example if you want to do a period scheme. I'm pretty certain that the original colour was green with cream flying surfaces and stripes. The next scheme was again overall cream with green details. I think the race numbers were always gold with black outlines and the registration was black under the wings. See here:Link and here: Link Also here: Link Link Googling Art Chester's Jeep will give you lots of images. If you look closely you'll see variations of the nose intakes, spinner and trim lines around the wheel pants. There's also detail differences in the sponsor arrangements. Incidentally, you can see the the two outlets I mentioned previously just below the leading edge of the port wing on both the cream and green versions. The best way could be to choose the best match for the kit decals and then go with that unless you can make decals yourself. OR a second decal sheet from Brengun would provide the nearer match for the underwing race number and a bit of leeway if you go adrift with decal placement. Dave Link to comment Share on other sites More sharing options...
sjsald Posted May 5, 2020 Author Share Posted May 5, 2020 @Fastcat thank you! This is super helpful 1 Link to comment Share on other sites More sharing options...
sjsald Posted May 6, 2020 Author Share Posted May 6, 2020 Made some progress this evening on the Jeep. Specifically, I installed the instrument gauges and then glued in the top of the cockpit. I need to work on my photography skills because IMO it looks a bit better in real life. Also, not shown, but I painted the inside of the upper part of the fuselage since it appeared a little translucent which I wanted to avoid. Next I did a quite a bit more sanding on the rudder to continue the repair job. It actually looks quite good. Since the repair spanned the seam between the fin and rudder I used a razor saw to re-mark the seam (once again difficult to see in the photo. I think the white putty doesn't help. Perhaps a panel line wash once it is painted?). Next I installed the horizontal stabilizers and elevators. These took a little work to get straight and even since there aren't any mounting tabs. Even though the wings have small holes drilled I suspect they will be more difficult. I then primed the entire fuselage, wings, and engine cowling. I am going to dry fit the cowling to the fuselage for painting and then cut out the engine access hatch so that the paining masks all match up. Really having a blast with this model and learning a ton! (Both on technical skills and researching) 5 Link to comment Share on other sites More sharing options...

Recommended Posts
Create an account or sign in to comment
You need to be a member in order to leave a comment
Create an account
Sign up for a new account in our community. It's easy!
Register a new accountSign in
Already have an account? Sign in here.
Sign In Now