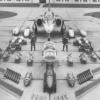
Allatsea Posted March 30, 2020 Share Posted March 30, 2020 (edited) Afternoon All, Purchased off Ebay before Christmas, had been watching the price go up all week and couldn't bring myself to put a bid in... until coming home from a very boozy lunch. Anyway one thing lead to another and before I knew it I'd won. I wont divulge the price, but sure you can all guess it wasn't cheap. A few days later it turned up on the door step, unfortunately it was my fiancee who answered. (Normally I sneak any purchases up to the loft asap, although god knows why, im 32 and its my own money 🙄 ). After the initial argument over buying another "plane" she said it would be my Christmas present, saves her having to find me something, although i wouldn't be getting anything else. The other thing was I wasn't to build it until we had moved house and I had a proper work space and the right tools. I think the words she used where "all your other ones look unfinished, I'm not wasting £**.** for this one to turn out the same." Anyway I took this as a win, money back in my account and a Bucc with lots of goodies included for Christmas. Fast forward to March, looking forward to moving into the new house and we all get put on lock down, not sure when we'll be moving now, but this weekend I was "allowed" to start. Airfix Buccaneer SDC 1/48 Airwaves - PE Airbrake Set Airwaves - PE Cockpit Set Airwaves - PE Wing Fold Set Paragon - Resin Flaps Pavla - Resin Ejector Seats Montex - Canopy Masks Airoclub - Canopy (not sure if I'll use it, as the Airfix Canopy doesn't look to bad) Obligatory warped fuselage shot. Although not as bad as some. I have a second bucc, that is even worse. Started off by cutting out the flaps to be replaced with the Paragon set. First, scored along the panel lines, on my second pass the scalpel blade went straight through the plastic, although Plasticine would be a better term for it i think. I was able to just run the scalpel along the panel lines and it came away. A couple of minutes later the flaps on both the upper and lower halves of the fuselage had been removed. Next on to the PE cockpit. The original owner had already made a start on the cockpit, and had glued it into the upper fuselage. Had to remove that and take apart the instrument panels, before adding the PE. The final result looks ok, need to tidy up some of the tabs along the edge and will be better than just putting the decals over the plastic, although can't decide on weather to get the neomega cockpit. I'll see once I've painted it all up, and busied the cockpit with some wire. Below are some of the larger assemblies, wings, slipper tanks, tail section and a part of the air brake. More tidying up to do along the leading edges and where the wing tips meet the wing. There are large gaps in the slipper tank that need filling. I cut away the rudder to pose it, the plastic here was much harder than the plastic on the fuselage. This seems to be a running theme as the bomb bay is a different plastic again, being much harder and tinny in sound when you drop it. Dry fitted the tail to the top part of the fuselage, which is a terrible fit. Thats pretty much all the main sub assemblies done. The air breaks had the main bit of PE attached to them, but there's still a lot more to go and will put some pictures up if i manage to finish them next weekend. Bombs and rockets are done, but doubt ill use them. I'm tempted to get the flightpath martel missiles, I see they are still open atm. Intakes, aren't so bad, one is almost seamless the other has a large gap, that will need filled. Will attempt to get some paint down next weekend, which is where things will go really wrong. Sometimes I'm quiet tempted to spray in grey primer and just leave it as that, looks so neat and tidy, before i destroy it with "proper paint". So far I've enjoyed it, I know I'm not at the join the fuselage stage yet, but I've got plenty of time with this lock down and no need to rush it. First built one when I was 9 or 10 I think in an arctic camo scheme (because why not) with a combination of Navy and South African decals 🤔. Been wanting to get one for a while, and have a phantom waiting for decals so hopefully the two should look good together once I'm done. Edited June 8, 2020 by Allatsea 15 2 Link to comment Share on other sites More sharing options...
Graham T Posted March 30, 2020 Share Posted March 30, 2020 Great kit, worth taking your time with. I finished a Bucc a few months ago, adding elements from various AM sources (the Neomega cockpit is really, really nice & worth tracking down). Very pleased with it & it was sitting proudly on the shelf..........until Saturday when Mrs T accidentally caught it & sent it flying. I managed to reattach most of the parts & really thought I'd got away with it, until I noticed that the seam behind the port intake had "popped" which is very hard (impossible) to fix without glue ruining the paint job. Ah well, hardly noticeable 😭 1 Link to comment Share on other sites More sharing options...
Back in the Saddle Posted March 30, 2020 Share Posted March 30, 2020 Definitely pulling up a seat to watch this one - looks like a great set of AM goodies! That’s quite an impressive warp too! 😂 Link to comment Share on other sites More sharing options...
Lord Riot Posted March 30, 2020 Share Posted March 30, 2020 Christ mate, that sounds harsh, you'd be better selling your mrs on ebay and buying some more Buccaneers! 😂 1 4 Link to comment Share on other sites More sharing options...
FalkeEins Posted March 30, 2020 Share Posted March 30, 2020 1 hour ago, Allatsea said: Purchased off Ebay before Christmas, had been watching the price go up all week and couldn't bring myself to put a bid in... until coming home from a very boozy lunch. Anyway one thing lead to another and before I knew it I'd won. I wont divulge the price, but sure you can all guess it wasn't cheap. ...I'm sure I was bidding on that one too. But then - and I'm telling this story again as these sorts of things don't happen to me - I just happened to wander into my local antiques/curios/odds n' sods shop ..and there was one sitting there on the shelf! Watching with interest - I have no AM stuff though! 1 Link to comment Share on other sites More sharing options...
Phone Phixer Posted March 31, 2020 Share Posted March 31, 2020 If you are planning to build it as an S2D with Martels, you need the longer "universal pylons" for the wings. Those are the one's you have attached to the Matra rocket pods. The shorter stubby pylons, to the left of the airbrakes in your photo of all the "bits", are for S2C pre Martel aircraft. I'll second Graham T's comment about the Neomega cockpit, tis a thing of beauty!! Link to comment Share on other sites More sharing options...
moaning dolphin Posted March 31, 2020 Share Posted March 31, 2020 Great stuff, I do love the Buccaneer, but like all my favourite aircraft I find it hard to build them, mine has sat in the bottom of my stash closet for must be nearly 20 years! Definitely worth going with the Neomega cockpit, it is an absolute work of art. The only thing was I also used a had a flightpath detail set which meant a lot of brass wasn't used! Looking forward to seeing this build develop, I trust you are going to finish her as intended and not in that god awful green/grey 😆 Bob 1 Link to comment Share on other sites More sharing options...
Allatsea Posted April 3, 2020 Author Share Posted April 3, 2020 On 3/30/2020 at 5:01 PM, Lord Riot said: Christ mate, that sounds harsh, you'd be better selling your mrs on ebay and buying some more Buccaneers! 😂 To be honest shes not wrong (hopefully she didnt hear me say that) ,I've got 5 on the chest of draws of doom. 2 Tornados, Phantom, Harrier Frs1 and a Typhoon all in various stages of paint and repair after the cats walked across the shelf and knocked them off whilst i was away with work. On 3/31/2020 at 3:56 AM, moaning dolphin said: Great stuff, I do love the Buccaneer, but like all my favourite aircraft I find it hard to build them, mine has sat in the bottom of my stash closet for must be nearly 20 years! Definitely worth going with the Neomega cockpit, it is an absolute work of art. The only thing was I also used a had a flightpath detail set which meant a lot of brass wasn't used! Looking forward to seeing this build develop, I trust you are going to finish her as intended and not in that god awful green/grey 😆 Bob Went for it and ordered the Neomega Cockpit, got the email this morning to say its been dispatched. haha, no this one will be in the proper colours to go along with the phantom. 2 Link to comment Share on other sites More sharing options...
crobinsonh Posted April 3, 2020 Share Posted April 3, 2020 Nice work. Got to love the Bucc Link to comment Share on other sites More sharing options...
Riksbar Posted April 3, 2020 Share Posted April 3, 2020 Watching this with interest. I’ve got four of these in the loft in various states of warpage. I was half expecting to build one on furlough but I’m kept on working from home. Link to comment Share on other sites More sharing options...
Troy Smith Posted April 3, 2020 Share Posted April 3, 2020 On 30/03/2020 at 15:59, Allatsea said: Obligatory warped fuselage shot. Although not as bad as some. I have a second bucc, that is even worse. There was a thread on building the Bucc, by an ex member. Looks like this has gone, probably as the pictures went, but IIRC the general way to deal with the long fuselage parts was to start at the front, and then carefully glue in several stages, letting the glue set between each stage, making a stable structure as you go along, this allows the warpage to be gradually removed. You could test this by using gaffa tape in small strips, it got a lot more oomph that masking tape and gives less, so good for jobs like this. I also use tiny drops of superglue to tack parts into place, and if happy with alignment, then wick in Tamiya Extra Thin to make a full bond. Since SG does not melt plastic, if not happy, pop the join and re align, the SG dots can be scraped off. PS https://www.airfix.com/us-en/forum/post/view/topic_id/9185/?p=1 Quote I've made about four down the years. The biggest problem with the is the way the fuselage halves flex, more so if the mouldings have been popped out too fast. The best fix is to glue and tape each section are you go. Once that's out of the way, the rest of the kit is straightforward. Posted at 23:06:29 Tue, 5 May 2015 https://jonbryon.com/buccaneer-html/ Quote This is a much-maligned kit. It did have warped fuselage halves, but with patience, and plently of clamping and tape, HTH 1 Link to comment Share on other sites More sharing options...
DAG058 Posted April 3, 2020 Share Posted April 3, 2020 Nice work so far. Link to comment Share on other sites More sharing options...
hairystick Posted April 3, 2020 Share Posted April 3, 2020 Good luck with this build! I did this kit a year back (link in my Sig.) and it put up a good fight. As Troy Smith says, joining the fuselage halves requires joining only an inch at a time. I started from the nose and worked down one side to the wing, then back down the other side of the nose. Same process at the rear. Don't be tempted to try and join it all at once! I also left off the engine intakes until a lot of the other fuselage work was done. This was mainly because I joined the tailpipe exhaust fairings (without the jetpipes inside them) onto the fuselage - as this made filling and fairing easier. I then slid the tailpipes in through the holes where the intakes were, using a long stick with blutac on the end, to hold the tailpipe. It can build up into a nice finished model. Link to comment Share on other sites More sharing options...
F-32 Posted April 3, 2020 Share Posted April 3, 2020 I had a wife like that once, she said it was 'her or the boxes of plastic', it wasn't worth the continued hassle so I just divorced her. Nice start on the Bucc, I've got one in the stash so looking forward to seeing how yours turns out. 3 Link to comment Share on other sites More sharing options...
Allatsea Posted April 6, 2020 Author Share Posted April 6, 2020 Not much progress over the weekend. Added a bit of detail to the wheel wells using lead wire and left over PE frets, and primed them. Not the most accurate but livens them up a little bit, once the build is finished no will ever see. 9 Link to comment Share on other sites More sharing options...
Dstream Posted April 6, 2020 Share Posted April 6, 2020 Perhaps not the most accurate, but very effective. Looking forward to see more. Regards, D. Link to comment Share on other sites More sharing options...
Allatsea Posted April 14, 2020 Author Share Posted April 14, 2020 Hope everyone had a good Easter Weekend, Slow progress with this at the moment, managed to paint up the cockpit and the Paval Seats, last week during the evenings. Used Tamyia acrylics and some old Humbrol Enamel for the red. Had Tamiyas 1/48 Frs1 sat waiting for decals and some final touch ups for a good few months now. So decided to try and get that completed and clear some space in between waiting for the paint to dry in the buccaneer cockpit. Still needs some paint details, decent seat added and the roundels sorted on the intakes, but personally think she looks alright... although photo isn't the best. And... this just arrived about 10mins ago. 4 Link to comment Share on other sites More sharing options...
Lewis95 Posted April 14, 2020 Share Posted April 14, 2020 Bucc looks good so far bud! Link to comment Share on other sites More sharing options...
Allatsea Posted April 22, 2020 Author Share Posted April 22, 2020 Morning Everyone, After painting up the kit cockpit with the added airwaves photo etch, decided to go ahead and get the neomega resin one as well. Adding the instrument combing from neomega at the front wasn't as easy as i though. Shaving little bits off the kit at a time, test fitting, taking a bit more off, until obviously went too far and took too much off leaving a gap at the front. Anyway turning the upper fuselage upside down and balancing the combing, used a couple dabs of super glue to hold it in place. Then went around the edge using some home made sprue glue to fill in the gaps and get a more secure hold. Next onto the cockpit, panels and seats. Resin flash around the panels was easy enough to remove with a scalpel blade and a quick sand. Not shown in the photo below but a coat of tamiya medium sea grey was used to prime everything, humbrol red enamel for the hoses and extinguishers. The pull handles on the ejector seats will be taken from the kit, they slot in quite nicely to the head box. Originally I had purchased the Buc on the right of the picture below, but it turned up with no clear parts, decals where stuck to the instructions (although did manage to salvage some) the fuselage forward of the intakes had been snapped and was hanging on by a minimal plastic, and not only was the fuselage warped, the air brake pieces where/are completely out of shape too. This had put me off ever building it. The left hand side one came up on Ebay (the kit that started this thread) and came with a areclub canopy. Didn't want to waste the airwaves cockpit, so decided to use that and the spare canopy on the "broken buc" . Going to try and do this one in RAF service the grey/grey camo, and try to scratch build the bomb bay open to avoid the lack of the bulge. Cockpit already glued in, and some wiring placed around the combing at the front. Back to the original Buc, Neomega cockpit installed, pretty much click fitted into place. Sorry the photos seems to be a bit blurry. Once the cockpit was in, was on to the main event. Joining the fuselage halves. Following from Troys advice, I started at the front working my way around, from front to back and back up the other side. Second picture below of the fuselage joining, circled in red, I had to take a slither of plastic of the bottom half where there is a kink. With out doing this there was no way i was getting the halves to meet. Only places I used super glue was at the back end, where the air brake will slot in, couldn't get any alignment, by just using extra thin. Couple of blobs of loctite on the inside to hold it straight away and then some extra thin around the outside edges did the job. Tacked the undercarriage on to stand her up to make sure everything was aligned and the wings where in the correct position. Should have taken a front on picture to show everything was fine. All in all not as bad as I was expecting it to be. 12 Link to comment Share on other sites More sharing options...
Col. Posted April 23, 2020 Share Posted April 23, 2020 Nice work in the 'pit and well done getting the fuselage together without any major gaps or steps. Link to comment Share on other sites More sharing options...
Allatsea Posted April 28, 2020 Author Share Posted April 28, 2020 Masking tape off and some filling and sanding. Filled the gap in the fuselage created when removing the flaps. Seams between the two fuselage halves wasn't to bad, but my modelling skills ran out with the amount of filling and sanding the intakes and exhausts need. Ill give it a few more passes with the sander to try and blend a little better but I don't want to go too far and end up wrecking it or sapping the enjoyment I'm having building this kit. Taking breaks between sanding I carried on with the airbrakes. Quiet fiddly and defiantly tested my patience a few times, but they turned out pretty well i think. Next on to the wing folds. I had to do some work on these as the photo etch didn't seem strong enough to hold the outer wings. started by cutting the kit wing folds, and sanding any detail off them, before attaching it to the back of the photo etch. This then slotted into the inner wing. I forgot to take a picture of the next step but i separated the central hinge from the kit part and glued it in the same position on the photo etch part and sandwiched it between the photo etched hinge provided by airwaves so give that bit more support. Can just about make out the hybrid hinge below. Tail section was added, another gap to fill and sand, and the resin flaps where stuck in place. I think the next step is masking the canopy and start painting. 6 Link to comment Share on other sites More sharing options...
Daedalus72 Posted April 28, 2020 Share Posted April 28, 2020 Really nice looking work. I finished one of these a couple of years ago, it took me about fifteen years from start to finish. Also used the Neomega cockpit which was no trouble, but had a hell of a job with the seams either side of the nose. Despite all the aggro, it is a very impressive model when built and dominates the shelf Link to comment Share on other sites More sharing options...
Allatsea Posted May 17, 2020 Author Share Posted May 17, 2020 Havnt managed to get much done on this one with the good weather the last few weekends and a bit of bad luck. Started to paint up the buc but ended up dropping my air brush, bending the needle and then somehow sheared off the screw thread on the nozzle in the airbrush. Got my spare out, went to turn on the compressor and... nothing. Couldn't get it to turn on, no idea why it stopped working. Anyway, got a new one on order with some paints. Whilst I'm waiting decided to crack on with the other Buc, cockpit already installed with the air waves photo etch. Getting the fuselage together on this one was a nightmare, 2 hours or super gluing, poly cement, clamps and tape and it's just about joined. The warping was awful. Wanting to do a RAF wrap around camo for this one. With no buldged bomb bay I'm attempting doing it open and detailing it up a bit. Still a bit to go. 2 Link to comment Share on other sites More sharing options...
corsaircorp Posted May 17, 2020 Share Posted May 17, 2020 A nice Bucc on its way !! The Shar is pretty fine too !! Congrats Man !! Sincerely. CC Link to comment Share on other sites More sharing options...
Allatsea Posted May 17, 2020 Author Share Posted May 17, 2020 And the two together 1 Link to comment Share on other sites More sharing options...

Recommended Posts
Create an account or sign in to comment
You need to be a member in order to leave a comment
Create an account
Sign up for a new account in our community. It's easy!
Register a new accountSign in
Already have an account? Sign in here.
Sign In Now