BlueNosers352nd Posted March 22, 2020 Share Posted March 22, 2020 I wanna add this detail on the Mustang. Actually doing this aircraft. Was for the P-51STGB but I couldn't make it. How would you all tackle it? I tried yesterday with some oils, but hands are not as steady as they once were. Fortunately that is easy to wipe off. Heard in the past taking a shot of liquor can help calm that unsteadiness down. Thought about using the airbrush, but then my question is what to use as an under coat and as a paint......that if I don't like it I can wipe it off. Right now it's coat with Tamiya Flat (Not sure why they call it that). I have mostly Tamiya, Gunze, some Model Master. Not really much in the line Vallejo. Got tire black in both Mig and Aeromaster Aircraft Colors. For clear coats, besides Tamiya, I have Gunze flat base, Vallejo 100% Acrylic Resin in both Matte and Satin. Alclad Aqua Gloss and Klear Kote Matte. I have Windsor Netwon in both acrylic and oil. Have some Mig (or is it AK) panel line washes and the Engine, Kerosene stuff. Not like I am in a hurry to finish this and I'm not really going any where anytime soon (thank you Corona). So I guess if I needed to I could try and order some stuff. Thoughts? Thanks! Stay Safe! Link to comment Share on other sites More sharing options...
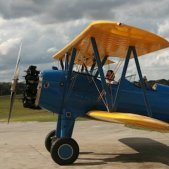
72modeler Posted March 22, 2020 Share Posted March 22, 2020 Not sure what your Modelmaster paint inventoy looks like, but I have have great success with enamels thinned with turpentine or turps. I use black or dark brown on a glass slab or you can use a paint bottle cap or other small metal cup. You thin the bejeezus out of a few drops and apply with a very very small pointed brush- I have made a brush I use for fuel/oil/hydraulic fluid stains by cutting hairs from an old detail brush. With some practice on old kit parts, you can soon get the hang of how much thinner to apply and how to stroke the brush. My early mistake was in making the stains too dark (I do 1/72 scale almost exclusively.) for the scale of my models. It's a good idea to look at photos that show how the fuel/oil stains appear on a chosen airplane type. Those that use acrylics or the aftermarket weathering products should be able to help. Be sure the staining follows the airflow or the path you see in period photos. (In the photo you posted, you can see the actual route taken by the fluid from the oil breather port as the slipstream blew it back along the cowling; the vertical stain is most likely what has dripped out after shutdown- I think this is the case, as one of the inner fairing doors has not dropped, yet, so this Mustang was most likely just shut down when the photo was taken.) Mike BTW- if you think you've done too little on a stain, stop- you've done enough! There are 'way too many models with 'way too much or too dark staining for the scale. 3 Link to comment Share on other sites More sharing options...
BlueNosers352nd Posted March 22, 2020 Author Share Posted March 22, 2020 Well, this is my attempt. Since my in-progress thread is in the STGB, not sure where to post this. Haven't tried and not sure if we are allowed to continue those threads until done. But wanted to share the results. Not to shabby for a first run. Maybe could of been a little smoother. Might go back after the clear coat dries and add a little and blend it......but we'll see. Also gotta say, I tried some of the Vallejo 100% Acrylic Resin Matte.............color me impressed, well clear me impressed. Maybe I got the wrong kinda turpentine. I only have Turpenoid or the thinners that come with AK/Mig stuff. But with Model Master is ended up curdling. What I end up using was regular old Winsor Newton oils (a brownish and black) thinned, applied and let to dry a bit then blended, brushed, blended, more added, etc. 7 Link to comment Share on other sites More sharing options...
Corsairfoxfouruncle Posted March 22, 2020 Share Posted March 22, 2020 41 minutes ago, BlueNosers352nd said: Since my in-progress thread is in the STGB, not sure where to post this. Haven't tried and not sure if we are allowed to continue those threads until done. You are though the other option is to flag your thread, and then ask a mod to move it to the standard Aviation work in progress section. 1 Link to comment Share on other sites More sharing options...
Biggles87 Posted March 22, 2020 Share Posted March 22, 2020 You can continue in the STGB thread and post it in RFI when complete, that’s what I’m going to do. I’ve had some success in the past with putting a drop of paint at the point of origin of the leak and then blowing it in the direction of the airflow with a hairdryer. HTH John 1 1 Link to comment Share on other sites More sharing options...
MDriskill Posted March 23, 2020 Share Posted March 23, 2020 (edited) Your model looks good to me! I have a friend who is a true master modeler and weathering guru, lately on his advice I too have been using Windsor & Newton oils, thinned with W&N’s “Sansodor” non-stinky thinner. This is done after the model has received a gloss clear coat, then alternating further layers of oil work and clear coats until the desired look is achieved. Working over a gloss coat assures the paint won’t be harmed, and gives a good surface and a lot of time to work and blend the effects (or wipe them off and start over...an important advantage for me, LOL). Lately this same friend has been using Vallejo brushable acryllics, thinned with distilled water (NEVER use tap water, he says!), with equally gorgeous effects. Edited March 23, 2020 by MDriskill 1 Link to comment Share on other sites More sharing options...
Troy Smith Posted March 23, 2020 Share Posted March 23, 2020 14 hours ago, BlueNosers352nd said: What I end up using was regular old Winsor Newton oils (a brownish and black) thinned, applied and let to dry a bit then blended, brushed, blended, more added, etc. Merlins leak a LOT of oil. hot oil is runny, then cools and is sticky , I used a the same mix as you, basically neat, just a drop or two of lighter fuel to allow the mix. lighter fuel is for zippo type lighters, is really volatile, makes really flowing washes and then evporates. In the below, I applied a thick mix, and used a brush with some lighter fuel on to streak and remove as required. This was over acrylic matt varnish, and is just as applied. On 03/04/2019 at 10:53, Troy Smith said: But, did some oil stains, with oil paint, raw umber and black, applied again with lighter fuel, and then streaked and removed with a brush soaked/washed out in lighter fuel. I pleased with the effect, in the flesh it has an oily sheen. 50620677 by losethekibble, on Flickr posed over the Hurricane book I have since I was 8..... note the way the oil blows back onto the doors creating the stains seen here the reference plane is is on test flight, and the leaking oik is fresh, as it goes on, it gets blown back more. HTH 3 Link to comment Share on other sites More sharing options...
Work In Progress Posted March 23, 2020 Share Posted March 23, 2020 14 hours ago, Biggles87 said: You can continue in the STGB thread and post it in RFI when complete, that’s what I’m going to do. I’ve had some success in the past with putting a drop of paint at the point of origin of the leak and then blowing it in the direction of the airflow with a hairdryer. Or by mouth, through a straw - you can get a lot of control that way 2 Link to comment Share on other sites More sharing options...
72modeler Posted March 23, 2020 Share Posted March 23, 2020 19 hours ago, BlueNosers352nd said: Maybe I got the wrong kinda turpentine. Not sure why that happened. I have yet to use a gloss pre-coat and then a clear matte/gloss overcoat, and I use enamels/lacquers for my color coats, so perhaps the thinning agent you used reacted with whatever you used for a clear coat? Just guessing! I think that what you did looks pretty good to me- maybe just thin the paint more so it looks like a fluid rather than an exhaust stain; BTW- very nice bare metal finish, and you can't beat a Bodney-based Bluenose Mustang for looks! (My all-time favorite is William Whisner's Princess Elizabeth!) Do you have 'Punchy' Powell's book on the 352nd FG? Well worth getting, if you can find one, as it is an incredible read and has tons of photos of 352nd Mustangs! Mike Link to comment Share on other sites More sharing options...
Jackson Duvalier Posted March 23, 2020 Share Posted March 23, 2020 18 hours ago, Biggles87 said: I’ve had some success in the past with putting a drop of paint at the point of origin of the leak and then blowing it in the direction of the airflow with a hairdryer. 3 hours ago, Work In Progress said: Or by mouth, through a straw - you can get a lot of control that way If there were a handy, controllable way to provide airflow right at a modeller's workbench... I'll bet somebody like Iwata or HS would already make such a device, and charge a lot of money for it. 😉 19 hours ago, BlueNosers352nd said: Maybe I got the wrong kinda turpentine. I only have Turpenoid or the thinners that come with AK/Mig stuff. But with Model Master is ended up curdling. What I end up using was regular old Winsor Newton oils (a brownish and black) thinned, applied and let to dry a bit then blended, brushed, blended, more added, etc. FWIW, I think you've got a good result here. I second Troy's suggestion re. naphtha/Zippo fuel. It thins oils beautifully and dries very quickly. Any tide marks or areas you wish to tidy up can be dealt with using a cotton bud moistened with same fuel. Payne's Grey and Burnt Umber are my fave oil colours for washes. White spirit gives a little more working time if the naphtha evaporates too quickly. That blue nose is well-applied and the bare metal is convincing. I'd expect as much from a guy with your handle, BN352. 😁 2 Link to comment Share on other sites More sharing options...
Work In Progress Posted March 23, 2020 Share Posted March 23, 2020 3 hours ago, Jackson Duvalier said: If there were a handy, controllable way to provide airflow right at a modeller's workbench... I'll bet somebody like Iwata or HS would already make such a device, and charge a lot of money for it. 😉 Such witchcraft will NEVER catch on, NEVER 1 1 Link to comment Share on other sites More sharing options...

Recommended Posts
Create an account or sign in to comment
You need to be a member in order to leave a comment
Create an account
Sign up for a new account in our community. It's easy!
Register a new accountSign in
Already have an account? Sign in here.
Sign In Now