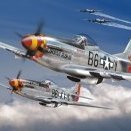
RadMax8 Posted March 2, 2020 Share Posted March 2, 2020 Hello all, My last RFI was a success, so I’d like to submit for your approval another recently finished build. This was a kit I “finished” back in May-April of 2019, with only a couple tiny detail left to do such as add the antenna and the aftermarket resin position lights. I finally took care of those items when I finished my Mustang. The kit is Tamiya’s 2008 offering of the A6M5/5a Zero. This is probably the best kit I’ve ever had the pleasure of putting together, the cockpit specifically is absolutely amazing. I built this once in college as a commission piece... it was very hard to let it go, but the money was nice! After doing some reading about the pilot I wanted to build it again. Sadaaki Akamatsu was the pilot of this plane. If you know the story of Pappy Boyington, Akamatsu was Japan’s answer. He was a wily older pilot who had good skills and a penchant for some rowdy times. If you do any reading on him, make sure your source is reliable... as always, the legend can be quite intoxicating! Here’s a photo of Akamatsu: Now, here’s the finished build. This was my last attempt at black-basing, and it made me realize that the bottom comes out great because it’s light colored. Topside not so much, it’s way too dark to show modulation. I did add some resin goodies to this one, namely a seat from Ultracast, and exhaust & gun barrels from Quickboost. I also used CMK resin nav lights (the blue lights on top of the wing) and Infini Aero Rigging, which I absolutely love. Anyway, here’s why you’re here: This is what the cockpit looked like before joining the fuselage halves. Excellent details. The engine, which I added some ignition wiring to, turned out nice. Much of it is blocked by the tight cowl and large spinner, but hey I’ve got a photo! Thanks for looking, and please feel free to leave questions, comments, and constructive criticism here! 39 Link to comment Share on other sites More sharing options...
Gary Brantley Posted March 2, 2020 Share Posted March 2, 2020 I'm happy to be the first to say that is a real beauty! The finished cockpit and engine really turned out well as did the final result. What did you use for the aotake color in the wells? 😀 1 Link to comment Share on other sites More sharing options...
IanC Posted March 2, 2020 Share Posted March 2, 2020 Brilliant. Very fine paintwork and subtle, realistic weathering. 1 Link to comment Share on other sites More sharing options...
Toryu Posted March 2, 2020 Share Posted March 2, 2020 Fantastic model with superb work on the cockpit. Hard to believe that there are no aftermarket parts. Don't be concerned about the topside dark green. It's spot-on! Most renditions of the two IJN greens are too bright, and most modellers apply too much pre-shading and weathering. This may show off their painting skills but not reality in the IJN who kept their planes in very good shape. I do like your result. Link to comment Share on other sites More sharing options...
RadMax8 Posted March 2, 2020 Author Share Posted March 2, 2020 9 hours ago, Gary Brantley said: I'm happy to be the first to say that is a real beauty! The finished cockpit and engine really turned out well as did the final result. What did you use for the aotake color in the wells? 😀 Thanks, Gary! After using Tamiya’s recommendation of Metallic Blue mixed with Clear green on my first build, and then seeing a restored example at the Pearl Harbor museum, I decided to try something different. For this build, I painted the wheel wells Testors silver, then overcoated with a custom blend of Tamiya clear blue and clear green. I didn’t write down the ratio, but from what I’ve read there was some variation in the shade of aotake in production. 5 hours ago, Toryu said: Fantastic model with superb work on the cockpit. Hard to believe that there are no aftermarket parts. Thanks for your comment, Toryu. I can’t take full credit for the cockpit, the seat came from Ultracast. I prefer painting seatbelts over using photoetch. But everything else is Tamiya plastic. Using a Zero book I inherited as reference, everything checked out favorably. Thanks for the comments, everyone! 1 Link to comment Share on other sites More sharing options...
Gary Brantley Posted March 2, 2020 Share Posted March 2, 2020 30 minutes ago, RadMax8 said: Thanks, Gary! After using Tamiya’s recommendation of Metallic Blue mixed with Clear green on my first build, and then seeing a restored example at the Pearl Harbor museum, I decided to try something different. For this build, I painted the wheel wells Testors silver, then overcoated with a custom blend of Tamiya clear blue and clear green. I didn’t write down the ratio, but from what I’ve read there was some variation in the shade of aotake in production. You're quite welcome! That's very similar to the method I've used. On my Kyushu Shinden, I painted the wells with Humbrol unpolished aluminum, then over-coated that with ModelMaster teal acrylic. I think it's a pretty fair approximation of the color too. 🙂 1 Link to comment Share on other sites More sharing options...
RadMax8 Posted March 2, 2020 Author Share Posted March 2, 2020 @Gary Brantley I agree, and it’s much closer to the actual production method of coating metal than mixing paints. 1 Link to comment Share on other sites More sharing options...
72modeler Posted March 2, 2020 Share Posted March 2, 2020 Great (Deranged?) minds think alike! I have always used flat aluminum as the base coat, then mixed up clear flat with a few drops of either metallic blue or green from the old Testors little glass bottles. The more passes with the airbrush, the darker the coverage, and it looks very realistic. I totally agree with the comments made by the others regarding the colors and subtle weathering-yes, the cockpit is outstanding! Mike 1 Link to comment Share on other sites More sharing options...
Sky Keg Posted March 3, 2020 Share Posted March 3, 2020 Outstanding Zero!!!!! 1 Link to comment Share on other sites More sharing options...
Shashman Posted March 3, 2020 Share Posted March 3, 2020 The weathering and effects are perfect. Having just got back into the hobby, I feel like it will be many, many ruined kits (2 out of 4, so far) until I can achieve quality of this calibre! 1 Link to comment Share on other sites More sharing options...
RadMax8 Posted March 4, 2020 Author Share Posted March 4, 2020 2 hours ago, Sky Keg said: Outstanding Zero!!!!! Thanks Sky Keg, from one Buckeye to another! 1 hour ago, Shashman said: The weathering and effects are perfect. Having just got back into the hobby, I feel like it will be many, many ruined kits (2 out of 4, so far) until I can achieve quality of this calibre! Don’t worry Shashman, I’ve had my fair share of ruined kits. I’d argue this one was a letdown for me on the exterior, but I feel like if you don’t learn something with every kit you aren’t doing it right. Oh and @72modeler I think if you asked my wife she’d definitely agree with your assessment of deranged! 😆 1 Link to comment Share on other sites More sharing options...
kev67 Posted March 4, 2020 Share Posted March 4, 2020 Very nice, I always liked the Zero, you can go to town on these aircraft with either moderate weathering or to the extreme of one with paint peeling and a highly weathered combat usage 1 Link to comment Share on other sites More sharing options...
russ c Posted March 4, 2020 Share Posted March 4, 2020 Excellent Zero there, really nice work 1 Link to comment Share on other sites More sharing options...
Smithy Posted March 4, 2020 Share Posted March 4, 2020 Stunning work and looks absolutely beautiful. 1 Link to comment Share on other sites More sharing options...
Greg Law Posted March 4, 2020 Share Posted March 4, 2020 Very nice Zero. Good choice of weathering being not too much. 1 Link to comment Share on other sites More sharing options...
Ron Pearcy Posted March 4, 2020 Share Posted March 4, 2020 Excellent build. 1 Link to comment Share on other sites More sharing options...
The Spadgent Posted April 12, 2020 Share Posted April 12, 2020 Great looking Zero. I have had this one in the stash for years. Hopefully I can get it looking something like this beauty. Johnny. 😇 1 Link to comment Share on other sites More sharing options...
trickydicky210 Posted April 12, 2020 Share Posted April 12, 2020 Fantastic Zero, that’s really inspiring me to get mine finished cheers Rich 1 Link to comment Share on other sites More sharing options...
Bullbasket Posted April 12, 2020 Share Posted April 12, 2020 Beautiful model. You might want to change the title from Nakajima to Mitsubishi. John. 1 Link to comment Share on other sites More sharing options...
Mig88 Posted April 12, 2020 Share Posted April 12, 2020 Lovely job all over! Miguel 1 Link to comment Share on other sites More sharing options...
Mikey-1980 Posted April 12, 2020 Share Posted April 12, 2020 Very nice finish, and love the detail in the cockpit too! 1 Link to comment Share on other sites More sharing options...
Wulfman Posted April 12, 2020 Share Posted April 12, 2020 Superb looking Zero. Marvellous modelling ! Wulfman 1 Link to comment Share on other sites More sharing options...
Bigglesof266 Posted April 12, 2020 Share Posted April 12, 2020 Any Zero is always going to get a thumbs up from me. I have a venerable Hasegawa mould late Zero (A6M5b) rebox from 2009 (61103), but that Tamiya 2008 tooling Tamiya shines. I like it. 👍 1 Link to comment Share on other sites More sharing options...
RadMax8 Posted April 21, 2020 Author Share Posted April 21, 2020 On 4/12/2020 at 4:19 AM, Bullbasket said: Beautiful model. You might want to change the title from Nakajima to Mitsubishi. John. Hi John, thanks for the compliment. While Mitsubishi was the designer of the plane, this particular airframe was built by Nakajima. I decided to reflect this fact in the title. During my research for this build, I found that the tell-tale for where a Zero was built lies in the demarcation for the upper camo. If it slopes up gently from the trailing edge of the wing to the horizontal stabilizer, it was produced by Nakajima. If it’s more abrupt, it was produced by Mitsubishi. There are many more minor details, too. Thanks to everyone else for the kind words! 1 Link to comment Share on other sites More sharing options...
fubar57 Posted April 21, 2020 Share Posted April 21, 2020 Great looking model, love the innards. At the moment I'm building Hasegawas's version. It'll be built as a Mitsubishi aircraft so I don't have to worry about the wheel wells. It'll be the captured ATAIU • SEA version 1 Link to comment Share on other sites More sharing options...

Recommended Posts
Create an account or sign in to comment
You need to be a member in order to leave a comment
Create an account
Sign up for a new account in our community. It's easy!
Register a new accountSign in
Already have an account? Sign in here.
Sign In Now