flashlight Posted February 17, 2020 Share Posted February 17, 2020 Next project, another wheely thingie. It's Zvezda's GAZ Tiger-M with "Arbalet" remote control weapon system. Boxtop Inside is a sturdy top opening cardboard box Inside the box we have 6 sprues of grey plastic and one sprue with clear parts. Sprue A Sprue B A second sprue B - on both sprues B are parts that will go into the spares boc Sprue C - two times in the box Sprue F Clear parts, decals and metal foil stickers for the rear view mirrors Mesh and the tyres - the tyres have prominent mould seams running along the center lines, these will be hard to come by Paint instructions for two versions Finally a peek inside the instructions booklet This seems to be a nicely detailed kit and should be a straightforward build. Hope to show you some progress soon! Have a nice day Nick 6 Link to comment Share on other sites More sharing options...
Hamden Posted February 17, 2020 Share Posted February 17, 2020 Looks a nice project and will complement your VBL well. Which scheme are you planning to do? Roger Link to comment Share on other sites More sharing options...
Jasper dog Posted February 17, 2020 Share Posted February 17, 2020 I'll tag along if I may, bit odd ball but there's now't wrong with that. Cheers Link to comment Share on other sites More sharing options...
flashlight Posted February 17, 2020 Author Share Posted February 17, 2020 @Hamden Hi Roger, of course I will go for the three tone camo. Will have to guess how the camo scheme could be on the rooftop, the instructions do not show a view from above. @Jasper dog Darryl, I am glad that you'll accompany me, please take a seat and grab a beer. Any help and encouragement will be needed! Have a nice day Nick 1 Link to comment Share on other sites More sharing options...
Bullbasket Posted February 18, 2020 Share Posted February 18, 2020 It's deja vu Nick. As has already been said, it will make a nice companion, and comparison with the VBL. John. Link to comment Share on other sites More sharing options...
flashlight Posted February 18, 2020 Author Share Posted February 18, 2020 (edited) @Bullbasket Hi John, yes, compared to the VBL the Tiger is quite a large vehicle. Have a nice day Nick Edited February 18, 2020 by flashlight forgot something Link to comment Share on other sites More sharing options...
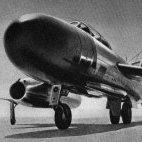
Andy Moore Posted February 18, 2020 Share Posted February 18, 2020 17 hours ago, flashlight said: Will have to guess how the camo scheme could be on the rooftop, the instructions do not show a view from above. Hi Nick, looking forward to seeing this one come together. Regarding the roof camo, this photo shows the kit camo scheme with a partial view of the roof. Should help with the pattern. Andy 1 Link to comment Share on other sites More sharing options...
flashlight Posted February 18, 2020 Author Share Posted February 18, 2020 @Andy Moore Hi Andy, brilliant! Thank you very much, this photo is of good use! Have a nice day Nick Link to comment Share on other sites More sharing options...
flashlight Posted February 18, 2020 Author Share Posted February 18, 2020 Hi everybody, the build has started, as per instructions with the chassis. Not much to see, but this is 28 parts alltogether. Nicely moulded and good fit so far. The chassis is now waiting for the paint shop for a coat of black. Thanks for looking! All comments are welcome. Have a nice day Nick 6 Link to comment Share on other sites More sharing options...
flashlight Posted February 23, 2020 Author Share Posted February 23, 2020 Hi everybody, I have made a little progress this weekend. I finished the chassis, painted it black. I assembled and painted the parts of the transmssion, and painted the underside of the cabin protective green. That's where I am now. Dry fit Thanks for looking. Have a nice day Nick 7 Link to comment Share on other sites More sharing options...
flashlight Posted February 27, 2020 Author Share Posted February 27, 2020 Hi everybody, had a little desaster with my project. I have primed the cabin floor and painted it white as per instructions. Unfortunately there was something wrong either with the primer or the white colour. While drying the colour got grainy and the surface turned into something like a sand paper. So I had to strip it all off. Tossed the colour and the primer into the bin and ordered new. Until I have received the new colours the project comes to a stall. To keep myself busy I started this one: There'll be a WIP soon. The big Tiger will be finished for sure, don't worry! Have a nice day Nick 2 2 Link to comment Share on other sites More sharing options...
Jasper dog Posted February 27, 2020 Share Posted February 27, 2020 Hi Nick What a pain in the... At least you've been able to strip it off ready to start a fresh. Good luck with the new paint. All the best Darryl 1 Link to comment Share on other sites More sharing options...
flashlight Posted February 27, 2020 Author Share Posted February 27, 2020 Hi Darryl, thank you for the kind words. Well, what can you do, that's life. Such things happen from time to time, no big problem at all. With the help of an oven cleaner the colour came off easily without problems. Now I have to wait for the new colours, once they have arrived, the project will be continued. Thank you very much! Have a nice day Nick Link to comment Share on other sites More sharing options...
Hamden Posted February 28, 2020 Share Posted February 28, 2020 Sorry to hear of your paint problem Nick. Just a thought did you wash the parts before painting as grease from mould release or even hands can cause trouble Roger 1 Link to comment Share on other sites More sharing options...
flashlight Posted February 28, 2020 Author Share Posted February 28, 2020 @Hamden Hi Roger, yes, I did. The primer went on without problems and showed an even surface. I think that the white colour was the problem. Have a nice day Nick 1 Link to comment Share on other sites More sharing options...
Jasper dog Posted February 29, 2020 Share Posted February 29, 2020 Hi Nick, glad it all stripped off ok with out issue. Never tried having to strip paint off before, always been a bit hesitant about it. Good luck with the 2nd attempt. All the best Darryl 1 Link to comment Share on other sites More sharing options...
flashlight Posted March 1, 2020 Author Share Posted March 1, 2020 @Jasper dog Hi Darryl, oven cleaner is a vey good tool for paint stripping. Just cover everything with the foam, let it rest for a few hours and then wash it off with water, use an old brush and a toothpick to get the color off, it's as easy as that. Not sure if it works with enamels, but it surely works with acrylics. Thank you very much! Have a nice day Nick 1 Link to comment Share on other sites More sharing options...
Jasper dog Posted March 2, 2020 Share Posted March 2, 2020 Thanks Nick, hope I dont need it but useful to know. Cheers 1 Link to comment Share on other sites More sharing options...
flashlight Posted April 11, 2020 Author Share Posted April 11, 2020 Hi everybody, on with the show at last - back to where everything has stopped! During the last day I got the chassis and the cabin floor primed and painted again. Primed... ...and painted - the cabin intrior off white, the underside protective green. The current status - same as it was more than a month ago! Happy Easter to you all! Nick 5 Link to comment Share on other sites More sharing options...
Jasper dog Posted April 12, 2020 Share Posted April 12, 2020 Progress, or at least back to where you where! All the best Darryl 1 Link to comment Share on other sites More sharing options...
flashlight Posted April 12, 2020 Author Share Posted April 12, 2020 @Jasper dog Yes, Darryl, I am glad that the build is going on now. Today I painted the cabin floor black, as per instructions. That was all I could do today. 3 hours preparation... ...for 2 minutes spraying! Next will be painting the rear wheel arches in light beige (another funny masking job!), then on to the interior. Thanks for looking! Have a nice day Nick 5 Link to comment Share on other sites More sharing options...
flashlight Posted April 14, 2020 Author Share Posted April 14, 2020 Hi everybody, today I managed some time at the workbench for going on with this project. First I painted the wheel arches (and the inner side walls and rooftop of the cabin) in light beige, this time the masking didn't take too much time. After this I painted the running boards aluminium as per instructions. Then I started working on the interior. First was the instrument panel. The guys at Zvezda test your brush painting skills, they want you to paint each separate panel individually! That's great for an old guy like me and my with trembling hands! Under light conditions that are not ideal you don't even see, where exactly to put the tip of your brush in this white-on-white environment! Anyway, this was the most time consuming part of today's work. Don't look too close, please! From further away it looks acceptable. Of course it will get some dry brushing to bring out the details. Later on I will apply the decals for the instruments. The rest of today's building time I spent with glueing and painting the crew's seats, the steering column (the small black thingie) and building the WSO's workstation (unpainted). That's all for today. Thanks for looking! Have a nice day Nick 6 Link to comment Share on other sites More sharing options...
Hamden Posted April 14, 2020 Share Posted April 14, 2020 Nice steady progress much neater IP than I could manage for sure! Stay safe Roger Link to comment Share on other sites More sharing options...
flashlight Posted April 18, 2020 Author Share Posted April 18, 2020 (edited) @Hamden Hi Roger, thank you for your nice words, but I know that your skills are far superior! Had some progress during the last days. The interior is almost done now. Steering column and steering wheel will be attached after dry brushing the instrument panel. The rear seats and the ammo boxes are fixed already, the driver's and commander's seat will be fixed after the instrument panel will be glued in place. The decals representing the intruments are not very good, the details are hardly to be seen and they are blurry. But after the cab will be closed they won't be seen anyway. Ah well, the ammo boxes need some more colour. That's the good thing about the pics! The WSO's workstation is complete and also needs some dry brushing. It will hang down from the rooftop. I used RLM 71 black green to make it look like a computer monitor. I painted the window frames of the sidewalls white, and during peeling off the masking tape some of the beige colour was pulled off of the lower one in the pic. I had to repaint it, but I didn't get the same mixture of beige and white. So I did the same on the other one. Now it looks like the lazy crew is always leaning on the sidewalls. I think this will hardly be noticed once the cabin is closed, in reality the difference of the colours is not as blatant as in the pics. That's all for now, thanks for looking! Have a nice day Nick Edit: I think that I'll redo the sidewalls. I don't like them. Edited April 18, 2020 by flashlight 5 Link to comment Share on other sites More sharing options...
Hamden Posted April 19, 2020 Share Posted April 19, 2020 This is coming together nicely Nick I really like the way you have done the interior Stay safe Roger 1 Link to comment Share on other sites More sharing options...

Recommended Posts
Create an account or sign in to comment
You need to be a member in order to leave a comment
Create an account
Sign up for a new account in our community. It's easy!
Register a new accountSign in
Already have an account? Sign in here.
Sign In Now