Lightpainter Posted January 10, 2020 Share Posted January 10, 2020 (edited) Hi, I finally was able to finish this kit. Do not buy it... it has many issues and the biggest one is that is not 1/48 scale as advertised but 1/50 scale! I am surprised no review picked this up or any of the other things that gave away the scale problems... I did the math and I came out on 1/50scale. Later I found a 1/50 scale plan on the web and the parts fit on it. It is clear they used that plan but it says clearly 1/50 scale and not 1/48 scale. The reason I started to measure was that the pilot seat seemed very small. So I took out a couple of 1/72 scale seats and compared them. The left seat is the 1/72 Heller Dewoitine D510. Second is my scratch build seat using the thinnest materials I could find to make it as big as I could. Third one is the kit seat and last is the Tamiya 1/72 Seiran seat. As you can see the 1/48 scale Pc.7 seat is smaller than the 1/72 scale seats. Oh and the Pe seatbelts can be thrown away to. The buckles are not centered on the belt. I some made some from scratch. The radiator on the wings and nose are bad to, sometimes the lines stop in the middle and go on a bit further. I repaired some but some were impossible to repair. If you insist on building the kit you should probably make your own lines. They might have repaired tis flaw in later boxings but the first ones all suffered from this. The wing to fuselage join is bad and I had to thin it to paper thickness to get it to line up and then had to use a lot of miliput to smooth it out. I will leave it at that but I can say each day I wanted to throw it away. That is not to say I did not make errors.. I botched up the maint job. For one reason or another the Tamiya paint with levelling thinner would not dry. It took 2 months before it was dry enough to carry on. I had to polish everything out with Tamiya compound. Several times.. and that left it with a very shiny surface. Oh and the canopy is a blob of unclear plastic but I had no more energy to scratch one… But this is what I got, not my best work and not exactly the quality I was looking for but I wanted to let people know what kind of a kit it was. Then again it is only the second kit I did after coming back to the hobby so I need to get back into it... The stands were scratch build as wel since the kit does not provide them. Edited January 10, 2020 by Lightpainter 35 Link to comment Share on other sites More sharing options...
Adam Poultney Posted January 10, 2020 Share Posted January 10, 2020 Images not displaying Link to comment Share on other sites More sharing options...
Lightpainter Posted January 10, 2020 Author Share Posted January 10, 2020 They do now sorry about that! Link to comment Share on other sites More sharing options...
JWM Posted January 10, 2020 Share Posted January 10, 2020 Very nice result and really testy photos! Cheers J-W 1 Link to comment Share on other sites More sharing options...
invidia Posted January 10, 2020 Share Posted January 10, 2020 really nice model, i have this kit, i had noticed the seat was very small, and the seatbelts where useless. after reading this, it might stay in the stash. 1 Link to comment Share on other sites More sharing options...
Courageous Posted January 10, 2020 Share Posted January 10, 2020 Beautiful. Cracking job. Stuart 1 Link to comment Share on other sites More sharing options...
Spitfire31 Posted January 11, 2020 Share Posted January 11, 2020 Superb rendition of this beautiful and radical Schneider Trophy racer that never managed to take off! The glossy finish looks perfect for this type of machine. Kind regards, Joachim 1 Link to comment Share on other sites More sharing options...
Wulfman Posted January 11, 2020 Share Posted January 11, 2020 Beautifully built and photographed, lovely job. Wulfman 1 Link to comment Share on other sites More sharing options...
fjaweijfopi4j48 Posted January 11, 2020 Share Posted January 11, 2020 Excellent model! and double congrats because the starting point is challenging. This is a such a futuristic-looking plane, always nice to see it modeled. Cheers 2 Link to comment Share on other sites More sharing options...
roginoz Posted January 11, 2020 Share Posted January 11, 2020 Very brave of you to tackle a limited run kit like Mikromir put out, nevertheless, the model looks very nice indeed. After returning to the hobby 10 years ago, it was with a degree of trepidation that I approached my first limited run kit, but with advice and guidance from fellow modellers, I managed to get the hang of it most of the time........ Now I go out of my way to source the unusual models generally only available as limited run Kits. As a second kit since your return, I dips me lid to your result and presentation. Rog 1 Link to comment Share on other sites More sharing options...
Lightpainter Posted January 11, 2020 Author Share Posted January 11, 2020 On 10/01/2020 at 20:53, JWM said: Very nice result and really testy photos! Cheers J-W Thank you, and I did the photo's like this because I like big contrasts. Photography is also a hobby of mine although it has taken a bit of a backseat lately 🙂 Link to comment Share on other sites More sharing options...
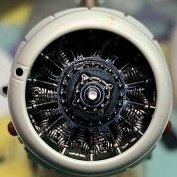
Lightpainter Posted January 12, 2020 Author Share Posted January 12, 2020 On 10/01/2020 at 21:42, invidia said: really nice model, i have this kit, i had noticed the seat was very small, and the seatbelts where useless. after reading this, it might stay in the stash. Hi, Thank you for your comment! Of course any kit can be build but you cannot change the fact that it is 1/50 scale instead of 1/48 scale. The kit has some difficult bits. The nose for example. The radiators are separate and the engine covers too. So it is hard to line them up knowing that the plastic is very thin. I did not fit the engine because I could not find any photographs of it. So you should reinforce that part from the inside. I had it split several times due to the very thin plastic. There are errors too, the boxlike structure on top stops in the kit at the attachment of the wings withe the fuselage. It shows that on the box-top too. In the instruction notice it extends till past the first row of exhausts. However photographic evidence shows that it stops at the third row of exhausts. The interior then, there are only a couple of photographs and bad ones at that. But they show that the instruments were four in a row so the PE part with the instruments is completely wrong. Oh and the instruction notice in step 9 shows a part Dec2 that you should use behind the PE part. I suppose it should have been a little film or decal but it is not provided in the kit... it does not show in the parts list either. There are two different water rudders on the sprue but only one is correct for the real aircraft, the other one was depicted on a drawing but not used on the real model. Curiously enough it is not mentioned in the instructions. There are also two sets of hydrofoil legs but what you should do with the second set is not mentioned either. The body has no slots tho attach the hydrofoils to, just 2 shallow recessed lines. Check the photographs for were and you teach them since the kit offers no information. The flaps are longer than the holes in the wings and about half as thick. So al these things ad up in the end... Should you stil want to build the kit you can find valuable photographs here: https://giadel.webnode.it/foto/#! http://alain.vassel.pagesperso-orange.fr/piaggio.htm Here you can find the plan in 1/50 scale: https://www.pinterest.com/pin/303852306110971858/ Oh and the concept of the aeroplane was later proved in the RC world, in the RC Schneider Trophy of 1988 the model of the Piaggio-Pegna Pc.7 won the race 🙂 Link to comment Share on other sites More sharing options...
Lightpainter Posted January 12, 2020 Author Share Posted January 12, 2020 On 10/01/2020 at 23:35, Courageous said: Beautiful. Cracking job. Stuart Thank you Stuart 🙂 Link to comment Share on other sites More sharing options...
Lightpainter Posted January 12, 2020 Author Share Posted January 12, 2020 On 11/01/2020 at 05:27, Spitfire31 said: Superb rendition of this beautiful and radical Schneider Trophy racer that never managed to take off! The glossy finish looks perfect for this type of machine. Kind regards, Joachim Thank you I was always aiming for a glossy finish but never thought I would get it so shiny by having to polish everything several times. In this case it works 🙂 Link to comment Share on other sites More sharing options...
Lightpainter Posted January 12, 2020 Author Share Posted January 12, 2020 On 11/01/2020 at 07:27, Moa said: Excellent model! and double congrats because the starting point is challenging. This is a such a futuristic-looking plane, always nice to see it modeled. Cheers Hi Moa thank you and indeed it was challenging! Yes the futuristic look was what attracted me too it in the first place! 1 Link to comment Share on other sites More sharing options...
Lightpainter Posted January 12, 2020 Author Share Posted January 12, 2020 On 11/01/2020 at 11:37, roginoz said: Very brave of you to tackle a limited run kit like Mikromir put out, nevertheless, the model looks very nice indeed. After returning to the hobby 10 years ago, it was with a degree of trepidation that I approached my first limited run kit, but with advice and guidance from fellow modellers, I managed to get the hang of it most of the time........ Now I go out of my way to source the unusual models generally only available as limited run Kits. As a second kit since your return, I dips me lid to your result and presentation. Rog Hi Roginoz and thank you for your kind words! I mostly look for the out of the ordinary or special kits too. I am working on my first all resin kit and have more in the stash. I still manage to muck up everything but till now as able to recuperate almost every time... But it keeps me busy and I get relaxed :-) Still those those limited run kits are something else. 1 Link to comment Share on other sites More sharing options...
JOCKNEY Posted January 20, 2020 Share Posted January 20, 2020 Outstanding, it has that unique quality that Italian supercars have of looking fast even when stationary ! Congratulations cheers Pat 1 Link to comment Share on other sites More sharing options...
Lightpainter Posted January 22, 2020 Author Share Posted January 22, 2020 On 20/01/2020 at 14:21, JOCKNEY said: Outstanding, it has that unique quality that Italian supercars have of looking fast even when stationary ! Congratulations cheers Pat Indeed it does and it was that what attracted me in the first place 😅. Thanks 😃 1 Link to comment Share on other sites More sharing options...
toniosky Posted January 22, 2020 Share Posted January 22, 2020 This is beautiful - sleek painting ! I faced similar issues with the UT-1b from MikroMir, and one has to be quite motivated to finish the build. The price of originality ! 1 Link to comment Share on other sites More sharing options...
Buzby061 Posted January 22, 2020 Share Posted January 22, 2020 I bet you were tempted to mutter "Some modelling skills required my a**e" before you binned it! Glad you persevered, she's a beauty. Pete 1 Link to comment Share on other sites More sharing options...
Lightpainter Posted January 23, 2020 Author Share Posted January 23, 2020 19 hours ago, toniosky said: This is beautiful - sleek painting ! I faced similar issues with the UT-1b from MikroMir, and one has to be quite motivated to finish the build. The price of originality ! Thank you for your nice words! I have one more MirkoMir AMP kit lying around, the new De Havilland DH.88 Comet in 1/48 scale. I first need to build something else before I will tackle that one. I am interested in their new Supermarine S-5 too but would like to see the parts before buying... Link to comment Share on other sites More sharing options...
Lightpainter Posted January 23, 2020 Author Share Posted January 23, 2020 18 hours ago, Buzby061 said: I bet you were tempted to mutter "Some modelling skills required my a**e" before you binned it! Glad you persevered, she's a beauty. Pete I have to say that all kinds of words were spoken that I cannot repeat here 😉 Thanks a lot 🙂 1 Link to comment Share on other sites More sharing options...
Silenoz Posted February 12, 2020 Share Posted February 12, 2020 never heard of this before, but and intriguing idea... very nicely built and finished... Mikromir can be a pain... 1 Link to comment Share on other sites More sharing options...
toniosky Posted February 12, 2020 Share Posted February 12, 2020 Beautiful and very classy presentation on that glossy black socle 1 Link to comment Share on other sites More sharing options...
Lightpainter Posted February 12, 2020 Author Share Posted February 12, 2020 1 hour ago, Silenoz said: never heard of this before, but and intriguing idea... very nicely built and finished... Mikromir can be a pain... It can be indeed! Thak you for your nice words 😃 Link to comment Share on other sites More sharing options...

Recommended Posts
Create an account or sign in to comment
You need to be a member in order to leave a comment
Create an account
Sign up for a new account in our community. It's easy!
Register a new accountSign in
Already have an account? Sign in here.
Sign In Now