johnd Posted December 16, 2019 Share Posted December 16, 2019 Here we go with an entry for the group build. Its nothing ambitious, just a Hobby Boss 1/72 Mustang III Easy Build. If it goes well, an Airfix Mustang IVa is on the cards too! The obligatory parts shot: The markings will come from here: The original plan was to do a 315 Squadron example, PK-G, but I forgot that when I did PK-O, the 'PKs' fell apart and I had to nick the others. So Wing Commander Skalski then.. John. 6 Link to comment Share on other sites More sharing options...
gingerbob Posted December 17, 2019 Share Posted December 17, 2019 Welcome! And another new kit for the GB, which is always fun to see. 1 Link to comment Share on other sites More sharing options...
TEMPESTMK5 Posted December 18, 2019 Share Posted December 18, 2019 Good morning John Welcome aboard Have fun with your build Patrice 1 Link to comment Share on other sites More sharing options...
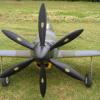
johnd Posted January 8, 2020 Author Share Posted January 8, 2020 Well, some progress has been made. The propeller is ready, the underside rocket mounting points filled and the interior done except for the belts. Unfortunately, that's is far as it will get. Those familiar with the kit may have already spotted from the above parts shot that there's one missing. It's the piece that makes up the lower fuselage and I've exhausted my search (don't even know if it was in the box when it arrived). As it's pretty unlikely that anyone would have a spare, it looks like Plan B. John. Link to comment Share on other sites More sharing options...
Andwil Posted January 8, 2020 Share Posted January 8, 2020 Is it not the part on the sprue between the prop and the spinner? AW Link to comment Share on other sites More sharing options...
johnd Posted January 8, 2020 Author Share Posted January 8, 2020 7 minutes ago, Andwil said: Is it not the part on the sprue between the prop and the spinner? No, that's the radiator housing, it fits behind that. Thanks for looking. John. Link to comment Share on other sites More sharing options...
Dave Fleming Posted January 8, 2020 Share Posted January 8, 2020 10 minutes ago, Andwil said: Is it not the part on the sprue between the prop and the spinner? AW No, the part John is looking for is for the rear fuselage and comes as a separate part in the box (Not attached to any sprue) Link to comment Share on other sites More sharing options...
johnd Posted January 8, 2020 Author Share Posted January 8, 2020 Well, wonders never cease. I found it! For reference, the part comes in a small polythene bag tightly folded and taped. Why, I will never know but Plan B can stay on the shelf for a little longer. John. 2 Link to comment Share on other sites More sharing options...
johnd Posted January 8, 2020 Author Share Posted January 8, 2020 First progress update on the build... The propeller was taken from an Airfix Mustang IV as it's a bit more refined than the supplied one. The undersides have had the "clam shell" doors stuck on in the up position and the mounting points for the weird rockets supplied in the kit have been filled with some plastic rod. A coat of white primer didn't go on too well so was removed with some vodka (nice to find a use for it). I have some steel belts from Eduard to try out on that, on the off-chance that they'll be seen through the canopy. Shame there aren't any AM control columns to be had, though. John. 3 Link to comment Share on other sites More sharing options...
Johnson Posted January 8, 2020 Share Posted January 8, 2020 Best wishes for the build John. I used Techmod decals for a Corsair build. They were beautifully printed but incredibly thin which made positioning them quite a challenge. Link to comment Share on other sites More sharing options...
johnd Posted January 8, 2020 Author Share Posted January 8, 2020 14 minutes ago, Johnson said: Best wishes for the build John. I used Techmod decals for a Corsair build. They were beautifully printed but incredibly thin which made positioning them quite a challenge. Thanks! I used them once before and one broke up on me. This time I'm prepared and will use Microscale Decal Film. John. 1 Link to comment Share on other sites More sharing options...
Johnson Posted January 8, 2020 Share Posted January 8, 2020 6 minutes ago, johnd said: and one broke up on me Several of mine disintegrated. I managed to salvage them but it was a bit fraught! 6 minutes ago, johnd said: will use Microscale Decal Film Good idea, but maybe do an experiment first on one you're not going to use? Apologies if I'm 'teaching you how to suck eggs'! Best wishes, Link to comment Share on other sites More sharing options...
johnd Posted January 8, 2020 Author Share Posted January 8, 2020 I have a way out of sorts, in that I have the Hobby Boss transfers for the same aircraft but hopefully it won't come to that. The Decal Film did the trick last time but I'm not complacent 😟 John. Link to comment Share on other sites More sharing options...
johnd Posted January 28, 2020 Author Share Posted January 28, 2020 I've been neglecting this somewhat as I've just taken advantage of some brewing equipment at a good price in the sales. Now that fermentation is underway, I can finally pull my socks up and get building. The belts have been fitted and the fuselage attached to the wings, ready for the inevitable filling and sanding. Photos to follow shortly... John. Link to comment Share on other sites More sharing options...
johnd Posted February 16, 2020 Author Share Posted February 16, 2020 Somewhat later than intended, here are the photos of where Wing Commander Skalski's Mustang is at: The primer needs a rub down and then a second coat. Quite pleased with the cockpit, should look ok through the canopy. John. 5 Link to comment Share on other sites More sharing options...
johnd Posted March 10, 2020 Author Share Posted March 10, 2020 Evening. I've been plugging away at this but neglected to take photos, I'm afraid, largely because the only time to take them is in the evening under quite poor artificial light. It's still on track to finish by the deadline though. Here is where we are... This is my first attempt with an airbrush, hence the slow progress. I'm also trying out Maskol. You can see it on the canopy and the nose. There is also a small sliver on the green tail-plane to act as a tester on the Hataka acrylic paint. If it's fine I'll use Maskol on the rest and spray, if it isn't it's back to freehand brushing (of the hairy sort). The tape on the underside was to prevent overspray and the original intention was to do it all but I found that the low pressure I was using made it superfluous. Happy modelling. John. 5 Link to comment Share on other sites More sharing options...
johnd Posted March 12, 2020 Author Share Posted March 12, 2020 Well, the tape and Maskol has been removed and the results are ok rather than spectacular. Photos will be posted tomorrow as the tempus has fugited this evening. Tomorrow will involve painting on the leading edge yellow bands, a bit of tidying up and then glossing ready for the markings. John. Link to comment Share on other sites More sharing options...
johnd Posted March 25, 2020 Author Share Posted March 25, 2020 The latest... Next step, the markings. John. 3 Link to comment Share on other sites More sharing options...
johnd Posted March 25, 2020 Author Share Posted March 25, 2020 The national markings have been applied to the upper surfaces and are currently all wrinkled up and setting. Does anyone know whether Wg Cdr Skalski's Mustang had shrouded exhausts or not? Thanks, John. Link to comment Share on other sites More sharing options...
Paul J Posted March 25, 2020 Share Posted March 25, 2020 7 minutes ago, johnd said: The national markings have been applied to the upper surfaces and are currently all wrinkled up and setting. Does anyone know whether Wg Cdr Skalski's Mustang had shrouded exhausts or not? Thanks, John. Yes it did !!!! There are photos about showing this is so. http://www.polishsquadronsremembered.com/ Look under 306 Squadron. Incidentaly I met the great man back in 1994 at a dedication to Coolham ALG for the D-Day 50th. 1 Link to comment Share on other sites More sharing options...
johnd Posted March 25, 2020 Author Share Posted March 25, 2020 Nice one, thanks. Hope I've got one 🙂 John. Link to comment Share on other sites More sharing options...
johnd Posted March 27, 2020 Author Share Posted March 27, 2020 Part way through the stickering now... John. 3 Link to comment Share on other sites More sharing options...

Recommended Posts
Create an account or sign in to comment
You need to be a member in order to leave a comment
Create an account
Sign up for a new account in our community. It's easy!
Register a new accountSign in
Already have an account? Sign in here.
Sign In Now