Troy Smith Posted December 4, 2019 Share Posted December 4, 2019 17 minutes ago, ragnarec said: I plan to make the wash by mixing oil paint (tube type) with odorless thinner. try using Zippo type lighter fuel for thinner, is really volatile, makes a really thin wash which flows very well, and evaporates really fast. Try using a dirty grey as well, black, white and burnt umber. this is how I did this, the dirty grey avoids the harshness of neat black. see https://www.britmodeller.com/forums/index.php?/topic/235052380-hurricane-airfix-72nd-fabric-wing-mki-oob/&do=findComment&comment=3296243 HTH 3 Link to comment Share on other sites More sharing options...
ragnarec Posted December 5, 2019 Author Share Posted December 5, 2019 19 hours ago, Troy Smith said: try using Zippo type lighter fuel for thinner, is really volatile, makes a really thin wash which flows very well, and evaporates really fast. Try using a dirty grey as well, black, white and burnt umber. Thanks for the tip! May be well worth a try. I need to find a local supplier of Zippo lighter fluid though. May be other brands of lighter fluid may work equally well? No problems with the fluid attacking the underlying paint? Ragnar Link to comment Share on other sites More sharing options...
Troy Smith Posted December 5, 2019 Share Posted December 5, 2019 2 minutes ago, ragnarec said: May be other brands of lighter fluid may work equally well? the stuff I used was from a pound shop, I just said 'zippo' as it's a well known name for the type of lighter, the fuel is all the same, basically 'light petrol' or Hexane, meaning it is lot more volatile, and thus thinner than usual thinners, so flows very well, normal thinners makes it flow,. but if you do a comparative test you will see what I mean. it also dries really fast. Use in a well ventilated area as well. 2 minutes ago, ragnarec said: No problems with the fluid attacking the underlying paint? I put it over a coat of Kleer, which is an acrylic varnish, when scrubbed it did take a bit of paint off, (which was Vallejo on an unprimed surface) but if well gloss coated it should be fine, though always worth testing on a paint mule first as you have put a lot of work into this build, . If you check the link, what happened was I put the wash on, and then took offf the excess using a brush dipped just in lighter fuel, which worked very well, and gave a subtle modulation to the paint finish. The photo above is after a coat of matt varnish, and the model wasa brush painted, so the surface is rougher than an airbrush finish, and a very small amount of the wash stayed on overall, which is what modulated the final effect. I was very pleased as it was an unexpected bonus. I also used it to thin neat oil paint (black and burnt umber) for the oil stains, and then a clean brush with it to streak the paint back, as if blown by the airflow. That was done over the matt varnish, and gave a very good oily look. That build was about completion, and not worrying about the kits problems, and I was very pleased overall with how the paintwork looked, and how the wash and weathering came out, it's all well and good theorising, it's when it works in practice as well. You build has come out really well so far, given the problems you have had here and there during it. cheers T 1 Link to comment Share on other sites More sharing options...
ragnarec Posted January 15, 2020 Author Share Posted January 15, 2020 I lost a bit of motivation in the middle of the weathering process, and as a result the Spitfire was laying untouched for a couple of weeks. In order to get things started up again, I decided to finish miscellaneous bits and pieces - like propeller, wheels, exhausts etc. This is the current state. Some more playing with oils on the airframe before the final coat of flat varnish. Then getting all bits glued on and the Spit will be done. Looking forward to that! Ragnar 4 Link to comment Share on other sites More sharing options...
128fiddler Posted February 7, 2020 Share Posted February 7, 2020 Hi Ragnar, That's a lovely build you have of VN489! Looks amazing and cool to see how well the mishaps are worked away unvissible. One of the better builds I've seen so far for this subject. However, when looking for references I only find 2 pictures regularly returning. Showing each side, but no clue for the wings. I'm planning on building the Special Hobby 1/72 kit but there is scale difference between the markings on the wing and fuselage. If I measure the white/black serial number, I should paint the white and black 4mm / 0.16in in width. However keeping that width on the wings I should have a band of 12 mm / 0.54in, but the width between the aileron inner tip and outer canon blister is only a mere 8 mm / 0.32in... so what width do you use in 1/48th? Maybe the ailerons are to long or the canons to far outward, I dunno, but if the bands are aplied equal on fuse and wings, something is wrong with my model 😁 Thanks in advance and sorry to hijack your great building thread! Greetings! Link to comment Share on other sites More sharing options...
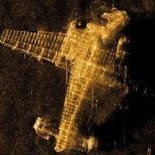
ragnarec Posted February 7, 2020 Author Share Posted February 7, 2020 8 hours ago, 128fiddler said: Hi Ragnar, That's a lovely build you have of VN489! Looks amazing and cool to see how well the mishaps are worked away unvissible. One of the better builds I've seen so far for this subject. However, when looking for references I only find 2 pictures regularly returning. Showing each side, but no clue for the wings. I'm planning on building the Special Hobby 1/72 kit but there is scale difference between the markings on the wing and fuselage. If I measure the white/black serial number, I should paint the white and black 4mm / 0.16in in width. However keeping that width on the wings I should have a band of 12 mm / 0.54in, but the width between the aileron inner tip and outer canon blister is only a mere 8 mm / 0.32in... so what width do you use in 1/48th? Maybe the ailerons are to long or the canons to far outward, I dunno, but if the bands are aplied equal on fuse and wings, something is wrong with my model 😁 Thanks in advance and sorry to hijack your great building thread! Greetings! Hi @128fiddler, Tanks for kind compliments! I'm the first to admit that my model is not strictly accurate. When painting the tail stripes, I decided to use the same width for the white and black stripes, which is incorrect if you study the available photos carefully. The white stripe should be slightly narrower. My "miss" made placement of the letters and digits in the serial number complicated and I had to compromise. I've used approximately 4 mm width for each colour, i.e. 12 mm in total. Same for fuselage as for wings. (I guess the correct number should be 12.7 mm, which would translate to 3 x 8" = 24" in full size.) I have a picture of VN489 (found on the net somewhere) showing both wings, and it clearly shows that the wing bands fit between the canon blisters and the ailerons. Regards, Ragnar Link to comment Share on other sites More sharing options...
ragnarec Posted February 7, 2020 Author Share Posted February 7, 2020 Picture of VN489 showing the wings. 2 Link to comment Share on other sites More sharing options...
128fiddler Posted February 8, 2020 Share Posted February 8, 2020 Indeed Ragnar, Your right about the width of the white being thinner then the black. I guess if i'd say 3mm for the black and 2mm for the white would be to obvious. So actually it should be aprox 2.5mm for the white, but not sure how I could solve that... Tamiya tape does only come in 2 and 3 mm iirc... maybe decalling the white? Link to comment Share on other sites More sharing options...
alt-92 Posted February 8, 2020 Share Posted February 8, 2020 I've heard an Xacto knive & ruler works.. 1 Link to comment Share on other sites More sharing options...
ragnarec Posted September 7, 2020 Author Share Posted September 7, 2020 I've finally found the mojo to get the Spitfire finished. I added some more dirt using oils, plus a bit more paint chipping using some aluminium paint and a fine brush. I then put on a flat coat using my usual mixture of Aqua Gloss and Tamiya Flat Base. Then it was time to mount all small pieces. I had some trouble fitting the main landing gear legs, and had to cut some plastic to get them to fit. I also struggled with the alignment of the legs and I'm not sure that I got it 100% right. I should have checked this before gluing together the wings, but forgot to do so... One of the last things to do was to apply exhaust streaks, but I got a little carried away and the result is a bit overdone. I've never really got the hang of it. Pictures can be found in the RFI section. Ragnar Link to comment Share on other sites More sharing options...
TempestV Posted September 8, 2020 Share Posted September 8, 2020 On 12/4/2019 at 10:20 PM, Troy Smith said: try using Zippo type lighter fuel for thinner, is really volatile, makes a really thin wash which flows very well, and evaporates really fast. Try using a dirty grey as well, black, white and burnt umber. this is how I did this, the dirty grey avoids the harshness of neat black. see https://www.britmodeller.com/forums/index.php?/topic/235052380-hurricane-airfix-72nd-fabric-wing-mki-oob/&do=findComment&comment=3296243 HTH That must smell nice....! Link to comment Share on other sites More sharing options...

Recommended Posts
Create an account or sign in to comment
You need to be a member in order to leave a comment
Create an account
Sign up for a new account in our community. It's easy!
Register a new accountSign in
Already have an account? Sign in here.
Sign In Now