Gemini 8 Posted April 17, 2019 Share Posted April 17, 2019 3 hours ago, Dubz said: A major update, the hull got their base coat. So lot's of pictures for your enjoyment 🙂 Hope you like it! I love it. The window sizes are perfect. Many other models have too big window lights... I also like the colour. What is the main color you used? Is the colour mixed or bought? Many say the Star Destroyers are white. But it doesn´t look like it. 1 Link to comment Share on other sites More sharing options...
harveyb258 Posted April 17, 2019 Share Posted April 17, 2019 Beautiful job, Dubz!! If I may say, though, I think she needs a good weathering to really make her pop ( or have I missed something, again?) btw, how large is it??? It looks about 3ft from here??? Cheers, H Link to comment Share on other sites More sharing options...
Dubz Posted April 18, 2019 Author Share Posted April 18, 2019 Thanks guys, I used Tamiya XF-2 mixed with a bit of XF-19. The SD is 60cm long and far from being finished (panels, panellines, pin washing, decent weathering) 😉 Dirk 1 1 Link to comment Share on other sites More sharing options...
k5054nz Posted April 20, 2019 Share Posted April 20, 2019 Beautiful, Dirk, I'm sorry I didn't come here sooner. I love the extra detail work you've put in, not to mention the lighting. But I got very excited when I saw the little 3D-printed Slave I. Brilliant addition! Link to comment Share on other sites More sharing options...
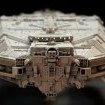
Dubz Posted April 23, 2019 Author Share Posted April 23, 2019 Some more impressions. Will take better pictures soon. At the moment it's just my iPhone and with low light it's not the best. cheers, Dirk 5 Link to comment Share on other sites More sharing options...
Gimme Shelter Posted April 23, 2019 Share Posted April 23, 2019 looks amazing - I love an ISD and can really appreciate the work you have put into this model ( I built a whopper sized Randy Cooper Avenger a few years back and still have not recovered from the experience) - in case these help, here are some pictures of the filmset model that I took up in London a few years ago. This is the real deal from the ESB film Good luck with the remainder of your build 2 1 Link to comment Share on other sites More sharing options...
Dubz Posted April 24, 2019 Author Share Posted April 24, 2019 (edited) Thanks 🙂 First testshots with my Canon. I'm pretty satisfied with the lights, colors and the positions. And some details I missed to post. cheers, Dirk Edited April 24, 2019 by Dubz 6 Link to comment Share on other sites More sharing options...
Gemini 8 Posted April 24, 2019 Share Posted April 24, 2019 Great work again. 🙂 It seems that I confused somebody with my last comment. If it is the case because of the "white" colour... In reports to Rogue One, the special effects guys talked about recreating the Destroyers of A New Hope, and called them "White Star Destroyers" and made them white. I also read on some other sources that the movie props are painted white and only got their final appearance through weathering. But of course 1 drop of grey in 10 parts of white can make a big difference. So I am not so sure that the described white is really pure white... 1 Link to comment Share on other sites More sharing options...
Dubz Posted April 26, 2019 Author Share Posted April 26, 2019 I finally glued the hull together ... I started the case so here are the pictures 🙂 cheers, Dirk 14 Link to comment Share on other sites More sharing options...
DalekCheese Posted April 26, 2019 Share Posted April 26, 2019 Amazing work 1 Link to comment Share on other sites More sharing options...
Getting Old Posted April 29, 2019 Share Posted April 29, 2019 A masterpiece, Very nice work Sir 1 Link to comment Share on other sites More sharing options...
rockpopandchips Posted April 30, 2019 Share Posted April 30, 2019 Beautiful! 1 Link to comment Share on other sites More sharing options...
Gimme Shelter Posted May 2, 2019 Share Posted May 2, 2019 looks cracking 1 Link to comment Share on other sites More sharing options...
Mike Posted May 2, 2019 Share Posted May 2, 2019 I've just played catch-up with this, and it's an awesome undertaking - especially the lights I've got one to do, and with almost the same aftermarket list from what I can see. Did you get any of the GreenStrawberry sets, or weren't they out back then? 1 Link to comment Share on other sites More sharing options...
Caerbannog Posted May 3, 2019 Share Posted May 3, 2019 Awsome work. So 0.3 mm fibers are the perfect size for this kit. Thanks for this - it will help me a lot with my kit - but of course it will be not even half as nice as what you have shown here (if I ever finish it....). 1 Link to comment Share on other sites More sharing options...
Martel768 Posted September 18, 2019 Share Posted September 18, 2019 Roughly how much fibre optic do you need for this level of lighting? Any details on the electronics/power draw? Are the lights purely on/off or do they have logic and effects built in? (I'm thinking of running some relays off of an arduino uno, rather than component-driven effects.) Very nice work... I have this one to start, but might so some much needed learning on the Star Trek Voyager kit I have...rather than screw up the Magnum Opus. 🙂 I feel newly inspired to get back on track with this now. Well done...once again. Link to comment Share on other sites More sharing options...
Dubz Posted September 19, 2019 Author Share Posted September 19, 2019 Thanks for your kind comment 🙂 >Roughly how much fibre optic do you need for this level of lighting? Puhhh, hard to say, approx 1500-2000 maybe more holes I drilled. I did not count them 🙂 > Are the lights purely on/off or do they have logic and effects built in? On/Off. The engines have some logic though via Arduino. cheers Dirk Link to comment Share on other sites More sharing options...
Martel768 Posted September 26, 2019 Share Posted September 26, 2019 Great - 200m of 0.5mm fibre on its way! I know the led-strip-and-holes is easier, but yours (and others who followed the fibre route) seem to come out best, especially with the coloured lights. I'll arduino the engines - as planned...looks like this will need a clear-desk and dedicated effort! Cheers, J Link to comment Share on other sites More sharing options...
Dubz Posted September 26, 2019 Author Share Posted September 26, 2019 Hej J, I did not used 0.5mm (oversized imo) but 0.25mm fibers in 0.3mm holes 😉 cheers Dirk Link to comment Share on other sites More sharing options...
Matt_ Posted January 15, 2020 Share Posted January 15, 2020 Oh dear. My Revell ISD has sat untouched in the box for the last year since we moved house (as has all my model gear ). I finally got around to cutting some sprues this week, and now I've seen this thread, I think you've just added around 3 more years to my build! 😅 AFAICT, this kit is an ISD2 such as Avenger from ESB. Anyone know if there are any parts that are obviously wrong and/or worthy of updating? I think my plan is going to be to get the Green Strawberry engine bells and PE, some fiber-optics, .... and, well, apparently to spend the next year sticking extra greeblies all over it! 🤣 Outstanding work @dubz. Thanks for sharing. 1 Link to comment Share on other sites More sharing options...

Recommended Posts
Create an account or sign in to comment
You need to be a member in order to leave a comment
Create an account
Sign up for a new account in our community. It's easy!
Register a new accountSign in
Already have an account? Sign in here.
Sign In Now