AaronKSJ Posted April 11, 2019 Author Share Posted April 11, 2019 (edited) I'm still no further forward with my quest for a suitable insignia blue for the stars and bars marking that I'll be painting with the aim of some masks.... Nothing massively exciting to report at this point of the build! Most of the main sub-assembly bits are glued together. Think my future is going to involve a fair bit of sanding to smooth out all the joints and trying to re-scribe lost panel lines. Eeeek. Need to finish off painting the engines and then I'll be digging out the Montex mask for the canopy. Although it does include the inside mask, I value my sanity so I'll be skipping that bit. I'll just spray the outside of the frame green before covering it with black, which should look passable. Aaron Edited April 11, 2019 by AaronKSJ Pic error 1 Link to comment Share on other sites More sharing options...
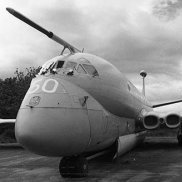
AaronKSJ Posted April 14, 2019 Author Share Posted April 14, 2019 Got all the major bits glued on now. Boy is this a big kit! And size compared to the 1/48 P-38.... It all went together without too much trouble. I ended up with a 1 or 2 mm gap on the underside of each wing which I filled with stretched sprue which worked a treat! And there was a slight step on the top wing joint towards the leading edge. Kind of expect this might be down to poor prep work on my part. But it looks pretty good now. Made a start with the canopy masks, from Montex, which are going down well. I've decided I'm going to go for a faded black paint job, more for aesthetic reasons than owt else. Still not figured out which blue paint to use for the markings. Might just pop into the local Games Workshop store and pick up a few different blues and try to mix something up. Here's one of the engines. Very simple, but it'll be pretty much hidden behind the prop. Aaron 7 Link to comment Share on other sites More sharing options...
Christer A Posted April 15, 2019 Share Posted April 15, 2019 Span wise it's not that much larger than the P-38 but everything else is more massive and sturdy for sure! A lovely engine too, but bonus point for USS Voyager in the background! Link to comment Share on other sites More sharing options...
AaronKSJ Posted April 15, 2019 Author Share Posted April 15, 2019 8 hours ago, Christer A said: bonus point for USS Voyager in the background! Haha, I've been working my way through re-watching the various Star Trek series. So far made it from start to finish through Next Generator and Deep Space Nine, so that's a fair few hours! It's my series of choice to stick on in the background while I model. Last night finished masking of the canopy's and got them glued down. Had a mini panic when I realised I'd forgotten to re-glue the gunners sight thingy which I'd managed to knock off. But luck was on my side and manged to get the canopy off before the glue had fully set. Crisis averted. Probably wont get much done this evening as Game of Thrones is on... 🐲👑 But next up need to mask off the engines and wheel wells - then get to have fun doing a faded black paint job. Aaron 2 Link to comment Share on other sites More sharing options...
AaronKSJ Posted April 16, 2019 Author Share Posted April 16, 2019 Got more done than expected last night! Got various bits masked off and gave it a coat of white paint to prime (although all I had was some Tamiya flat white) So here is the Black White Widow! Tonight I'll start on adding a mottling coat using very thinned down Tamiya Panzer grey. Then for the main colour thinking of using Tamiya rubber black (possibly lightened a little with Panzer grey) Aaron 4 1 Link to comment Share on other sites More sharing options...
Christer A Posted April 16, 2019 Share Posted April 16, 2019 Exciting times ahead! Link to comment Share on other sites More sharing options...
AaronKSJ Posted April 17, 2019 Author Share Posted April 17, 2019 Here's how it stands at the moment! Although it looks a bit circular with the grey it shouldn't be as noticeable once the final colour is down. I'm now thinking 50/50 tamiya panzer grey / rubber black which I'll try out on the underside first. Realised I've forgotten to glue on the side antenna bits and the pitot tube, so will have to get them sorted out tonight. Aaron 6 Link to comment Share on other sites More sharing options...
Col. Posted April 17, 2019 Share Posted April 17, 2019 I'm interested to see how this turns out for you Aaron. Link to comment Share on other sites More sharing options...
AaronKSJ Posted April 18, 2019 Author Share Posted April 18, 2019 10 hours ago, Col. said: I'm interested to see how this turns out Yeah, I'm having doubts about how it will look. 😑 I spent a while yesterday looking at various photos and videos on youtube and all the black versions look a fairly solid gloss black with no fading. Although lots of chipping down to the bare metal. The one colour photo I came across that showed a really faded / worn looking P-61 turned out to be green / grey once I read the description - to my eyes it still looked black and not green! So I figure the various black & white photos I've seen that I thought showed faded black ones were in fact green/grey! So I'm going to have a ponder about what to do. I'm leaning more towards giving it a top coat of 100% Tamiya rubber black (XF-85) thinned down so that at least a little of the mottling shows through. Then use a light grey oil paint wash to highlight some of the panel lines to show grime. Aaron 1 Link to comment Share on other sites More sharing options...
Mottlemaster Posted April 18, 2019 Share Posted April 18, 2019 Looks like its been captured by the Luftwaffe and painted over 😉 Link to comment Share on other sites More sharing options...
AaronKSJ Posted April 18, 2019 Author Share Posted April 18, 2019 @Mottlemaster it does have a look of the UHU now you come to mention it! Link to comment Share on other sites More sharing options...
Corsairfoxfouruncle Posted April 18, 2019 Share Posted April 18, 2019 7 hours ago, AaronKSJ said: I spent a while yesterday looking at various photos and videos on youtube and all the black versions look a fairly solid gloss black with no fading. Although lots of chipping down to the bare metal. I believe when i built mine, i found while researching. That no primer had been used during the painting process. Thats why they chipped so badly. 1 Link to comment Share on other sites More sharing options...
AaronKSJ Posted April 23, 2019 Author Share Posted April 23, 2019 On 18/04/2019 at 17:49, Corsairfoxfouruncle said: That no primer had been used during the painting process. Thats why they chipped so badly. Excellent, that's good to know! I seem to always have difficulty with chipping and getting it to look "right" I guess at least with this plane I'll have lots to practice on. Gulp. Since my last post I managed to get a fair bit done, for didn't get any interim pics of progress. Following on from the squiggly grey line mess that I made, gave the P-61 a coat of very thinned down Tamiya rubber black. Turns out my airbrush work needs a lot more practice. Managed to get a few very grainy / rough paint patches on the booms under the wing 😥 I guess from over spray on the wings were the paint has dried before it's hit the boom. Which I hadn't expected as the paint was thinned heavily - 50/50 ish It was so bad that lightly brushing it and it rubbed off. D'oh. So had to do some touching up. To be honest the overall finish was pretty poor and I was really annoyed with how it turned out, it is rough in other areas rather than a nice smooth coat. Gave it a couple of coats of Klear - which has helped a tad. But I suspect I might still get some silvering when the decals go down. The Klear coat helped to darken down the rubber black, which was initially looking pretty grey on such a big model! And then last night gave the entire thing a wash with black oil paint heavily thinned to darken it further and with the aim of picking out the panel lines - not sure this worked that well. But hey-ho. This evening planning on using a light grey oil wash to pick out some of the panel lines. But this is how it stands at the moment.... Thanks for looking Aaron 6 Link to comment Share on other sites More sharing options...
Corsairfoxfouruncle Posted April 23, 2019 Share Posted April 23, 2019 Your paint sounds as though its thinned enough. But sounds like the paint is drying before it gets to the surface. Move the Airbrush closer to the surface. You also may want to dial your pressure down a little. That should compensate for the reduced distance. I will try to help with more widow info if you need any. I hope that helps a little ? Dennis Link to comment Share on other sites More sharing options...
AaronKSJ Posted April 24, 2019 Author Share Posted April 24, 2019 19 hours ago, Corsairfoxfouruncle said: I will try to help with more widow info if you need any. Thanks Dennis, I think you're quite right about the airbrush being too far away from the model! The poor paint finish (roughness) has been causing me no end of grief since then. 😭 Next time I will have to sand it back and start again rather than plowing on. Last night applied a light grey oil panel line wash, which went down fine on one wing.... But on the other one, it had more of that rough paint finish I've mentioned, so rather than the oil and thinner flowing nicely down the panel lines, it seeped out across the panels and left awful splotches (even when using my smallest brush the capillary action was still enough for it to escape the panel line) So there was a lot of cursing! And tried to neaten it using just thinner and a brush - with limited success. It's fair to say by the end of yesterday evening I was pretty peeved! This morning decided to tackle the decals. It did not go well! They are very thin, but really prone to curling and folding over themselves. The "sleepy time gal" decal nearly pushed me over the edge when I manged to get it folding over itself in around 5 different places. Talk about making a pigs ear of it! 🤬 However, my heart rate has returned to normal, and got them all on. Tonight I'm going to tackle the hundred micro air bubbles that have formed under some of them. No amount of Sol & Set seemed to help. So with the aid of my sharpest pin, I'm hopefully going to be able to sort things out. If tomorrow I post a picture of my bin, you'll all know I didn't have a good evening 😁Aaron 1 Link to comment Share on other sites More sharing options...
Mottlemaster Posted April 24, 2019 Share Posted April 24, 2019 We have had some unseasonaly high temps here and with low humidity can cause paint to dry in the air . itry to avoid spraying untill things cool down later in the evening . 1 Link to comment Share on other sites More sharing options...
AaronKSJ Posted April 24, 2019 Author Share Posted April 24, 2019 Thanks @Mottlemaster that's a good tip to know! I'm still a novice when it comes to all things airbrush related Link to comment Share on other sites More sharing options...
Corsairfoxfouruncle Posted April 24, 2019 Share Posted April 24, 2019 2 hours ago, AaronKSJ said: It's fair to say by the end of yesterday evening I was pretty peeved! This morning decided to tackle the decals. It did not go well! When it goes south like this ⬆️for me. I just push the model aside, and work on something else for the day. I usually have 3-5 kits going at one time. Currently I'm at 5 about to start a 6th when the sharkmouth build opens up in a week or two. 1 Link to comment Share on other sites More sharing options...
AaronKSJ Posted April 24, 2019 Author Share Posted April 24, 2019 @Corsairfoxfouruncle I do have the Hobby Boss P-38 waiting in the wings, that will be getting built in the Lockheed GB I only have one other part built kit at the minute - a Tamiya 1/35 Panzer III but that is at the chipping stage now... I'll only get an hour on the bench tonight, so will probably just work at sorting out the air bubbles. Then I'll be away until next Sunday, which will give me plenty of time to regroup and continue with the dreaded (to me at least) chipping! I'd spotted the sharkmouth GB, and was thinking of finally having a go at the Academy reboxed AM 1/48 B-25G - using the sharkmouth scheme. I'll see how I feel once this P-61 and the P-38 are completed, I might just stick with some simpler builds until I've sorted out my airbrush skills! 1 Link to comment Share on other sites More sharing options...
trickyrich Posted April 25, 2019 Share Posted April 25, 2019 it doesn't look to bad at all. Pressure is a really big thing with airbrushes, you need to go quite low, you can thin the paint way more if you want (maybe should), just means you'll need to do more coats, but its a great way to give some depth to the finish and achieve different effects. If you do find that it goes on too dry and you get a "rough" finish, just let it dry completely (leave for a day of so). Then with a soft cotton cloth gentlely rub back the paint surface, it's almost like doing a fine polish, you'll knock back the finish and it'll become quite smooth again. You can then either re-paint or clear coat from there. You can do the same with the final flat clear coat, it helps give a worn patchy finish to the paint. The pre-paint work was great, I did something similar with my F-14, the trick after that is to use really thin coats and gradually build up the lays to give you effect you're after. Think I had 14+ layers of colour on the F-14. To be honest I probably should have thinned the paint even further, I was using super thin acrylic lacquer straight from the bottle (it's incredibly thin to start with), but with Tamiya acrylic you're safe to go to 75-80% thinner @ low pressure, the trick is to not "wet" the surface. I'll be doing something along those lines with the Skyknight, being resin getting the base surface is super hard, so it's really not suitable for lacquer acrylics. I'll be using Tamiya NATO black for the paint. The simple way for chipping (a bit late for you) is to spray the model first with a metallic lacquer (Model Master Metalizer or Alclad), and polish slightly, paint the main colours then when dry carefully using some stick tape, lift off small chips of paint, you can use a wooden tooth pick or cocktail stick along the panel lines. Mistakes can be remarked with post-it notes and re-sprayed, gives a nice mottled/repaired finish. Link to comment Share on other sites More sharing options...
AaronKSJ Posted April 25, 2019 Author Share Posted April 25, 2019 UPDATE: The bin remains unfed 😋 Spent a while pricking the various bubbles under the decals and applying numerous coats of Micro Sol and they now look a lot better. Not great, but definitely an improvement 😁 To be fair to the decals, where they have gone down nicely they have really conformed to the panel lines and look really good. Thanks @trickyrich The mottled effect looked pretty good to start with - but after the Klear coat darkened it down a tad along with the subsequent black oil wash it's barely noticeable. Which I guess is more in keeping with how the real thing would have looked. I did try to factor in the darkening down from Klear and wash, but not enough. Next Time.... I'm pretty set on building a P-38 next, so I'll be trying black basing again, going for drab over grey so I can really go to town on making it look dramatic. I do like the idea of pre painting first with a metallic as you've mentioned. I've a Kate somewhere in the stash that I think will be a good test bed for that technique! With the chipping this time round going to try a mix of silver and black then use a 5/0 brush and some sponge for some of the heavier areas (leading edges of wings etc) The messy grey splotches for the panel wash actually seem to have been mainly recovered too, which is great! Once the chipping is out of the way, will be doing the exhaust stains. Not entirely sure how to go about. What I've though about doing is: Tamiya white with a few drops of Tamiya clear yellow mixed in and then THIN coats to build up the stains, with a final thin coat of Tamiya smoke. Thoughts / Suggestions on this welcome. Aaron Link to comment Share on other sites More sharing options...
trickyrich Posted April 25, 2019 Share Posted April 25, 2019 Tamiya smoke works well. Have a good look at photos of the real thing to get the right colour mixes, different engines ran quite differently. Some look to run very rich with really sooty exhaust marks other leaner with quite pale exhaust stains. Come to painting...I'd go 90/10 mix of thinner/paint and just slowly build up the effect. This is what I did on my Sea Fury, it wasn't perfect but I did manage to get the "flow" to match the real thing. The RAN aircraft seem to be run much leaner and the exhaust stains were quite light in colour, while the RN ones were very sooty and dark looking. It's a bit easier on a large model but do some practice runs to get use to the super thin mix. You can do all sorts of cool stuff with these super thin paint mixes. The sponge trick works well too. 4 Link to comment Share on other sites More sharing options...
Christer A Posted April 30, 2019 Share Posted April 30, 2019 Getting a good smooth coat is not an easy task, but I's say you hit the bad paintjob-look! The cloth rubbing is a very good thing to do, in between every new layer of paint as well. Can't wait to see how it looks with the stickers on! Link to comment Share on other sites More sharing options...
AaronKSJ Posted April 30, 2019 Author Share Posted April 30, 2019 Not had a chance to touch the P-61 since last week. Tonight is hopefully the night I get to start on the chipping. Luckily there are other odds and ends left for me to do too (props / interior undercarriage doors / landing gear etc) to give me breaks between the chipping. While I was away for a few days managed to squeeze in a trip to the model shop in Halifax. To pick up a few essential paint supplies etc. I did stubble across this....... MINE Might see if I can keep my mitts off it for the Film, Fictional & Spec GB later this year. Aaron 3 Link to comment Share on other sites More sharing options...
Christer A Posted April 30, 2019 Share Posted April 30, 2019 "I was just going to buy some paint" That's how the story ALWAYS goes. 😁 Great find, though! Those Bandai Star Wars kits are great! Link to comment Share on other sites More sharing options...

Recommended Posts
Create an account or sign in to comment
You need to be a member in order to leave a comment
Create an account
Sign up for a new account in our community. It's easy!
Register a new accountSign in
Already have an account? Sign in here.
Sign In Now