Filler Posted January 25, 2020 Author Share Posted January 25, 2020 Thanks for the comments everyone. So, I did apply another coat of Klear. I tried to make it a very light coat as I didn't want to over do it and end up with a 1:47 scale Tornado. Plus I'm frightened of getting pooling of the Klear. This extra coat has helped I think and whilst not perfect, with a quick pass of a polishing stick has achieved what feels like a pretty smooth surface for decaling. I will give it a flat coat at the end. I have a rattle can of Humbrol Matt varnish that I think I'll use. Hopefully as you say Ivan, that will even everything out nicely. David, yes I painted the navigation lights with Tamiya clear red and green with a tiny brush while they were still on the sprue. They have come out pretty well if I do say so myself. Back home now after a day of grocery and car shopping, so I now plan to run upstairs and start applying some decals before my wife gives me some chores. Fancy I'll have this finished by next weekend. 3 Link to comment Share on other sites More sharing options...
Filler Posted February 5, 2020 Author Share Posted February 5, 2020 It certainly wasn't finished by the weekend as I'd predicted. So the decaling has been going on for a good few days now (on and off) and it's not been plain sailing. The Xtradecals for the serial and OEU were ok, but not surprisingly the Italeri decals for insignia and stenciling have been a nightmare. After all, they have been sat in the box (mostly it in sheds and attics) for 26 years and I doubt they were great even in 1994. So they are quite thick, yet also prone to disintegrating. The walkway ones have been really awful, ill-fitting and that is before they fragmented as I tried to position them. I can’t blame Italeri and the passing of time entirely though. I don’t know how I did it but I positioned the tail insignia a little higher than it should be and by the time it dawned on me, there was no moving them. My other observation about the decals is that whilst they are basically to scale, they really don’t look to scale. The walkway markings are just ludicrous. I’ve been through many books and countless online images of Tornado F.3s and they are barely visible on most photos. On my model they stand out to the point that they are distracting. They are undoubtedly oversized in width, and they are just far to bold. Anyway, They are all finally on and next up is adding the undercarriage and the easily knocked off probes and antennas. Still struggling with the Klear as well. Just hoping that a rattle can matt coat will hide the brush strokes. 6 Link to comment Share on other sites More sharing options...
Lord Riot Posted February 5, 2020 Share Posted February 5, 2020 Looks good to me! I think you've got the grey shade spot on too, looks very nice. 1 Link to comment Share on other sites More sharing options...
Filler Posted February 5, 2020 Author Share Posted February 5, 2020 (edited) Thanks mate. It took a couple of tries to get it looking right. It was actually the underside grey that I really struggled with but I'm pretty happy with it now. I'll put up a couple of extra photos later, hopefully with added undercarriage and tail planes. I'm at that exciting stage where you start thinking about what to build next. edit: Here's the underside. Pretty happy with it in the end. Enough contrast with the top but hopefully not too light. The funny thing is, looking through the various books I have and photos on line, you can find so many variations that you can find a match to what you've done sooner or later. Edited February 5, 2020 by Filler 4 Link to comment Share on other sites More sharing options...
bar side Posted February 5, 2020 Share Posted February 5, 2020 I must admit i didn’t want the walkway decals to bubble or mess up the finish so I drew them on with a white drawing pencil I borrowed from my daughters colouring pencil set. As you say they are barely visible on the real thing 1 Link to comment Share on other sites More sharing options...
Filler Posted February 6, 2020 Author Share Posted February 6, 2020 (edited) GAME OVER Oh well, that's all my (occasional and intermittent) modelling of the last 12 months up the swanny. Just as I was getting in touch of the finish line, and was fairly happy with the colours and finish, I took to it with a rattle can of Humbrol matt varnish and now I have a write off. I don't know for sure what went wrong, but I suspect that it was too cold when I sprayed the varnish and it's landed on the model in partially frozen particles. I tried some very gentle rubbing, polishing, sanding to no avail. So I thought that maybe another coat of Klear with some Mr Levelling Thinner might help. It hasn't. If I'd been building a USN F-14 Tomcat I'd be ecstatic, but unfortunately I've achieved a finish that has never been seen on a Tornado F.3, but I can recommend this as a much quicker and easier alternative to salt chipping. Really annoyed with myself for this. Ok, it wasn't all that anyway (lots of little errors here and there), and hardly competition winning stuff, but it was ok by my standards and it was the result of all the available modelling time I've had since last February. I'll still stick the wheels and bits on it as whilst it's a complete cock-up, it will hopefully serve as a reminder of what happens if you rush and don't think and ask questions before doing things you do only once in a blue moon. Edited February 6, 2020 by Filler 5 Link to comment Share on other sites More sharing options...
Lord Riot Posted February 6, 2020 Share Posted February 6, 2020 (edited) Mate that's such a bummer, I hate it when stuff like that happens. You never know, there might be someone on here with all the expertise we see written on BM that knows how to recover it? Or, how about considering turning her into this one instead? Pretty sure black would cover it up, I'm sure there must be aftermarket decals for it too? Not as nice as a grey one I agree but at least you could still have a cool looking F3. On ebay; Edited February 6, 2020 by Lord Riot 3 Link to comment Share on other sites More sharing options...
George Norman Posted February 6, 2020 Share Posted February 6, 2020 Some lads would kill for a weathering finish like that, Maybe enhance the panel lines with some pastels or such to bed in the effect, you never know. I gace fierce problems with cold, mositure and paint these days. Very off putting. Link to comment Share on other sites More sharing options...
Filler Posted February 6, 2020 Author Share Posted February 6, 2020 @Lord Riot, That black F.3 is an option for sure, but I think for now at least I'll leave it as a lesson learnt. Don't think I could face a few more months of this kit now either. @George Norman, it's crazy really, if I had been attempting a US Navy Tomcat, I'm sure I would not have got close to this finish for love nor money. But when trying to build a type that is (exhaust staining aside which I chickened out of trying) a very clean jet I have indeed got a very weathered look. Usually the 'shelf of doom' is the name for those half built and abandoned projects, but my shelf of doom is my finished stuff 😭 Next up in my quest to waste perfectly good model kits shall be Italeri's 1:48 scale Mirage IIIE. Log in next February to see how I mess it up 1 Link to comment Share on other sites More sharing options...
Filler Posted February 7, 2020 Author Share Posted February 7, 2020 I've calmed down a bit now and although the speckled finish is here to stay, I've brushed some W&N satin acrylic varnish on, stuck on the tailplanes and removed the canopy masking. Still got to get its legs on and attach a good few tiny little antenna type bits yet. If you don't get too close it's not looking so bad. Here she is next to my other finished model, an Airfix Jaguar. 6 Link to comment Share on other sites More sharing options...
Alan P Posted February 7, 2020 Share Posted February 7, 2020 Glad you stuck with it, hoping it'll make it to a display shelf eventually! 1 Link to comment Share on other sites More sharing options...
Filler Posted February 8, 2020 Author Share Posted February 8, 2020 Got the empty weapons pylons on and attached the undercarriage legs. Leaving them to dry fully over night before adding the wheels. I'm going to try and sand a slight flat on the tyres to reduce the tip-toes appearance when finished. A rather grainy image of the undercarriage drying with (hopefully) gravity assisted straightness. 2 Link to comment Share on other sites More sharing options...
Filler Posted February 11, 2020 Author Share Posted February 11, 2020 Ok, calling this finished at last. Not exactly what I hoped for, but not too bad considering how little modelling I do and therefore the lack of practice - that's my excuse anyway! An evening of painting and fixing antenna and pitot types bits, and reattaching the undercarriage bits I knocked off whilst trying to glue the other parts on. And here we are. Now on to either a BAF F-16A (Hasegawa), French Mirage IIIE (Italeri) or a Harrier GR.3 (Airfix). 6 Link to comment Share on other sites More sharing options...
bar side Posted February 11, 2020 Share Posted February 11, 2020 Looking good - nice result. Always liked the Dutch and Belgian F-16s. The Harrier isn’t much fun & looks quite a bit undersized around the cockpit to me. Save the nose cone & graft it on to a Monogram AV-8A and you will have a better kit. Built the Monogram AV-8B as a GR5 and that was a dream compared to the Airfix GR3. 1 Link to comment Share on other sites More sharing options...
Filler Posted February 12, 2020 Author Share Posted February 12, 2020 Cheers Ivan. I should do the F-16 as I actually started it about 6 years ago but didn't get far and stuck it in a shoe box under a bed. It made a brief re-appearance for a group build 3 years ago, but it quickly returned to it's shoe box. It has a slight twist in it's tail that I think is a result of being poorly stored. Regarding the Airfix Harrier GR.3; that is a conundrum. I'd read plenty about it not being a good kit for many reasons and I really saw how undersized the cockpit is when I saw some alongside Kinetic Sea Harriers on the Harrer SIG table at Bolton. Looks to have been squashed in a vice. So the Monogram idea sounds good, but with Kinetic apparently due to release a GR.3 soon(ish) I think I'd be better off waiting for that as the Monogram AV-8As don't seem too common and as far as I can make out, aren't exactly given away either. The one thing pushing me to just bite the bullet and build it is that I have resin intakes, a resin seat, brass pitot and an etch sheet for it. So maybe I just go for the Italeri Mirage IIIE (but that doesn't exactly get spoken well of either!) Link to comment Share on other sites More sharing options...
exdraken Posted February 12, 2020 Share Posted February 12, 2020 very nice result nonetheless! of your options, i#d certailnly go for the Mirage not because the ESCI kit, but of the plane itself! not sure which boxing you have, https://www.scalemates.com/de/kits/italeri-2674-mirage-iii-e--101731 this one has many interesting decal and load out options! add a Neomega resin cockpit for this kit, leave the canopy open and add a AML resin exhaust and you will get a very nice model! if you want a very detailed Mirage IIIE, go for a Kinetic kit.... not easy to build though either The Airfix GR.3 is also in need of lots of upgrades, the Hase F-16 surely the best kit out of the 3.... but bare cockpit and landing gear. No modern F-16AM possible either without upgrades cheers, Werner 1 Link to comment Share on other sites More sharing options...
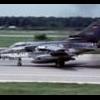
Filler Posted February 12, 2020 Author Share Posted February 12, 2020 (edited) That's the very edition of the Mirage kit I have. I've chosen the scheme for 619 4-BJ EC 2/4 La Fayette based at Luxeuil in 1987. I did ponder the resin upgrades, but I'm really just wanting to build a kit OOB and fairly quickly in order to keep the momentum going and to practice the skills that went wrong on the F.3, such as airbrushing, weathering, varnishing etc. The F-16 is supposed to be the Belgian 350 squadron special from 1987. And that has a very daunting paint job!! (Here's a link to a photo of FA-18 on Flickr) The Harrier, I might just go for it. As the kit is so bad, I guess it makes no odds at all if I have any painting or varnishing disasters. And just for fun, here's a very crudely superimposed picture of my finished Tornado F.3 of the RAF Coningsby based Tornado Operational Evaluation Unit, circa 1988 onto a photo of a HAS at what is now Newquay airport (formerly RAF St Mawgan). Edited February 12, 2020 by Filler added link to BAF F-16 photo in Flickr 2 Link to comment Share on other sites More sharing options...
bar side Posted February 12, 2020 Share Posted February 12, 2020 Always liked the Mirage - fancy a 2000 and a 4 at some point. Did a Fujimi recce Mirage once but that was about as under scale as the Harrier. Almost felt 1/72 at times. So FOD covers, chicks & rbf tags for the posed Tornado? 1 Link to comment Share on other sites More sharing options...
Filler Posted February 13, 2020 Author Share Posted February 13, 2020 Not sure about FOD covers etc. To be honest, although it lacks in terms of realism, I prefer what I call the 'airshow look'. Most of my experience of these aircraft has been looking at them either performing their displays or in the static park. I quite like it as closed canopies and no intake covers is both familiar and easier. I guess some chocks would be good and not too difficult though. Decision made regarding what is next too. Thanks to you guys (@exdraken & @bar side ), I've decided that the Airfix Harrier is a no go, so I'll hang on to the aftermarket goodies and wait patiently for a Monogram AV-8A or instead buy the Kinetic GR.3, whichever appears first. I've also decided that the Italeri Mirage IIIE would be wasted straight OOB and have ordered a resin exhaust and cockpit. I figured that as I already have the kit, the extra cost is slightly less than buying the Kinetic kit and even that has aftermarket resin exhaust, cockpit and wheels available, which says to me that the kit isn't all that OOB itself. So next is to crack on with the F-16. And I will post up an RFI of the Tornado if I can get some half decent photos at the weekend. Thanks all for your support and input. 1 Link to comment Share on other sites More sharing options...
Filler Posted April 1, 2021 Author Share Posted April 1, 2021 This was the last kit I finished and after a more than a year sat on a shelf quietly gathering dust, I have managed to un-finish it. I stumbled across a photo of the real aircraft and whilst comparing the two, I noticed that I had managed to attach all three undercarriage legs the wrong way round. Once seen I was irked at my error and then stating messing and before I knew it I had snapped off the the gear. I'm now trying to figure out if I can reattach it correctly and in a way that it will still support the aircraft. I guess just sizeable blobs of superglue is the only way to proceed unless anyone has a better suggestion? As you can see, they are clean breaks but have left the attachment points blocked in the aircraft and snapped off on the gear. And I've also broken a wheel off. Should have just left it alone. Link to comment Share on other sites More sharing options...
bar side Posted April 1, 2021 Share Posted April 1, 2021 That looks like the mystery ESCI main gear where the main strut hovers in mid air not connected to the body at all. I read somewhere that the ESCI design team based the design on what they could see on the prototype & guessed the rest. I did the ESCI one first & the Revell one made a lot more sense. Can’t find a decent picture of it though They will go back on ok I am sure. Talking of F-16 builds - as you were a while back - I built a few just after Christmas. I already had one of these but the other 3 are new. Still got one to finish as a Spangdahlem C model 2 Link to comment Share on other sites More sharing options...
Filler Posted April 1, 2021 Author Share Posted April 1, 2021 That's a lovely collection @bar side. Unfortunately the one I mentioned cracking on with a year ago (and that was started X years ago) has made no progress. Regarding my Tornado undercarriage, I'm thinking that if I originally used poly cement, I could possibly drill new fixing holes in the underside and drill holes in the undercarriage parts and use some plastic rod or maybe wire to try and create stronger joints. I'm not sure I'll get away with simply gluing them as they are because with the added nose weight, this model is not exactly light. I expect the trick with drilling will be getting the holes centered for correct alignment. Link to comment Share on other sites More sharing options...
bar side Posted April 1, 2021 Share Posted April 1, 2021 Could be a plan to superglue some new wire pins on to the undercarriage fixing points and drill out the holes. I use an old watchmakers screwdriver set to open out the holes rather than a pin chuck drill. One of those F-16s above arrived part built and had the glued on wheels snapped off. Both mains were in at least 3 parts, but went together ok. It the F-16 has no nose weight & is a lot lighter than a Tonka Link to comment Share on other sites More sharing options...

Recommended Posts
Create an account or sign in to comment
You need to be a member in order to leave a comment
Create an account
Sign up for a new account in our community. It's easy!
Register a new accountSign in
Already have an account? Sign in here.
Sign In Now