Wonky Donkey Posted January 28, 2019 Share Posted January 28, 2019 (edited) Howdy folks I don't do build threads for all my builds, but this one could be a laugh. Mostly for you lot... 😂 I could have titled the thread "bloke who normally avoids PE, builds model almost entirely made of PE". But I didn't. I picked up this old eduard kit for buttons on some auction site or other. I like a good WW1 kit, and this one's a bit out of the ordinary, I guesss. Here's what you get: Flash was thrown in for free..😂 As you'll see, there are two PE frets: These cover full interior, struts, u/c, spoked wheels, guns, bomb rack, engine.. Instructions are, erm, rudimentary. It has to be French, so I'll do option B as that allows a wee break from CDL and has an interesting armament fit. Now, I've never not finished a model once I've started. Granted, some have turned out rubbish, but never given up on one.. There's more than a fair chance this could break my duck. 🦆 If the interior goes together, we should be alright. Anyway, I'm up for the adventure. Here we go then... Cheers W-D Edited March 6, 2019 by Wonky Donkey 5 Link to comment Share on other sites More sharing options...
Wonky Donkey Posted January 28, 2019 Author Share Posted January 28, 2019 (edited) Ok, so I decided to just jump in and make a start. The main fuselage interior/cockpit section needs to be constructed first. It's a large piece of brass, but basically an open box structure. I don't have a proper folding tool as I don't normally use much PE. So knives and tweezers made do: I also randomly had a go at the seat. Curved bends always more tricky for me (any tips gratefully received), so this was another early test : Not perfect, but not too shabby either. More of the same/similar to come.. Cheers W-D Edited March 6, 2019 by Wonky Donkey 7 Link to comment Share on other sites More sharing options...
Marklo Posted January 29, 2019 Share Posted January 29, 2019 Looks great to me. I got some PE seatbelts today and it just struck me that I have never actually used PE before 1 Link to comment Share on other sites More sharing options...
Brandy Posted January 29, 2019 Share Posted January 29, 2019 Looking good. I'd stick some thin pieces of strip to the frame parts to give a bit of depth. Ian 1 Link to comment Share on other sites More sharing options...
Wonky Donkey Posted January 29, 2019 Author Share Posted January 29, 2019 5 hours ago, limeypilot said: Looking good. I'd stick some thin pieces of strip to the frame parts to give a bit of depth. Ian Good suggestion limey. I'll see how much is visible when I dry fit this lot into the fuselage and will see if it's worth it at that point. W-D Link to comment Share on other sites More sharing options...
Wonky Donkey Posted February 3, 2019 Author Share Posted February 3, 2019 So, only a small update to report for now. I've got all the interior parts together, and ready for primer. A test fit in the fuselage halves suggested you could only really see the top rails so, following limeypilot's suggestion, I added some styrene strip to bulk it out a bit. Seat 'cushions' are just from filler. Control column and link rod are made from pins which were actually supplied in the kit (there's another for the machine gun mount)!! The sort of curved plate to the left in the top pic I can't quite figure out. Instructions are vague on location, but I THINK it's supposed to represent the back of the fuel tank so I'll proceed on that basis unless anyone knows different..... Meantime, I've been cleaning up parts and drilling mounting holes for undercarriage, tail skid and wing "struts". The horizontal tail plane has a flimsy rod to mount to the fuselage and accept control horns. Its also broken on the sprue.. 😂 So I'll have a go at replacing this with brass rod. No rush though... Til next time. W-D 6 Link to comment Share on other sites More sharing options...
clive_t Posted February 3, 2019 Share Posted February 3, 2019 Interesting subject, I read somewhere that an aircraft such as this took down the first Zeppelin airship in air to air combat. Following with interest! 1 Link to comment Share on other sites More sharing options...
Wonky Donkey Posted February 3, 2019 Author Share Posted February 3, 2019 52 minutes ago, clive_t said: Interesting subject, I read somewhere that an aircraft such as this took down the first Zeppelin airship in air to air combat. Following with interest! Pierced it with the pointy end of a baguette.. Probably. I think a morane saulnier type G(?) - looks more like a fokker eindekker than a parasol set-up - was the first credited with bringing down another plane. Rammed the thing, supposedly. W-D Link to comment Share on other sites More sharing options...
clive_t Posted February 3, 2019 Share Posted February 3, 2019 12 minutes ago, Wonky Donkey said: Pierced it with the pointy end of a baguette.. Probably. I think a morane saulnier type G(?) - looks more like a fokker eindekker than a parasol set-up - was the first credited with bringing down another plane. Rammed the thing, supposedly. W-D The pilot was Reginald Warneford, a Flight Sub-Leutenant in the RNAS. Apparently he brought it down with a succession of 6 20lb Hales bombs dropped on top of it, fore to aft. You're right about the type G though, there's a link to an RFI describing that very event, accessible from my 2017 Yearbook thread. 1 Link to comment Share on other sites More sharing options...
Brandy Posted February 4, 2019 Share Posted February 4, 2019 13 hours ago, clive_t said: Interesting subject, I read somewhere that an aircraft such as this took down the first Zeppelin airship in air to air combat. Following with interest! Correct, it was Sub-Lt Warneford. Option C on the painting schemes at the top of this post. Re the curved piece of pe, my guess is that it is for the underside of the nose. Check to see if it fits there. Nice progress so far! Ian Link to comment Share on other sites More sharing options...
Wonky Donkey Posted February 5, 2019 Author Share Posted February 5, 2019 (edited) Enjoyed the write up of that @clive_t. Thanks for sharing the link. @limeypilot I wondered that too. But here's the instructions (it's part PE 58): So unless they really cocked up, it's defo part of the innards. I found a pic online of a stripped back build of one of these where I got the conclusion it's to represent the back of the fuel tank, but I'll be damned if I can find it again now 😡 W-D Edited February 5, 2019 by Wonky Donkey 2 Link to comment Share on other sites More sharing options...
Marklo Posted February 5, 2019 Share Posted February 5, 2019 Lovely job so far. Good tip on the PE, may add some strip to th einnards of th eFLoh to give it a bit of bulk. 1 Link to comment Share on other sites More sharing options...
Wonky Donkey Posted February 5, 2019 Author Share Posted February 5, 2019 Thanks for the comments folks. Yesterday I spent some time trying to get the fuselage halves to at least seem like they came out of the same box... A bit more fettling is needed but they're much closer now, though filler will be needed! Close enough to spray the CDL inside though. Used the same colour as the base for the "wood" in the cockpit before brushing some oils over. Wanted a fairly dark wood (no particular reason), but given very little can be seen I'll not mess around with grain effects too much (that's my excuse anyway.. 😂). Just gotta leave it to dry now before I can paint some details. Yawn.. Time to think more about the tail. I'll defo replace the broken plaxtic bar with rod. But I wonder if I could mount a slightly larger diameter tube to the rear of the fuselage and then insert the tail to that. Might give the illusion that it's not glued directly to the fuselage... Maybe. I'll drill through the fuselage sides and insert some rod there too as that's quite a prominent feature (pic in public domain): I can also get on with the engine. Kit includes a white metal engine which is a billion times better than the plastic parts, if still a bit rough. There's PE to enhance it (of course). On we go. W-D Link to comment Share on other sites More sharing options...
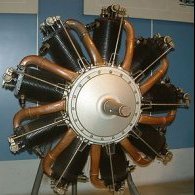
Wonky Donkey Posted February 5, 2019 Author Share Posted February 5, 2019 Decided to build up the engine. Curiously, both the plaxtix and white metal engines are 7 cylinder, but the instructions suggest this only applies to option A. Options B and C are supposed to get a 9 cylinder engine (le rhone, presumably?). Instructions clearly show 9 cylinders and the corresponding pe part is clearly meant for 9. There's no 9 cylinder parts in my box so I just had to go with it (crap pic - sorry) : And a reminder of why I don't generally go for PE bits. What a PITA, and (entirely due to my incompetence) they don't even look that great IMO. Paint might help and its half hidden under the cowl, so... Enough, already. W-D 3 Link to comment Share on other sites More sharing options...
TallBlondJohn Posted February 5, 2019 Share Posted February 5, 2019 Engines got swapped depending on what was available and what needed servicing, so I wouldn't lose sleep over the number of cylinders. Looks good so far! 1 Link to comment Share on other sites More sharing options...
pheonix Posted February 7, 2019 Share Posted February 7, 2019 Great to see a WW1 type being modelled. I scratch built one of these in plastic some years ago - getting the wing in the right place and angle was fun, but that apart it was straightforward. The detail you have in your model is certainly impressive and looks the part in every way. P 1 Link to comment Share on other sites More sharing options...
Martian Posted February 7, 2019 Share Posted February 7, 2019 Back of the fuel tank was my gut reaction for part 58. Its also logical seeing as how there is not many other places the tank can go. Martian 👽 1 Link to comment Share on other sites More sharing options...
Wonky Donkey Posted February 8, 2019 Author Share Posted February 8, 2019 (edited) 23 hours ago, Martian Hale said: Back of the fuel tank was my gut reaction for part 58. Its also logical seeing as how there is not many other places the tank can go. Martian 👽 Yes, and surely something must fill that space... Anyway, that's where it went. I've finally finished the painting of the cockpit and fuselage interior now: It's a little messy, but not too much will be visible despite quite a large opening, so it'll pass my lax QA procedures.. 😂 Next I'll fasten the fuselage together. Expecting quite a bit of work in that as the halves don't mate too well. Then onto the tail I mentioned earlier and then it might be time for paint before tackling the landing gear and struts. As @pheonix says, lining that up could be vexing.... Cheers for looking in. W-D Edited February 8, 2019 by Wonky Donkey 1 Link to comment Share on other sites More sharing options...
Wonky Donkey Posted February 17, 2019 Author Share Posted February 17, 2019 Hi all, A bit of progress to report on this. After much fettling, filling and sanding I managed a decent join on the fuselage halves. I got a bit bored with that so went and finished this instead: Enthusiasm restored, I went ahead and added the external PE parts. For some reason I had difficulty getting a few of them secured with CA glue. Peeled right off even after an hour or so. Surface was good and clean/smooth so far as I could tell. All seemed OK in the end though, but happy to hear of any thoughts on why that might have been. Then the tail. Originally I planned to drill into the tail and insert some rod, but changed my mind and carved out a channel instead. A very slightly wider piece of tubing has been mounted on the rear of the fuselage into which I'll insert the tail at the end. So I reckoned it was best to paint the main airframe parts at this time, before adding the potentially fragile undercarriage, tail skid and struts. So a shot of tamiya white primer first. I was expecting a bit more work to be needed on the fuselage join but I reckon it'll pass. I'm aiming for fairly grubby/stained on this one. There's a good photo online of one really showing stains on the fuselage sides which I'll use as justification! For the top surfaces/sides, I'll shade either side of the ribs/frame, but underneath I've drawn the framework on in pencil so it can show through the CDL and simulate light coming through. Supposedly. That's enough for now. W-D 4 Link to comment Share on other sites More sharing options...
pheonix Posted February 17, 2019 Share Posted February 17, 2019 Got to write that the Spitfire looks really good, especially in desert markings. The PE looks great on the fuselage and the ribs on the wing too. With reference to shading the sides of the rib tapes: since when did you see a shadow in these areas? This is a fad which has somehow taken hold (like panel lines on aircraft, which if scaled up would leave gaps of inches in some cases), which is simply unrealistic. Of course it is your model and you do what you think is right, but do look at actual aircraft and you will see what I mean. Oils stains along the fuselage sides is something completely different, and dark lines under the wings to represent ribs ditto. P 1 Link to comment Share on other sites More sharing options...
Wonky Donkey Posted February 17, 2019 Author Share Posted February 17, 2019 I kinda agree @Pheonix, as it happens. It's a bit of a balance between replication and creating some interest, IMO. I'm not sure I've got the balance right yet so still messing about with options. I suppose the idea is more to highlight the ribs than create a shadow down the sides as such. That's just a "trick of the light" obviously - the fabrics not actually a different colour - more just where the light catches it more. That is detectable on real aircraft - to my eyes anyway - and also on my Dad's r/c biplanes too. I'll see how it goes. Might turn out or might end up regretting it. W-D Link to comment Share on other sites More sharing options...
Wonky Donkey Posted February 24, 2019 Author Share Posted February 24, 2019 Hi folks, Been plodding away at this slowly. I added the reasonably prominent intake pipes(?) from brass tube, then pre-shaded the airframe with a sort of browny mixture (no pics of that stage - forgot..). After all the masking and shading, which I was fairly pleased with, I lost my nerve with the painting a bit and went for "one more coat" to limit the shading/framework effects. Now they're glossed over they're too subtle IMO. I also painted the wheels and cowl area in a lightened red. It's maybe too pinkish but the Eduard paint guide defo shows it as lighter than the cockade stripes on the tail. Looks a bit cerise in the photo with its gloss coat on 🤷♂️ As you can see I also braved the vertical tail decals. They're old and reputedly weren't very awesome originally... I kinda got away with it - enough for me to chance the rest of the decals. There's not many - two MS logos on the tail, roundels top and bottom of the wing and the "pilou pilou" legend on the fuselage side, and that's it. I'm part way through building the PE machine gun, and I might get to the decals tonight. Then I will weather the airframe before tackling the undercarriage then struts/top wing mount.... Cheers for now.. W-D 3 Link to comment Share on other sites More sharing options...
clive_t Posted February 24, 2019 Share Posted February 24, 2019 Some good progress here 1 Link to comment Share on other sites More sharing options...
pheonix Posted February 24, 2019 Share Posted February 24, 2019 That looks very good to me - no problems with those colours. Have fun putting on the wing.... P 1 Link to comment Share on other sites More sharing options...
Wonky Donkey Posted February 24, 2019 Author Share Posted February 24, 2019 34 minutes ago, pheonix said: That looks very good to me - no problems with those colours. Have fun putting on the wing.... P Thanks - yeah, thats not going to be straightforward so I've been pondering it a bit. It locates at three points: two front, one rear, with a "pylon" above it for the rigging. All of which is "single-ply" PE.... As it stands, my favoured route will be to make sure it lines up, fix the struts to the fuselage but not to the wing. Then fix the pylon and upper-side rigging before trying to add it to the fuselage. I'm worried it will be too fragile to cope with having the rigging pulled through etc. I'll go for simplified rigging on this one I think too (me? chicken?...). Might just pull ezline right through and be happy with that....🤔 W-D Link to comment Share on other sites More sharing options...

Recommended Posts
Create an account or sign in to comment
You need to be a member in order to leave a comment
Create an account
Sign up for a new account in our community. It's easy!
Register a new accountSign in
Already have an account? Sign in here.
Sign In Now