phantom61 Posted January 21, 2019 Share Posted January 21, 2019 Hi guys, here are some photos of a model being completed ... departing from the terrible Trumpeter Kit Tu16 K10 ... converted into K10-26 I propose a backward WIP, that is starting from the current state and the phases that preceded it ... 😎 sorry for my mistake english ... ciao Silvano 5 Link to comment Share on other sites More sharing options...
phantom61 Posted January 21, 2019 Author Share Posted January 21, 2019 first question/problem... the nose... 🤔 incredible how trumpeter wrong that in 72 and done that in 144 correctly 2 Link to comment Share on other sites More sharing options...
phantom61 Posted January 21, 2019 Author Share Posted January 21, 2019 the first step was to separate the parts that made up the nose of the plane ... including the radome below ... create vertical and horizontal frames from scale drawing 1/72 and with the help of Tamiya two-component filler, recreate the correct shape. 12 Link to comment Share on other sites More sharing options...
giemme Posted January 24, 2019 Share Posted January 24, 2019 Impressive job on this beast, Silvano! Keep it coming Ciao 1 Link to comment Share on other sites More sharing options...
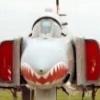
phantom61 Posted January 24, 2019 Author Share Posted January 24, 2019 the result of the correction is this: I added another two-component putty to complete the scratch we're almost there the transparency profile remains to be changed 10 Link to comment Share on other sites More sharing options...
giemme Posted January 25, 2019 Share Posted January 25, 2019 Spot on now! What kind of tools have you been using to reshape that nose? Also, the canopy looks very different from the tech drawing; are you going carve a master out and plounge mold a new one? Ciao Link to comment Share on other sites More sharing options...
phantom61 Posted January 25, 2019 Author Share Posted January 25, 2019 13 minutes ago, giemme said: Spot on now! What kind of tools have you been using to reshape that nose? Also, the canopy looks very different from the tech drawing; are you going carve a master out and plounge mold a new one? Ciao ciao Giemme, tools have you been using to reshape ? nail files... different gradations... the canopy very different ... I used the nose technique ... epoxi putty and a lot of filing 😎 5 Link to comment Share on other sites More sharing options...
phantom61 Posted January 25, 2019 Author Share Posted January 25, 2019 the new profile is better ... 7 Link to comment Share on other sites More sharing options...
giemme Posted January 25, 2019 Share Posted January 25, 2019 Definitely better! How are you going to restore the frames on the canopy? Will you paint them on or will you actually try something more 3D? Ciao Link to comment Share on other sites More sharing options...
phantom61 Posted January 26, 2019 Author Share Posted January 26, 2019 On 1/25/2019 at 2:11 PM, giemme said: Definitely better! How are you going to restore the frames on the canopy? Will you paint them on or will you actually try something more 3D? Ciao Giemme... I'm from the old school😂 two possibilities... those of black and then finish color or first the black, a pair of hands of Mr. surface with airbrush and then background color ... meanwhile ... enjoy the first test of vacuform ciao Silvano 4 Link to comment Share on other sites More sharing options...
phantom61 Posted January 26, 2019 Author Share Posted January 26, 2019 the interior of the cockpit was bare ... I tried to improve as much as possible ... 7 Link to comment Share on other sites More sharing options...
giemme Posted January 26, 2019 Share Posted January 26, 2019 Your method to reproduce the frames sounds perfect for the scale Nice vacforming, BTW And the interiors look great with all the added detail Ciao Link to comment Share on other sites More sharing options...
phantom61 Posted January 27, 2019 Author Share Posted January 27, 2019 Giemme, thanks for the solidarity ... I continue undaunted to post the wip of the Tu-16 colored interiors before being placed in the cockpit area grazie Silvano 11 Link to comment Share on other sites More sharing options...
giemme Posted January 27, 2019 Share Posted January 27, 2019 Cockpit is impressive! Ciao Link to comment Share on other sites More sharing options...
phantom61 Posted January 29, 2019 Author Share Posted January 29, 2019 Hi, new update... rebuild nose and main gear starting from the kit and modifying it nose gear nose e mail gear your comments are welcome ciao Silvano 9 Link to comment Share on other sites More sharing options...
giemme Posted January 29, 2019 Share Posted January 29, 2019 Those make a lot of difference with the kit parts! Ciao Link to comment Share on other sites More sharing options...
phantom61 Posted January 30, 2019 Author Share Posted January 30, 2019 11 hours ago, giemme said: Those make a lot of difference with the kit parts! Ciao Giorgio... in reality the nose gear is practically in scratch big changes have been made in the main gear 11 Link to comment Share on other sites More sharing options...
giemme Posted January 31, 2019 Share Posted January 31, 2019 Impressive! The scissor links look like they're made in resin: did you cast them yourself? Ciao Link to comment Share on other sites More sharing options...
corsaircorp Posted January 31, 2019 Share Posted January 31, 2019 Impressive job Silvano !! Congratulations ! I love the way you get through this difficult build !! Sincerely. CC Link to comment Share on other sites More sharing options...
phantom61 Posted February 2, 2019 Author Share Posted February 2, 2019 On 1/31/2019 at 8:43 AM, giemme said: Impressive! The scissor links look like they're made in resin: did you cast them yourself? Ciao yes giorgio ... made in plasticard and replicated in resin ... 2 1 Link to comment Share on other sites More sharing options...
phantom61 Posted February 3, 2019 Author Share Posted February 3, 2019 On 1/31/2019 at 8:54 AM, corsaircorp said: Impressive job Silvano !! Congratulations ! I love the way you get through this difficult build !! Sincerely. CC Tks Corsaircorp... I always say that everything is possible ... or almost everything try watching this wip on an old Chipmunk Airfix https://www.flickr.com/photos/127045504@N03/albums/72157647222928440 Cheers... Silvano Link to comment Share on other sites More sharing options...
phantom61 Posted February 4, 2019 Author Share Posted February 4, 2019 Hi Folks, let's move to the wings ... from the drawings, the changes had to be more extensive, I limited myself to correct obvious errors... like the aileron, ( short ) and to open the Flaps ( inboard and OUTboard ) Cheers... Ciao Silvano 6 Link to comment Share on other sites More sharing options...
giemme Posted February 4, 2019 Share Posted February 4, 2019 Lots of surgery there, Silvano! Ciao Link to comment Share on other sites More sharing options...
Vultures1 Posted February 4, 2019 Share Posted February 4, 2019 Your detail work is amazing, as is the major surgery you are doing on that Trumpeter TU-16! 1 Link to comment Share on other sites More sharing options...
phantom61 Posted February 4, 2019 Author Share Posted February 4, 2019 2 hours ago, Vultures1 said: Your detail work is amazing, as is the major surgery you are doing on that Trumpeter TU-16! Tks Vultures1 I was used to small airplanes ... this is giant I also riveted it 5 Link to comment Share on other sites More sharing options...

Recommended Posts
Create an account or sign in to comment
You need to be a member in order to leave a comment
Create an account
Sign up for a new account in our community. It's easy!
Register a new accountSign in
Already have an account? Sign in here.
Sign In Now