Nikolay Polyakov Posted February 11, 2019 Share Posted February 11, 2019 Good progress, @nikos! Cheers! 🙂 Link to comment Share on other sites More sharing options...
nikos Posted February 11, 2019 Author Share Posted February 11, 2019 (edited) Thanks Nikolay. Your fotos helped me to make the gunner nest colour , the wires of the ceilling and other things. Work in progress. The only problem is that the first accommodation appartment has a manufacture problem. The right part is smallest from the left!! I must solve it. Cheers. Edited February 11, 2019 by nikos 1 Link to comment Share on other sites More sharing options...
Nikolay Polyakov Posted February 11, 2019 Share Posted February 11, 2019 57 minutes ago, nikos said: The right part is smallest from the left!! I must solve it. I wish you a patience with this kit! 🙂 Link to comment Share on other sites More sharing options...
nikos Posted February 11, 2019 Author Share Posted February 11, 2019 The problem solved. The left side has lenght 3,5 cm. The right 2,5 cm. An added small piece 1 cm of elastic silicone will solve the problem 1 Link to comment Share on other sites More sharing options...
nikos Posted February 11, 2019 Author Share Posted February 11, 2019 So I 'll put and the electric generator in that appartment😉 Link to comment Share on other sites More sharing options...
nikos Posted March 3, 2019 Author Share Posted March 3, 2019 Scratching the interior 5 Link to comment Share on other sites More sharing options...
nikos Posted March 3, 2019 Author Share Posted March 3, 2019 Scratching the interior Link to comment Share on other sites More sharing options...
nikos Posted March 3, 2019 Author Share Posted March 3, 2019 There is big problem to assembly the pieces of fuselage and the interior part ceiling, floor, pilot appartment and seperator parts of accommodation☹️ Roden has big designing problem . Link to comment Share on other sites More sharing options...
nikos Posted March 6, 2019 Author Share Posted March 6, 2019 4 Link to comment Share on other sites More sharing options...
nikos Posted March 6, 2019 Author Share Posted March 6, 2019 Work in progress Link to comment Share on other sites More sharing options...
nikos Posted March 13, 2019 Author Share Posted March 13, 2019 5 Link to comment Share on other sites More sharing options...
Romeo Alpha Yankee Posted March 13, 2019 Share Posted March 13, 2019 Wow, you are certainly making the back end look busy Nikos, nice work! Link to comment Share on other sites More sharing options...
nikos Posted March 14, 2019 Author Share Posted March 14, 2019 Thank you Romeo AY Link to comment Share on other sites More sharing options...
nikos Posted March 14, 2019 Author Share Posted March 14, 2019 For anyone who wants to construct this aircraft I have identified these problems. The right fuselage part has shorter lenght for the 2nd interior seperating part 1cm than the left, so you must scratch second base 1 cm longer to stay correct the seperator. The ceiling must cut to fix correct with the second seperator. The ceiling must cut from one side because the positions to fix with the side of fuselage cannot be able to contact when you try to close the fuselage. You can see the cut place of ceilling in fotos. One side must be straight cut and dont follow the manual of construction. The floor must be cut from the two sides in front to fix correct with the parts of fuselage. The decals quality is nt good. The table of nose observer must cut for 2 mm. The cockpit floor must cut to 2 mm to fix with the first seperator and stay correct on the bases. The fuselage has no good contact between each other part, pieces have not good fitting. 1 Link to comment Share on other sites More sharing options...
nikos Posted March 28, 2019 Author Share Posted March 28, 2019 4 Link to comment Share on other sites More sharing options...
nikos Posted April 23, 2019 Author Share Posted April 23, 2019 It closed and there are interior and exterior leds for lights . 4 Link to comment Share on other sites More sharing options...
Nikolay Polyakov Posted April 23, 2019 Share Posted April 23, 2019 Looks like you’re used a bit less wires in comparison to the real thing, Nikos. Congratulations with closing the fuselage halves! 👍 Cheers! 🙂 Link to comment Share on other sites More sharing options...
nikos Posted April 23, 2019 Author Share Posted April 23, 2019 Thank you Nikolay for your help. 1 Link to comment Share on other sites More sharing options...
James G Posted April 25, 2019 Share Posted April 25, 2019 Nice work Nikos! I have a Cub BK in the stash and i'm tempted to detail and light the interior now... looking forward to seeing your progress. Link to comment Share on other sites More sharing options...
nikos Posted April 25, 2019 Author Share Posted April 25, 2019 Thank you James. If you want to make interior lights and motors you must seperate the lights from the motor wires with different electrical circuit with two energy sources if you "ll use batteries. That because the motors want more power so the if there is only one circuit may be not the lights turn on. If you dont want to make electrical motors and only lights one circuit and one electrical source is enough. Cheers. Link to comment Share on other sites More sharing options...
nikos Posted May 28, 2019 Author Share Posted May 28, 2019 Scrathes continued. Each side of the nose and the antennas were placed on each side of the fuselage below the wings. Below of fuselage, the base of the electronic instruments and pods were made of the balsa and pods was made of spru. The 3 radomes of the cylindrical antennas were made of pencil rubber gums. Work continues. The ten air ducts on the sides are in progress. 2 Link to comment Share on other sites More sharing options...
nikos Posted May 30, 2019 Author Share Posted May 30, 2019 There was a lot of sanding, there were scratched 12 air ducts, two exausts on fuselage at the height of the windows each, 10 antennas? rounded on the fuselage side The only possible and good application was fixing the wings strongly , the motors were placed inside the nests (In case of the battery, they are currently rotating as much as possible) . There is a lot of work on the exausts of the engines to because of bad design. I choose anorthodox application with much sanding. The Ukrainians are not good in the design 2 Link to comment Share on other sites More sharing options...
nikos Posted June 3, 2019 Author Share Posted June 3, 2019 The first painting took place except of nose that still wants to place some antennas. I did a pre-shade, I also put wing navigation lights of green and red transparent plastic . The colour is AGAMA Light ghost gray. Very good coating for paint-brushing and leaving an intermediate matte-satin finish 6 Link to comment Share on other sites More sharing options...
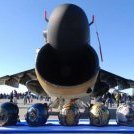
nikos Posted June 4, 2019 Author Share Posted June 4, 2019 The wheels fixed on gear system difficulty. The axies were hedgehogs. The white wheels coronets made of white insulating tape cut with special diabetes. Other mazohist senario.I coloured by hand with a paintbrush without masking glasses the nose cover ( Parkinson dont strikes me yet). The landing gear is very weak. I made a patent to make it more sttrong. Generally the kit is a continuous problem. Still has job. 3 Link to comment Share on other sites More sharing options...
nikos Posted June 5, 2019 Author Share Posted June 5, 2019 The pilot's cover and nose radar were fitted. On the ceiling I put a panel of instruments, a blue skyscreen for the pilots and a curtain on the left side. The ceiling glasses were made with darker sunscreen using from an old laptop screen film It has staircases in the application of the cover with the fuselage The work is continuing. 3 Link to comment Share on other sites More sharing options...

Recommended Posts
Create an account or sign in to comment
You need to be a member in order to leave a comment
Create an account
Sign up for a new account in our community. It's easy!
Register a new accountSign in
Already have an account? Sign in here.
Sign In Now