Justin M Posted January 1, 2019 Share Posted January 1, 2019 A new project to build an F-4J Phantom of the Vietnam era using the Revell 1/72 kit, which I think is the old Monogram kit, but happy to be corrected. It has raised panel lines so I decided to sand those off and re-scribe (using my go-to UMM SCR-01 SCRIBER) and also add some rivets (using Rosie The Riveter tools). I find the SCR-01 SCRIBER the best I have used. It is easy to use and the results are better than other devices I have used. Thoroughly recommend. My normal approach is to sand and re-scribe & rivet before assembly so it seems to be weeks after opening the box to eventually "sticking" things together. Once together, filled and sanded, the plan is to coat in Mr Finishing Surfacer 1500 Gray (cut 50/50 with Mr Color Levelling Thinner 400) and then sort out the blemishes. Tools used: Before starting: Top half of fuselage "as was" and bottom half with scribing underway. My technique is to sand an area to the point the raised lies are just visible and then scribe and then sand the rest of the raised lines away when I have enough of a scribed line to act as a guide. Another before and after compare - this time around the nose. Taking lots of photos on the iphone also helps to keep track of the lines. I also use "blueprint" images of the aircraft I find on the internet. Such are particularly useful when it comes to rivets. Below is a before shot of the wing. in progress; only partially done. There are some whitish blotches on the leading edge of the outboard wing section. This is Mr Dissolved Putty which is good for fixing areas where I have overrun the end of a panel line. It works very well but is not suitable if I have made a mistake that needs re-scribing. For that I have my own concoction of old sections of sprue dissolved in an old pot of Humbrol glue in a ratio of about 25% glue / 75% sprue. It is essentially liquid plastic that I brush on and when it sets hard, it is just like the original plastic and can be re-scribed once sanded and polished. Warning, it can only be used in small amounts otherwise the model melts! Also it needs to harden for about 24 hours, Once I have done the two fuselage halves, I tape them together to ensure the lines over the spine line up. Once I am happy the scribing looks reasonable, I give each part of the model a primer coat of Mr Finishing Surfacer 1500 Gray mix and start marking out the rivet lines with a soft pencil, using a straight edged strip of thin sheet plastic as a guide, whilst referencing the "blueprints". I then run the riveting tool alone each line. Here is an almost completed wing section. I give each section a rub down with 4000 grit paper. And here is the result with the fuselage. 15 Link to comment Share on other sites More sharing options...
stevehnz Posted January 1, 2019 Share Posted January 1, 2019 I'll be folloing along, I've just ordered one of these & while I may not rescribe/rivet as much as you are, I'll be keen to discover any other pit falls/tips with the kit. Steve. Link to comment Share on other sites More sharing options...
Justin M Posted January 2, 2019 Author Share Posted January 2, 2019 The kit seems to have a good overall F-4 shape; it looks right, but I am no F-4 expert. The parts fit is not great but the cockpit is quite good. That said, the parts will go together but filler is required. One exception; the wing root join to the fuselage on the upper side is excellent. No filler or anything required at all. The air intake cowl presents the biggest challenge but filler sorts them out. Cockpit built out the box. Fuselage joined up with cockpit installed. Quite a lot of filler on the fuselage spine but I expected that so re-scribing not yet complete. Wings on and cowls in place. I needed to bend them a bit to get them to fit with the model and then filled the gaps with filler (Humbrol's finest - I'm no filler connoisseur) and my liquid plastic cocktail. Wing root required no work. 9 Link to comment Share on other sites More sharing options...
ANONYMOUS_0001 Posted January 3, 2019 Share Posted January 3, 2019 Fantastic looking start to the kit mate, now I'm compelled to get the same again and redo mine looking forward to your paintwork/extra details you might be thinking of adding! Link to comment Share on other sites More sharing options...
Justin M Posted January 6, 2019 Author Share Posted January 6, 2019 Progress on getting the air intakes to fit..........not the best fit but they came up alright in the end. Just need re-scribing and riveting. 11 Link to comment Share on other sites More sharing options...
Unfinished project Posted January 6, 2019 Share Posted January 6, 2019 Cracking start I’ll tag along with you if you don’t mind Link to comment Share on other sites More sharing options...
Justin M Posted January 6, 2019 Author Share Posted January 6, 2019 48 minutes ago, Unfinished project said: Cracking start I’ll tag along with you if you don’t mind A pleasure. There is still a long way to go and it nearly went for its maiden flight this afternoon....out the window. 2 Link to comment Share on other sites More sharing options...
Justin M Posted December 6, 2019 Author Share Posted December 6, 2019 My goodness, nearly a year since I last posted anything on this project. Anyway, I have made some progress. Post the previous photo, I sanded some more and gave a primer of Mr Finishing Surfacer 1500. 8 Link to comment Share on other sites More sharing options...
Justin M Posted December 6, 2019 Author Share Posted December 6, 2019 Then followed up with a layer of black primer Mr. products again. 8 Link to comment Share on other sites More sharing options...
Alan P Posted December 6, 2019 Share Posted December 6, 2019 That rescribing job is superb. One of the best I've seen 👍 Link to comment Share on other sites More sharing options...
Justin M Posted December 16, 2019 Author Share Posted December 16, 2019 Once the black primer was down, it was time to start on the top coats. At this point I tried acrylic Hataka Red Line as they have a good range of paint sets, including US Navy and USMC from the right era. Sadly, I really struggled with them and could not avoid a significant issue with nozzle clogging so I gave up and mixed my own colours from Gunze paints; they always work well. I did not try Hataka thinners as I did not have any, but tried just about everything else. I would like to get them to work as they have a good range. Anyone got any pointers? 13 Link to comment Share on other sites More sharing options...
Booty003 Posted December 16, 2019 Share Posted December 16, 2019 Superb re-scribe and rivet detail on this. I too was suffering badly with the airbrush nozzle clogging but using Vallejo Model Air. Have started using Tamiya with their own thinners and haven't looked back. Not a single issue with them at all. I have found that XF80 - Royal Light Grey is a good match for US Light Gull Grey. 1 Link to comment Share on other sites More sharing options...
Alan P Posted December 17, 2019 Share Posted December 17, 2019 Nice paint job. Must have driven you...dotty? 😉👍 1 Link to comment Share on other sites More sharing options...
opus999 Posted December 19, 2019 Share Posted December 19, 2019 On 12/16/2019 at 10:27 AM, Justin M said: Anyone got any pointers? I briefly used acrylics with an airbrush and found they worked much better when I got vallejo drying retardant. It kept the airbrush from clogging, the tip from drying and improved the smoothness of the finish. Personally I loathe acrylics -- I use the Gunze lacquers and have found Hataka's lacquers to be superb. The finish looks fantastic, BTW! Link to comment Share on other sites More sharing options...
Justin M Posted December 30, 2019 Author Share Posted December 30, 2019 On 12/19/2019 at 1:47 AM, opus999 said: I briefly used acrylics with an airbrush and found they worked much better when I got vallejo drying retardant. It kept the airbrush from clogging, the tip from drying and improved the smoothness of the finish. Personally I loathe acrylics -- I use the Gunze lacquers and have found Hataka's lacquers to be superb. The finish looks fantastic, BTW! I think I have found the formula for using Hataka's acrylics and that is Vallejo Airbrush Flow Improver plus thinning with Hataka's own thinner. Much better results. I am glad I have got the acrylics to work as they have a good range. 3 Link to comment Share on other sites More sharing options...
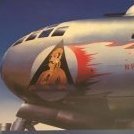
Justin M Posted December 30, 2019 Author Share Posted December 30, 2019 Some more progress over the last few weeks. The following is ready for decals having given a gloss coat. And now with decals on using Gunze solution. And the other side..... 10 Link to comment Share on other sites More sharing options...
Justin M Posted April 7, 2020 Author Share Posted April 7, 2020 One more photo with the wash applied. I'll stick the final photos up under a ready for inspection. 7 Link to comment Share on other sites More sharing options...
Justin M Posted April 8, 2020 Author Share Posted April 8, 2020 Completed model is at: 1 Link to comment Share on other sites More sharing options...
Gene K Posted October 31, 2020 Share Posted October 31, 2020 Justin, Just reviewing this great build again -- superb scribing as everyone has said. What do you use for a wash and what do you do to remove the "excess"? Thanks, Gene K Link to comment Share on other sites More sharing options...
alt-92 Posted October 31, 2020 Share Posted October 31, 2020 32 minutes ago, Gene K said: What do you use for a wash and what do you do to remove the "excess"? Judging from the label on the bottle, it's Flory wash - clay-based pigments in water suspension. Which is great, you can wipe the model off with soft tissue or cotton buds for the smaller places. Since it's clay & water, cleanup is easy. Link to comment Share on other sites More sharing options...
TheFlogger Posted October 31, 2020 Share Posted October 31, 2020 Wouww.. The best anti-raised panel activity I ever seen in my life! She turned to a top quality phantom 1 Link to comment Share on other sites More sharing options...
VT Red Sox Fan Posted October 31, 2020 Share Posted October 31, 2020 Great build--really liked how you sorted out the intake seams, the scribing pointed out by many and the paint finish.... well done🙌 & I will be following this and hopefully your future builds with interest... best, Erwin 1 Link to comment Share on other sites More sharing options...
Justin M Posted October 31, 2020 Author Share Posted October 31, 2020 7 hours ago, alt-92 said: Judging from the label on the bottle, it's Flory wash - clay-based pigments in water suspension. Which is great, you can wipe the model off with soft tissue or cotton buds for the smaller places. Since it's clay & water, cleanup is easy. Hi Everyone, that is correct - Flory Model's clay wash. Really easy to use as you just rub off the excess. 1 Link to comment Share on other sites More sharing options...
Justin M Posted October 31, 2020 Author Share Posted October 31, 2020 2 hours ago, VT Red Sox Fan said: Great build--really liked how you sorted out the intake seams, the scribing pointed out by many and the paint finish.... well done🙌 & I will be following this and hopefully your future builds with interest... best, Erwin Hi - thanks for the comments. Just finished a 1/48 Monogram B-29 and, guess what, that's a complete re-scribe too! I'll start posting the build soon. 3 Link to comment Share on other sites More sharing options...

Recommended Posts
Create an account or sign in to comment
You need to be a member in order to leave a comment
Create an account
Sign up for a new account in our community. It's easy!
Register a new accountSign in
Already have an account? Sign in here.
Sign In Now