Wonky Donkey Posted November 8, 2018 Share Posted November 8, 2018 (edited) That was my 3-year-old's reaction when I showed him a picture of the Sopwith Triplane so it seemed an ideal thread title.. 🤔 I picked this up in JohnT's sale. So I thought I'd get on with it. Plenty builds of this already posted on here so I'll forgo the pics of the box and contents and all that. It's well documented that the Roden fuselage is too short for the production tripe but OK for the prototype. Ideally, John's sale came with the Novascale decals for Flt. Cmdr. R Dallas, who flew the prototype in service ("Brown Bread"). Tail plane's the wrong size and shape, I believe but I can live with that I also got these HGW belts, for a laugh, erm I mean to improve my PE/detailing skills... 😂 I've made a start whilst I was waiting for the Dove's paint to dry and all that. Here we go then... W-D Edited December 12, 2018 by Wonky Donkey . 8 Link to comment Share on other sites More sharing options...
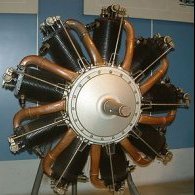
Wonky Donkey Posted November 9, 2018 Author Share Posted November 9, 2018 I started as per the instructions with the engine. Its also quite nice to get one of the sub-assemblies done and put to the side. There were some quite noticeable seems to get rid of first. None of the cylinder heads fit into the recesses for them in the cylinders themselves. My solution was to just slice off the "pegs" from the heads and glue them directly on top of the cylinders. Looks fine, I think. Apart from the one that launched into the usual, irrecoverable hidey-hole... 😡 I found a random part in the spares box that fitted on OK and now it's hard to tell which one it is... I added the ignition wiring using "rust" coloured ezline. I think technically there should be two wires per plug, but one was enough for me, especially as they're on the back of the thing.. Next is the interior painting and some wood fakery (or my feeble attempt at it), but that update will have to wait until after Telford. TTFN W-D 9 Link to comment Share on other sites More sharing options...
Wonky Donkey Posted November 13, 2018 Author Share Posted November 13, 2018 Hey folks. Here's a quick post-Telford update on this. It's always good to see some of the great models at a show to get some inspiration and motivation for your own builds, I find. I've painted the innards and have most of them together now. I'm using a combo of Roden and WnW instructions for paint guide as well as some online photos. However, it's all still a bit approximate in some areas. For instance, I couldn't tell for sure where the fabric and metal panels met on the cockpit floor, so made an educated guess... 🤷♂️ Internal rigging is also a bit on the made up side, partly due to the integral moulding of some details in the Roden kit. The very thin wash I used looks odd in the pics but looks fine to me in the plastic... Next I eed to fit a representation of the control wires, finish the instrument panel, make a cushion for the seat and see if I can bring the fuselage and bottom wing together. Cheers for popping in W-D 9 Link to comment Share on other sites More sharing options...
Wonky Donkey Posted November 17, 2018 Author Share Posted November 17, 2018 So after some head scratching about the best way to fit the fuselage and remaining interior parts together, I now have the fuselage and lower wing together and closed up. The way the seat fits onto a support on the cockpit floor and into two notches in the lower part of the struts caused the grief. In the end it seemed better to fix one side of the fuselage on first, then the seat, then the other half of the fuselage. Some trimming to the seat and the rear of the cockpit floor made the world of difference. So, time to say goodbye to most of the work done on this so far 😂 Why do we bother, eh: W-D 9 Link to comment Share on other sites More sharing options...
pheonix Posted November 18, 2018 Share Posted November 18, 2018 (edited) Only just found this and it is half finished already! The interior looks really good so why cover it all up? Could you not leave off a side panel so that we could see it all in future? Shame it will not be visible. If the remainder is anywhere near as good it will still be a cracking model. P Edited November 18, 2018 by pheonix 1 Link to comment Share on other sites More sharing options...
Wonky Donkey Posted November 18, 2018 Author Share Posted November 18, 2018 I toyed with the idea of opening up the inspection panels on the fuselage sides as it happens Pheonix, but bottled it in the end as I thought it might look odd. Actually, the cockpit opening's reasonably generous so a decent amount can be seen (from close enough obviously). Spent last night tidying a few minor seams (nowt to write home about), masking and priming. Yawn... 😦 Oh, and working out whether the pitot is mounted on the outer wing strut (usual Sopwith style) or the middle wing itself. So far as I can tell, it's on the wing for the prototype. Promptly snapped the bleedin' thing off like, but hey ho. Tonight's job is to start painting the struts, vickers gun, undercarriage... So far, I have confirmed yet again that I can't do laminated props in 1/32. I've tried loads of different ways and spent hours on YouTube.. 😂 They still just look brown.. Meh. W-D Link to comment Share on other sites More sharing options...
Smithy Posted November 18, 2018 Share Posted November 18, 2018 That's looking lovely, nice work. And it is rather demoralising going to all the trouble with the interior on a WWI aeroplane only for most of it to disappear once you button the fuselage up! 1 Link to comment Share on other sites More sharing options...
Col. Posted November 20, 2018 Share Posted November 20, 2018 Tidy work on both the cockpit and engine detail. This one is shaping up to be a stunning result 1 Link to comment Share on other sites More sharing options...
Marklo Posted November 20, 2018 Share Posted November 20, 2018 I love the interior detail. In 1/32 you should still be able to see quite a bit. I almost cried when I buttoned up my 1/48 Pup at how little was visible and on my current build a 1/48 Gamecock I reckon you'll be lucky to see the seat once it's zipped up , But I suppose it's par for the course on older types. 1 Link to comment Share on other sites More sharing options...
Wonky Donkey Posted November 20, 2018 Author Share Posted November 20, 2018 At least we don't have canopies to obscure detail even further in these older types Marklo. I'm quite fond of a pilot figure in my 1/72 builds, but never tried one in 1/48 or 1/32. Might have to give that a try sometime... W-D Link to comment Share on other sites More sharing options...
Wonky Donkey Posted November 23, 2018 Author Share Posted November 23, 2018 This week, I have mostly been masking wing ribs.... Talk about tedious... 😔 I'm trying some new approaches (for me) to emphasising the structure. For the underside (CDL), I thought I'd have a go at drawing the framework on with pencil then painted over. Should look like light's coming through the wings. A bit. As the top is the darker PC12 though I didn't want it to be too stark. On the top, my PC12 mix is tamiya brown with some khaki to lighten it a bit. The ribs will get a lighter version of the same, then misted over in neat brown (xf-10). Again, I only want a hint of highlight of the ribs. It's drying overnight so we'll see how it looks tomorrow. W-D 3 Link to comment Share on other sites More sharing options...
Col. Posted November 24, 2018 Share Posted November 24, 2018 Tedious but will be worthwhile in the end 1 Link to comment Share on other sites More sharing options...
Wonky Donkey Posted November 24, 2018 Author Share Posted November 24, 2018 Well, I'm moderately pleased with how this turned out ☺ The photos don't show it up too well - might try and get a better one. There's a definite dark trace of the wing's structure under the CDL The top side has a slight lightening along the lines of the ribs - again, the photos not great but you can see it a bit nearer the wing tip here. Also got the propellor finished off. Wooden effect is a bit more dining room table than WW1 prop, but it's acceptable to my eye.. Bit of detailing to do next, then the metalwork on the fuselage and cowl. W-D 7 Link to comment Share on other sites More sharing options...
Brandy Posted November 25, 2018 Share Posted November 25, 2018 The wings and prop look great. I use the reverse method, ie, spray the rib colour then mask, spray, unmask, and spray again to tone it down. Half the amount of masking! Ian 1 1 Link to comment Share on other sites More sharing options...
Wonky Donkey Posted November 25, 2018 Author Share Posted November 25, 2018 8 hours ago, limeypilot said: The wings and prop look great. I use the reverse method, ie, spray the rib colour then mask, spray, unmask, and spray again to tone it down. Half the amount of masking! Ian It's interesting isn't it, how many approaches there are to this. I'm trying to find out what works best for me. And yes, amount of masking is definitely a consideration.. Usually, I paint the wing colour, then mask the ribs and paint either side something darker. Though this is only my second 1/32 build, so... On my Wnw Camel, I did the blue "Suds" scheme and ran a thin line of smoke down each side of the ribs. Looks OK, and avoided what I felt was a risk of comedy blue stripes otherwise... 😂 I've been experimenting with metal effects for the cowl. Pics tomorrow. W-D Link to comment Share on other sites More sharing options...
Marklo Posted November 26, 2018 Share Posted November 26, 2018 (edited) Quote Wooden effect is a bit more dining room table than WW1 prop Looks pretty good to me, if you spend any length of time looking at WWI prop photos (and sadly I can say that I do) they vary a lot and the RFC/RNAS/RAF ones are much more like pieces of furniture than most. Edited November 26, 2018 by Marklo 1 Link to comment Share on other sites More sharing options...
Wonky Donkey Posted November 26, 2018 Author Share Posted November 26, 2018 How do, So, I said I'd been mucking about with finishes for the cowl. Im curious as to how best to approximate the beaten panel look of Sopwiths. I saw somewhere a method using Sharpie pens. Essentially, black primer, draw/dab the pattern on with a silver Sharpie, then overspray with ali/silver. Pattern should show through. Theoretically. I tried this on a 1/48 eindekker, but my top coat was too dense I think. It is still visible but only just. So, attempt no. 2. I wondered whether it would work with the Sharpie pattern last instead of the silver paint: Left of the strip of tape is gloss black + sharpie dots + (one, not very careful) duralumin top coat. On the right swaps the duralumin and sharpie around. Left is way better and more controllable IMHO. So, I just went for it: Next, finish the cowling then make a start on the Novascale decals. W-D 3 Link to comment Share on other sites More sharing options...
Wonky Donkey Posted December 2, 2018 Author Share Posted December 2, 2018 How do, I've made quite a bit of progress with this over the week. I'm pretty chuffed with the efffect on the cowl. Not easy to get it to show up in a photo: At this point I had a large pile of painted parts ready to build up, but as ever with these things there was more prep to do. Decals next. There's not many - roundels, rudder, serial number and "brown bread" on port fuselage. The Novascale decals are continuous film and the thinnest I've ever seen. They come with white "underlay" for the white bits. I had some tears in a couple of them, but managed to make them look acceptable. We'll, to me anyway. The blue seems too dark to me but who knows... I spent a fair while drilling the holes for the rigging, then joined the top and middle wings together. The way the struts locate means this isn't too tricky. I'll do as much of the rigging as I can before fitting to the lower wing, I think. The Roden tail is a really nice part of the kit, IMO. there's lots of detail moulded in and the mounting approach looks quite realistic. Makes it fiddly to secure but some patience paid off. Now it's on, the rear end can be rigged. I added some of the smaller sub-assemblies now just to make me feel like I was making some progress The undercarriage is the worst aspect of the kit I think. The mounting points are small and shallow, but there's not enough plastic in the "lugs" on the legs themselves to drill and pin. The more deft amongst you might manage, but I went for a "mixed glues" approach. Tamiya cement then superglue around the mounting points. It's well fixed after leaving overnight but still concerned the weight of the three wings might be too much for it... Next is to mount the wings, some more rigging and the wheels. Then she's done... Go steady. W-D 4 Link to comment Share on other sites More sharing options...
clive_t Posted December 2, 2018 Share Posted December 2, 2018 Very impressive modelling sir. But, what impresses me even more is that not only does your 3-year-old know what a biplane is, he was able to put you straight on where you went wrong Following this now! Link to comment Share on other sites More sharing options...
Wonky Donkey Posted December 2, 2018 Author Share Posted December 2, 2018 25 minutes ago, clive_t said: not only does your 3-year-old know what a biplane is, he was able to put you straight on where you went wrong Quite so Clive. Might have to bring him down a peg or two - build a Nieuport or something. See what he makes of a sesquiplane.... 😂 W-D 1 Link to comment Share on other sites More sharing options...
Wonky Donkey Posted December 12, 2018 Author Share Posted December 12, 2018 Evening. It's taken me ages to get round to taking some pics if this now it's done. No dramas to report really. Cowl was a bit reluctant to sit right despite multiple dry fits going perfectly well, and the odd rigging wire tried to go astray. As for the finish, the decal scheme and most profiles show the aircraft to be all over pc12, except the undersides. But as the prototype it was originally all over CDL. I found some pics - on the wnw website maybe? - which showed pretty clearly the wheel covers at least still in CDL after the upper surfaces were pc12'ed. Might have been left like this or been "painted" gradually. So for interest, I have left the wheels and cross brace in CDL. So here she is : Meantime, I finished an old airfix seahawk oob for a relaxing build (£2 from Telford kitswap! 😂) and am part way through the next project (revell 1/48 pt-17 kaydet). Happy building! 👋 W-D 6 Link to comment Share on other sites More sharing options...
Andwil Posted December 12, 2018 Share Posted December 12, 2018 Well done W-D, what a fantastic build! 👏 AW 1 Link to comment Share on other sites More sharing options...
clive_t Posted December 13, 2018 Share Posted December 13, 2018 Great build there 1 Link to comment Share on other sites More sharing options...
JohnT Posted December 13, 2018 Share Posted December 13, 2018 Oh very nice indeed. Had to have a squint after your pm. Nice job. You can pop round and do my one now. I might well nick some of those tips when (if?!!!) I get round to starting my one. I like the cowling metal effect too. Right - whats next !? 1 Link to comment Share on other sites More sharing options...

Recommended Posts
Create an account or sign in to comment
You need to be a member in order to leave a comment
Create an account
Sign up for a new account in our community. It's easy!
Register a new accountSign in
Already have an account? Sign in here.
Sign In Now