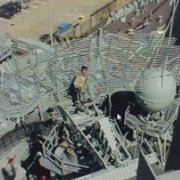
JJ2016 Posted November 3, 2018 Share Posted November 3, 2018 (edited) WARNING THIS TOPIC MAY DISTURB SOME VIEWERS EXTREME REMOVAL OF DETAIL FROM WHAT WAS OTHERWISE A HIGH END KIT Gday Britmodellers, here's my latest music room tribute project - a recreation of the tank on the cover of Iron Maiden's "A Matter of Life and Death" album. I couldn't find much reference to what the tank is based on besides the artist's quote in Wikipedia describing it as "Korean War era but with a twist as the gun barrel is patched over from another vehicle". Based on further research I found the closest match to be the Centurion with a modified front and barrel possibly from a Chieftain. The turret would also need to be widened and new scratch built fittings needed to be added, mainly built from plasticard or other things found in the house. I must say I thoroughly enjoyed scratch building as it gives great satisfaction when things turn out well, only problem was I didn't really know what these fittings were !! What I wanted to achieve here was to bring the art to life but in its abstract form, not as a highly detailed tank, hence the viewers warning ! The kit is a Tamiya 1:35 scale British Army Centurion and Eddie was made from a combination of Hornet tank crew head, unbranded soldier kit and Evolution Miniatures Machine Gun. Decals were custom made by V1 Decals. Apologies for the large amount of pics however this was quite an epic project !! Hope you enjoy it, cheers...... JJ Iron Maiden's "A Matter of Life and Death" cover art originally created by artist Tim Bradstreet. All the goodies, ready to be hacked at !! Dry fitted the tank to get an idea of what needed to be done..... And now to build the front shield modification. Made a mockup out of cardboard to get the dimensions before cutting the plastic. Also sized the decals... My son drew up the concept design for V1 decals.... they were very thankful....... I made this back support for the shield, I ended up removing it but I was really proud of it so I'll leave it here ! The start of the removal of detail and general hacking at this fine model.... Adding a little bit of battle damage as you would expect from a vehicle driven by Eddie.T.Head..... And now to hack at the turret. Smoothed out the surfaces with epoxy putty. I found the perfect sanding block, one of the kids Jenga blocks !! All sanded down, ready for the rest of the modification scratch building. Time to start on the bottom. And now the fun starts - the scratch building !! First up, the fittings on the top of the turret, not knowing much about tanks, I was pretty much flying blind !! Also added some more front shield parts. Used some of the boys lego for the black part (didn't tell him).... Made this one with the idea that its some sort of guidance radar..... Topside all done. And now for the base of the barrel and what I can only imagine is another guidance radar/director. Nicked some more of the boy's lego. Used epoxy putty to make the material at the base of the cannon. Also started widening the turret. Base of barrel done, and finished the widening of the turret. Time for the turret fittings and the things on the front I think are either shells or spent shells. Nicked the daughter's crayon (didn't tell her either). Used foil for the rack. Inspirational music for the big undertaking. Time for the barrel and I think this is the chieftain modification with the insulation over the barrel. Also modified the end to beef it up a bit (ala Eddie). Being an old ex Navy boy, the sewing skills helped....... And whilst my sewing mojo is on, doing the flag. Using a paper clip to size it. Also made the rucksacks/blankets. Painted some enamel black on to help the decal stick. Nicked another pen from the daughter's stash to do the beefing up of the cannon. Putting some panels on the side so I can get some more battle damage. All ready for priming. Primer on, ready for the rest of the paint. Gun metal grey for the bottom. And base colour - green for the wheel faces and the tank body. Made up a dirt colour out of tan and dabbed it on with a cotton ball. Minor detailing. Used a toothpick for the comms whip/flagpole. Now for the decals. And some oil wash to give that dirty Eddie look.... Added the rugs and the tank is done !! And now for the big man himself - EDDIE........... Quick Blu-Tac fit to see if we're on tack. Added a gun holster. Added the pants, epoxy mostly and some tape for the bottom. Shaping Eddie's face, as soon as the nose is removed he starts looking like Eddie !!! Added the Machine gun with scratch built magazine. Ready for primer. All primed. Black paint. Green pants and helmet paint. Skin colour. Rest of helmet detail and brown for gun. Used the lead pencil to try to get some more contour of the face. Added a little oil wash. And made some binoculars, also painted the binocular straps. Hardest part of the whole build - Eddie's jacket. Tried cotton material and plastic bag but the winner was foil. Once I had the shape, I primed it as quick as I could so it would set in its shape. All done !! All done, hope you liked it (if you got this far). RFI is here: UP THE IRONS......... Cheers JJ Edited November 3, 2018 by JJ2016 Added RFI link 12 1 Link to comment Share on other sites More sharing options...
Blaubar Posted November 3, 2018 Share Posted November 3, 2018 Up the Irons ❤️!!! Saw them live many times and again this summer, best band imho. thanks for this, I will go through this tonight and reply in detail. thanks for this! Link to comment Share on other sites More sharing options...
Kris B Posted November 7, 2018 Share Posted November 7, 2018 It is amazing how you getting close to the original. Good job. Link to comment Share on other sites More sharing options...
Radpoe Spitfire Posted November 7, 2018 Share Posted November 7, 2018 Hey, a tribute like this to Iron Maiden and Worksop's finest rock God can only be a good thing! Bring it on, I can't wait to see it finished👍 Link to comment Share on other sites More sharing options...
JJ2016 Posted November 8, 2018 Author Share Posted November 8, 2018 (edited) Cheers Guys, Radpoe, I've posted the RFI link above. JJ Edited November 8, 2018 by JJ2016 Link to comment Share on other sites More sharing options...
BadKarma75 Posted January 17, 2019 Share Posted January 17, 2019 Great build on an unusual subject, sooty would approve 😉 Link to comment Share on other sites More sharing options...
JJ2016 Posted February 18, 2019 Author Share Posted February 18, 2019 Cheers mate Link to comment Share on other sites More sharing options...
SgtPappas Posted June 14, 2020 Share Posted June 14, 2020 (edited) This is cool man. Huge work. But there is no Centurion tank. Art was made of two tanks. The botton one is the early Tiger, and the top is T-72 early version. Edited June 14, 2020 by SgtPappas Link to comment Share on other sites More sharing options...
JJ2016 Posted June 15, 2020 Author Share Posted June 15, 2020 Thanks mate, that makes more sense !! Link to comment Share on other sites More sharing options...

Recommended Posts
Create an account or sign in to comment
You need to be a member in order to leave a comment
Create an account
Sign up for a new account in our community. It's easy!
Register a new accountSign in
Already have an account? Sign in here.
Sign In Now