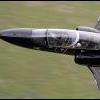
tom271282 Posted September 24, 2018 Share Posted September 24, 2018 (edited) Hi Everyone, Little while since I last posted. But anyway thought I would share this completed 1/48 KittyHawk Jaguar GR1. The kit is well documented, but needless to say there were fit issues. The instructions were useless (some parts not even called out so I think I may have missed a couple of bits on this build) and the smaller decals broke up. Anyway, it looks a bit like a Jag, so I am happy with the result. I used aftermarket decals, drop tanks and sidewinders from Flightpath, a new seat, new pitot probe, and I also modified parts that didnt look right, like the massive air conditioning inlet. I'm sure I did some other stuff too, but I can't remember. Painted in Tamiya colours, mixed to get a 'correcter' shade and finished off with generally matt Alclad varnish as I wanted it to look war-like. Hope you like it. Edited September 24, 2018 by tom271282 59 1 Link to comment Share on other sites More sharing options...
colin Posted September 24, 2018 Share Posted September 24, 2018 Very nice indeed, some bigger images would help Link to comment Share on other sites More sharing options...
tom271282 Posted September 24, 2018 Author Share Posted September 24, 2018 (edited) 1 minute ago, colin said: Very nice indeed, some bigger images would help Thank you. Edited now, should be bigger.... or simply click on the image for full size. Edited September 24, 2018 by tom271282 1 Link to comment Share on other sites More sharing options...
Mr B Posted September 24, 2018 Share Posted September 24, 2018 Very nice. this is the first kittyhawk Jaguar I have seen done. Not a very shake and bake kit.....u have done very well....lovely finish n pictures too rgds Link to comment Share on other sites More sharing options...
Filler Posted September 24, 2018 Share Posted September 24, 2018 That looks brilliant and looks exactly like a Jaguar in my eyes. Certainly looks a lot better than the Airfix one I'm trying to build at the moment; both in terms of detail and refinement of the kit and also you're obviously good at modelling too. I'm guessing the fit issues were mainly around the panels that Kitty hawk like to provide as open options? Those dropped flats and slats certainly make a lot of difference to the model. Great work Tom. Link to comment Share on other sites More sharing options...
tom271282 Posted September 24, 2018 Author Share Posted September 24, 2018 50 minutes ago, Filler said: That looks brilliant and looks exactly like a Jaguar in my eyes. Certainly looks a lot better than the Airfix one I'm trying to build at the moment; both in terms of detail and refinement of the kit and also you're obviously good at modelling too. I'm guessing the fit issues were mainly around the panels that Kitty hawk like to provide as open options? Those dropped flats and slats certainly make a lot of difference to the model. Great work Tom. Thank you - I muddle through most of the time - a quick build for me, just 4 months or thereabouts! Yes, the panels were a poor fit, though not awful and to be fair I could have done a better job with them. The main issue was the fuselage. I added vertical structural supports, which corrected the fuselage shape and also squeezed the wing roots in, which meant less filling and sanding. Still a lot of filling and rescriving overall though, and I could have done more but just wanted to get it done. 2 1 Link to comment Share on other sites More sharing options...
Terry1954 Posted September 24, 2018 Share Posted September 24, 2018 Thats a superb looking Jaguar, and reminds me exactly of the Jaguar's I saw coming off the Warton production line back in the 70's, albeit they had grey undersides at that time, before the wrap around. A cracking model of a cracking aircraft. Terry 2 Link to comment Share on other sites More sharing options...
MarkSH Posted September 24, 2018 Share Posted September 24, 2018 An excellent result, nice work. 1 Link to comment Share on other sites More sharing options...
Redstaff Posted September 24, 2018 Share Posted September 24, 2018 Very nice job, must get round to building a jag at some point Ian 1 Link to comment Share on other sites More sharing options...
Max Headroom Posted September 24, 2018 Share Posted September 24, 2018 I like that a lot! I opened the lid on mine recently, chickened out and put it back in the pile....... Good tip on the vertical supports for the fuselage. One question though, did you build the nose and fuselage separately and then attach, or fix each half to the fuselage first? Trevor 1 Link to comment Share on other sites More sharing options...
Michael-S Posted September 24, 2018 Share Posted September 24, 2018 Very nice Jaguar. Best regards. Michael. 1 Link to comment Share on other sites More sharing options...
RMCS Posted September 25, 2018 Share Posted September 25, 2018 Great job 1 Link to comment Share on other sites More sharing options...
DAG058 Posted September 25, 2018 Share Posted September 25, 2018 Love it! I have been playing with the idea of getting this kit but the bad reviews have been putting me off. Seeing your build has swung it the other way now though, I think I'll need to get one. 1 Link to comment Share on other sites More sharing options...
sanfrandragon Posted September 25, 2018 Share Posted September 25, 2018 I used to stand at the end of the runway at RAF Abingdon where the Jags were serviced. Certainly looks the planes I saw coming into land! 1 Link to comment Share on other sites More sharing options...
Phone Phixer Posted September 26, 2018 Share Posted September 26, 2018 Great job. Looks like you corrected alot of the shape issues with the kit. Got the pylons right too. It's the little things to notice, I love the real effect of the painted red suncorite on the gun pen nib fairings. I know, I used to do the 1:1 version. 1 Link to comment Share on other sites More sharing options...
robgizlu Posted September 26, 2018 Share Posted September 26, 2018 Absolute top job. Great looking model Rob 1 Link to comment Share on other sites More sharing options...
Filler Posted September 26, 2018 Share Posted September 26, 2018 6 hours ago, Phone Phixer said: Great job. Looks like you corrected a lot of the shape issues with the kit. Got the pylons right too. It's the little things to notice, I love the real effect of the painted red suncorite on the gun pen nib fairings. I know, I used to do the 1:1 version. As I said earlier, it's a fantastic representation of a Jaguar and looks exactly like the real thing to me. Not sure if this is the best place to ask this, but what are the shape issues that there are a lot of to correct in this kit? 1 Link to comment Share on other sites More sharing options...
Mikey-1980 Posted September 26, 2018 Share Posted September 26, 2018 Outstanding build! Really like the finish to the overall build too. Be proud of that one! 1 Link to comment Share on other sites More sharing options...
tom271282 Posted September 26, 2018 Author Share Posted September 26, 2018 On 9/24/2018 at 7:45 PM, Max Headroom said: I like that a lot! I opened the lid on mine recently, chickened out and put it back in the pile....... Good tip on the vertical supports for the fuselage. One question though, did you build the nose and fuselage separately and then attach, or fix each half to the fuselage first? Trevor Trevor, I fixed each half of the nose section to the respective fuselage half, to create a conventional kit then when all the gubbins was inside buttoned it up in the usual fashion. I think this approach helped to align the halves better, especially the arch behind the rear of the cockpit. 3 hours ago, Filler said: As I said earlier, it's a fantastic representation of a Jaguar and looks exactly like the real thing to me. Not sure if this is the best place to ask this, but what are the shape issues that there are a lot of to correct in this kit? Shape wise, I would say the overall model is pretty good. As previously mentioned, the pylons are the French sort so need butchering a bit and the noses blunted off. The air conditioning inlet is about twice the height it should be and so I filed that down to preserve the top line of the aircraft. Other than that, I felt it was pretty close to the drawings I had. Fit wise however, not good. The main issue is the fuselage halves which on my kit seemed warped and mishapen. Adding the vertical supports inside the fuselage as I showed above really helps to push and squeeze it into the right shape. Also added styrene strip inside to give a lip along the bottom join to assist, but still needed a lot of filling to get it level. The panels that you can display open are too small, so work is required to get them to fit right. Generally the fit is poor. Nothing really goes together simply, overall a big of a dog, but I almost prefer kits like this because I have to think about it, and come up with solutions. Maybe I'm just weird.... Thank you all for the really kind comments, coming from someone who rarely posts here, its lovely to get the support. 2 Link to comment Share on other sites More sharing options...
12jaguar Posted September 26, 2018 Share Posted September 26, 2018 The profile of the leading edge of the mainplane is well off underneath the slats but these at least help to mask the issue. The pylons are totally wrong as is the weapon load out. there's some odd depictions of panel lines and I wouldn't recommend having the avionics bay door open as this looks nothing like an RAF Jag. I replaced my secondary heat exchanger fairing on the spine with a resin aftermarket one John 1 Link to comment Share on other sites More sharing options...
exdraken Posted September 26, 2018 Share Posted September 26, 2018 looks goods and like a Jag! great to see a correct load out, something not too easy to achieve with this KH kit! Link to comment Share on other sites More sharing options...
russ c Posted September 26, 2018 Share Posted September 26, 2018 Really nice Jag there Tom, looks superb Link to comment Share on other sites More sharing options...
corsaircorp Posted September 26, 2018 Share Posted September 26, 2018 Hello Tom, Really good Jaguar to me ! Thanks for the tips, I will look at it closely on mine The box get down twice from the attic.... So, I will start mine soon, I already buy the sand paint..... It will be a not completely politically correct of a Jaguar ! The decal sheet has also landed on CC Castle ! 😈 Thank for sharing ! Sincerely. CC Link to comment Share on other sites More sharing options...
F-32 Posted September 26, 2018 Share Posted September 26, 2018 That looks stunning - very very cool indeed Link to comment Share on other sites More sharing options...
James G Posted September 27, 2018 Share Posted September 27, 2018 Excellent build! Link to comment Share on other sites More sharing options...

Recommended Posts
Create an account or sign in to comment
You need to be a member in order to leave a comment
Create an account
Sign up for a new account in our community. It's easy!
Register a new accountSign in
Already have an account? Sign in here.
Sign In Now