MikeR Posted September 4, 2018 Share Posted September 4, 2018 On 9/3/2018 at 5:12 AM, 109 fan said: Interesting thread, gentlemen. And very nice looking models, MikeR Thanks Barry, much appreciated. I'll be honest and say that like you I'm going to have a first preference for the FM kit from now on- I have two G-10's and the F-4 Trop boxing in the stash! Doing three lots of nasal surgery is enough for me! Mike. Link to comment Share on other sites More sharing options...
AaCee26 Posted September 5, 2018 Share Posted September 5, 2018 Hi all, When AZ G-6 came into market I got measurements from real aircraft from a friend. IIRC discrepancy between windscreen and cowl was 1.6 mm. Later ones (G-6AS, Avia etc.) are better but still a little too long. For G-6 I made a elongated and vertical turned Z-cutting removing that measure behind the top cowl and rear of the nose cooler. For wing incidence I put a 0.5 mm plug on to leading edge to drop the wing and sanding and filling wing root fairing to match with the original thickness wing. I'm not sure if I'll ever do that another time or just stay waiting Eduard FInemolds cowls are a tad short and the fuselage bottom cross section behind the wing is too rounded. For F to G-4 my choice is Zvezda with AZ or FM wings when needed. Cheers, AaCee 2 Link to comment Share on other sites More sharing options...
Vlad Posted September 5, 2018 Author Share Posted September 5, 2018 51 minutes ago, AaCee26 said: Hi all, When AZ G-6 came into market I got measurements from real aircraft from a friend. IIRC discrepancy between windscreen and cowl was 1.6 mm. Later ones (G-6AS, Avia etc.) are better but still a little too long. For G-6 I made a elongated and vertical turned Z-cutting removing that measure behind the top cowl and rear of the nose cooler. For wing incidence I put a 0.5 mm plug on to leading edge to drop the wing and sanding and filling wing root fairing to match with the original thickness wing. I'm not sure if I'll ever do that another time or just stay waiting Eduard This was pretty much my conclusion from a very rough picture comparison. I think what you did is the same as me. I'm still not in a position to post my pictures, I'll try to remember to do it when I can. I still have an unstarted joypack, I think I'd be happy to do some more cutting. Link to comment Share on other sites More sharing options...
Vlad Posted September 6, 2018 Author Share Posted September 6, 2018 (edited) Sorry for double post, had a bit more of a fiddle with my K-4 sprues and wanted to report back. Issues: - nose is still too long but now the various protruding fittings are correctly positioned relative to the wing. So the extra length is not between firewall and cockpit like on the early G, where is it? Well... it seems the oil tank is too long now. - the above explains why it's too narrow at the spinner. Extend a tapered shape too far and it gets narrower than you want it to be! Or taper less = loss of "Roman nose". Mystery solved. - top of cowling angle/curve in MG area looks OK actually. - exhaust stack opening is slanted slightly upwards at the front Proposed work to fix (all discussed before, just collating): - cut off and replace upper half of oil tank with one from a G (my K kit came with spare G fuselage halves). This will sort the length and nose kink - cut forward from exhaust stack openings and shim lower cowl down. This will restore the right height at the spinner and align the exhausts. - sand down lower cowl remaining spinner plate to meet new upper oil tank. - in theory, no need to completely cut off and realign nose. Edited September 6, 2018 by Vlad Link to comment Share on other sites More sharing options...
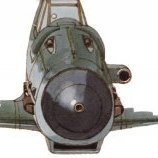
Jan Polc Posted September 6, 2018 Share Posted September 6, 2018 (edited) Dear gentlemen, I have read carefully all the thread here about our (not only) 109K-4. And it seems, that neverending story with the nose shape continues. Let me add some comments - There is a lot of various plans, published in various books and magazines. And majority of these plans are inacurrate, mainly in the nose section of Bf 109. These inacurracies started (I think) with Mr. Nohara´s work, who made late version of Bf 109 drawing to the lenght of Emil. Here mentioned plans in MMP book are also wrong, again the same mistake - too short nose section. When we started to work on Bf 109 line, we started with the references. Our work is based on the work of Mr. Beaman, his plans are the best around. And - we have scanned nearly complete factory plans, preserved in Prague National Technical Museum. It contains some 300 various drawings in 1:10 scale and some even in 1:1 scale. When working on master model, we were very careful with the nose section, so characteristic for Bf 109 late versions. Everything was checked many times. And I can say, that the nose IS accurate. We can look at Mr. Beaman´s drawings - We have corrected some minorities on the drawing, as you can see. Also of note is the angle of the wing, which corresponds with the kit. Yes, lenght is the lenght, what is very discussed is the shape of the nose. So we can take the plan in 1:72 scale and take the fuselage half and check it. The following photograph shows clearly, that the shape is correct. Also discussed are the exhausts and the fact, that theay are upwards in the front. So look at Mr. Beaman´s plan, you can see, that it is correct. Is the plan correct? We can do another check - here are side views coming from original factory plans, with stenciling positions. And - panel lines are again upwards in the front. Yes, plan is plan and real thing is real thing, so the last exhausts check is taken from the photograph. Even if the photograph is not a good reference as it is distorted thanks to the lens system of the camera, especially digital one. Do you see that exhausts are upwards in the front. I can also answer the question why we started with 109 line - because there not another really accurate kit on the market. Including the FM one, which is more than 2mm shorter, based on the wrong plans. It also suffer the inaccuracy in cross sections, see the last pictures. My personal opinion is, that surgery here suggested is a wasting of time. But, of course, it is only my personal opinion. Edited September 7, 2018 by Jan Polc 8 1 Link to comment Share on other sites More sharing options...
MDriskill Posted September 7, 2018 Share Posted September 7, 2018 (edited) Mr. Polc, thank you very much for this detailed and interesting post! It is a most intriguing counterpoint to this discussion. I own an original copy of Mr. Beaman's "The Last of the Eagles," and can confirm the AZ fuselage fits the 1/72 profile drawings in this book with notable precision. To my mind, the most interesting detail is shown in the port fuselage stenciling diagram: the fuselage structural datum line, and what appears to be the engine thrust line, are both indicated. They do not coincide, and are not parallel. The classic Beaman drawings seem to agree with this. I suspect many other Bf 109 drawings - rightly or wrongly, I don’t know - have assumed otherwise. On the issue of fuselage length, what is your opinion of this drawing, which also purportedly is based on factory data? My own study indicates that these dimensions, when translated into 1/72 scale, result in a fuselage length slightly longer than Fine Molds; but slightly shorter than AZ. If there is an error, where might it be? Edited September 7, 2018 by MDriskill Link to comment Share on other sites More sharing options...
Vlad Posted September 7, 2018 Author Share Posted September 7, 2018 (edited) @Jan Polc Thank you also for the detailed reply. First let me say that I have built, and still plan to build, many AZ 109 kits and I am generally a happy customer of your products. I am not continuing this "neverending story" to try to discredit you or your brand, only to satisfy myself and to make sense of my observations. And ultimately to have a 109 on my shelf that looks like the real thing. I apologise, I made some hasty conclusions. Using the dimensions @MDriskill gave, the AZ K-4 length is more or less fine, maybe slightly too long but within my measuring error. And I learned something new about the exhaust stack opening angle. However, as I said my observations still give me reason to continue this discussion. The fact is, I have now built two G-10 kits and have the K-4 parts in my hand and can see the same nose shape. I look at pictures of the real thing, then at the model on my shelf, and to my eye the shape does not look the same. As you say, real thing is real thing and when we build models we want them to look like what we've seen in historical pictures. Observe the below pictures, how parallel the profile of the lower cowling appears compared to the main axis of the plane, and the distinct step on the upper side as it comes down into the spinner. I look at the model from the same angles and I do not see these shapes like this. Even in the drawings, I do not see this classic shape from the pictures. I know what you will say, that pictures have distortions and observations are just my opinion, but I want to dig further. How is it possible that something is technically correct but still looks wrong (and not just to me)? Is it time instead to question the Beaman drawings? I don't want to make such a strong accusation without harder evidence, but it seems to me an option we should consider, if the real thing does not look like the drawings! Edited September 7, 2018 by Vlad Link to comment Share on other sites More sharing options...
Jan Polc Posted September 7, 2018 Share Posted September 7, 2018 (edited) Vlad - I was expecting something like this... 🙂 The nose section of 109 late versions, with big bulges (AS, G-10 and K) are very complicated in shape with complex system of curves etc. Also, drawings can not capture all that details. We were working with photographs, drawings and cross sections from factory plans. Let us say that the result is nearly correct. Not wrong or bad, just nearly correct with the tolerance for some minor mistakes. This is the result of the fact that we are human beings (I hope). When looking at photos and kit it is hard to see the same shapes. It depends on many factors - the same angle is not the same, light conditions, distance etc. In fact, judging the shapes is very subjective thing. It can be superb for one and totally wrong for another. Simply personal opinions. Taste of modelers is their own choice, somebody loves our 109, somebody FM or anything else. And the taste is not possible to change. My post was posted just for the correction of some really wrong conclusions - exhausts for instance. To the lenght of the kit - yes, maybe there is some minor difference. Maybe it is the result of measuring. To be 100% in scale is hard task. When I am looking at our 109K I see 109K, but it is my personal opinion and I am member of realisation team, so maybe I am wrong. Decision is yours, gentleman. 🙂 If you want to discuss more on the subject do not hesitate to contact me directly here - [email protected] Edited September 7, 2018 by Jan Polc 2 1 Link to comment Share on other sites More sharing options...
Graham Boak Posted September 7, 2018 Share Posted September 7, 2018 With regard to the kink behind the spinner on the top fuselage line, as I understand it the cowling panels open with a piano hinge therefore the top line of the cowling for a considerable length must be straight. This is an engineering constraint driven by the choice of the hinge, and is not a matter of discussion or opinion. When drawn as a curve, as in the Beaman plans. this cannot represent the true line of the aircraft centreline and the line of the hinges to the left and right of this. Because the start and end heights of this straight part are constrained by the engine inside, there is a resulting drop down to the spinner. There may well be some length of the cowling outside the actual hinge length, where some curvature is possible, but this length is small. (I must admit I thought that this particular factor had been recognised and taken allowance for by model manufacturers some decades back, but it does seem that old lessons can be forgotten if left taken for granted.) Now as far as impressions are concerned, when moving away from the centreline the original designer was less constrained and so the cowling can (and does) present more of an even curve between spinner and cockpit, especially as the fuselage diameter is closer in size to the spinner diameter. Depending upon the viewpoint of the photographer, we may be seeing more of the curved shape than the true straight hinge on the centreline. To me, some of the drawings with a straight line down the top of the cowling do seem a little stark, which may mean that the draughtsman has made an excessive allowance for the straight length, or perhaps that when viewing photos we are indeed not seeing the true side view. Which is yet another warning against placing excessive reliance on photographs for profiles. I don't have the AZ Bf109K, but if it has in side view a curved centreline to the top of the cowling then it has to be incorrect. Fortunately this is very easy to fix with a few strokes of the file. Aeroplanes have very subtle shapes and when draughtsmen and modelmakers simplify them (as sometimes they must) they do so at their peril. I recall being astonished when I saw a photo of a Bf109 with the bottom engine panel hanging open - it was astonishingly wide! Surely this was a fault of the photo in some way? But I saw Black 6 at Duxford with the panel open, and it's true. I remain unconvinced that any 1/72 model I have seen can possibly have this correct... but maybe that's just me. 1 Link to comment Share on other sites More sharing options...
Jan Polc Posted September 7, 2018 Share Posted September 7, 2018 Mr. Boak is right again, as usually... 🙂 Yes Graham, you are right with curve on Mr. Beaman´s drawing. As we know about piano hinge, we have created this part correct. Just of note is that this hinge was not from the panel line to the panel line and there is a small curve in frontal part (of kit part - cover). And - look at the photographs, you see curve there. Simply, photograph is tricky thing. Just for your info, new sprue and the part with piano hinge on the pictures. See you in Telford, I hope - same place, same face 🙂 1 Link to comment Share on other sites More sharing options...
Vlad Posted September 7, 2018 Author Share Posted September 7, 2018 Understood 🙂 I'm usually building 1/700 ships where the curves can be even more complex and analysis of correct hull shape can get quite crazy! I have no doubt a lot of effort has gone into the kits and yes, they do look like 109s. But then, old Revell G-10 kit also looks like a 109, good enough for some I'm sure! I'm happy to see this as an issue of perception rather than absolute right/wrong (which is impossible in kit form anyway). I would still like to go ahead with my surgery experiment, I already cut up the kit last night anyway! With your extra information, the change will be less than I planned originally, probably only 1mm, but I want to see what difference it makes to how I see it. 1 Link to comment Share on other sites More sharing options...
Jan Polc Posted September 7, 2018 Share Posted September 7, 2018 Vlad - enjoy your 1 milimeter... 🙂 Happy weekend to all of you gentlemen. 3 Link to comment Share on other sites More sharing options...
Smudge Posted September 7, 2018 Share Posted September 7, 2018 Hi Jan, and Graham. Also Vlad and MDriskill. I always enjoy reading any of your posts about the late 109's. Always very interesting. Just wanted to say I have just received my latest AZ kit, the 109K-4 and am very happy with it. I now have quite a collection and when all finished and lined up should I hope look quite impressive. I would not attempt any 'fixes' myself as frankly I don't think my efforts would add anything to the finished model. The damage to the panel lines and fine details of the various service panels etc would outweigh any perceived improvement in accuracy. Jan, do you recall sending me a spinner and prop for my Revell 109G-10? I built it, but it is sitting to one side of my bench, as I am a little apprehensive about setting to it with my airbrush, and want to do a good job on the 'mottling'. Which to me is another point often overlooked in these discussions, 'How good at actually making these am I!' Cheers, all the best. 1 Link to comment Share on other sites More sharing options...
AaCee26 Posted September 12, 2018 Share Posted September 12, 2018 Hi Jan (& all), A bit late thanks also from me about showing what AZ/KP late model 109's lenght was based. It was surprise for me that Mr. Beaman's over 40 years old drawings are still best of the bunch! I had only G-6AS and it too sit like a glove to the Beaman drawings. I agree wit you about the correction to the undersurface between spinner and nose cooler. For my taste there might be need for a little more angle between the oil tank cover shiled and opening cowling profile but much less than 1 mm. Maybe 1/3? But I think that if it is important or not or even if it is correct is matter of personal preference Just if the F to G-6 beule fuselage would match that lenght... You know, modellers are never happy Cheers, AaCee Link to comment Share on other sites More sharing options...
MDriskill Posted September 13, 2018 Share Posted September 13, 2018 14 hours ago, AaCee26 said: I had only G-6AS and it too sit like a glove to the Beaman drawings. I agree wit you about the correction to the undersurface between spinner and nose cooler. For my taste there might be need for a little more angle between the oil tank cover shiled and opening cowling profile but much less than 1 mm. Maybe 1/3? But I think that if it is important or not or even if it is correct is matter of personal preference You make an excellent point, and I agree that if correction is needed on the upper cowl, it is only a tiny amount. 1/3 mm sounds about right! As Mike suggested earlier in this thread, this could be accomplished by shimming the front of the upper cowl piece slightly, then re-shaping the top of the oil tank area with filler. Going back to an earlier question, there is a good new set of 109G-6 drawings by Radu Brinzan in the ADH book on building the Revell 1/32 kit. Those confirm that the engine and exhausts were angled upward slightly with respect to the fuselage structural datum line, and are useful on some other points as well. 1 1 Link to comment Share on other sites More sharing options...
MikeR Posted September 13, 2018 Share Posted September 13, 2018 4 hours ago, MDriskill said: You make an excellent point, and I agree that if correction is needed on the upper cowl, it is only a tiny amount. 1/3 mm sounds about right! As Mike suggested earlier in this thread, this could be accomplished by shimming the front of the upper cowl piece slightly, then re-shaping the top of the oil tank area with filler. Yep, that's all you need. Apart from that, faffing about with the spinner and using Jan's suggested fix for the too-narrow fuselage I didn't need to do anything else to G-14/AS I built. I actually think that most of the problems with AZ's 109G-10/G-*/AS kits stems from the damage sustained by the mould that Jan acknowledges in the post I linked to. Mike. Link to comment Share on other sites More sharing options...
Vlad Posted September 14, 2018 Author Share Posted September 14, 2018 (edited) Yes, the difference is tiny. In the end I used the oil tank from a G-6 but because the tank is a little bit shorter, I pretty much didn't need to shim down the lower half of the cowl. Once sanded down to match the length, it opens up to the right size for the spinner. I know we're talking about fractions of mm here but the now visible notch makes quite a difference (to me). EDIT: additional question. Is the spinner too large? On an unmodified G-10, the spinner overhangs the front of the engine cowl slightly. Edited September 14, 2018 by Vlad Link to comment Share on other sites More sharing options...
MDriskill Posted September 14, 2018 Share Posted September 14, 2018 Very interesting Vlad, thanks for the follow up. Hope you can post photos of the finished result! Random thought: another disadvantage of cutting and wedging down the front lower cowl, would be that the top and bottom of the exhaust openings, and nearby longitudinal panel lines, would no longer be parallel. That would look a little weird, and be difficult to fix. Link to comment Share on other sites More sharing options...
MikeR Posted September 14, 2018 Share Posted September 14, 2018 8 hours ago, Vlad said: EDIT: additional question. Is the spinner too large? On an unmodified G-10, the spinner overhangs the front of the engine cowl slightly. It might be or it may be that the nose itself is a bit pinched in. Whether that's due to the mould damage or a simple mismatch with the original Gustav parts I don't really know. I'm inclined to think the former. 6 hours ago, MDriskill said: Very interesting Vlad, thanks for the follow up. Hope you can post photos of the finished result! Random thought: another disadvantage of cutting and wedging down the front lower cowl, would be that the top and bottom of the exhaust openings, and nearby longitudinal panel lines, would no longer be parallel. That would look a little weird, and be difficult to fix. I wasn't too fussy about the panel lines on the G-2 and G-6 I built, but I used plasticard to rebuild the exhaust openings. Mike. Link to comment Share on other sites More sharing options...
AaCee26 Posted September 14, 2018 Share Posted September 14, 2018 Hi all, Related to the angle of the exhaust with my limited understanding of mechanical engineering I believe, that the exhaust opening should be in straight angle with the prop back plate (and the prop itself too). Cheers, AaCee Link to comment Share on other sites More sharing options...
MDriskill Posted September 14, 2018 Share Posted September 14, 2018 53 minutes ago, MikeR said: It might be or it may be that the nose itself is a bit pinched in. Whether that's due to the mould damage or a simple mismatch with the original Gustav parts I don't really know. I'm inclined to think the former. I think you are correct. Jan’s own photo seems to indicate the nose is just a tiny bit too shallow. So a slight shortening, and a slight shim of the upper panel, would likely be helpful. Link to comment Share on other sites More sharing options...
MDriskill Posted September 14, 2018 Share Posted September 14, 2018 (edited) 44 minutes ago, AaCee26 said: Hi all, Related to the angle of the exhaust with my limited understanding of mechanical engineering I believe, that the exhaust opening should be in straight angle with the prop back plate (and the prop itself too). Cheers, AaCee You are correct. My take on the drawings is that the firewall is perpendicular to the structural datum line. But the cowl’s geometric features forward of that, including the exhausts and prop of course, are of necessity generally parallel or perpendicular to the engine centerline, which is slightly inclined with respect to the structural datum. Edited September 14, 2018 by MDriskill Link to comment Share on other sites More sharing options...
Vlad Posted September 21, 2018 Author Share Posted September 21, 2018 Right, sorry it's taken so long. Here are some pictures of my 109K-4, with the oil tank from a G-6. Yes, I know that puts the filler cap circle in the wrong place, but I'm quite happy with the slightly modified profile. I accept the kit is accurate to the drawings, but I still felt the need to make this small modification to suit my own perception of the aircraft. 2 1 Link to comment Share on other sites More sharing options...

Recommended Posts
Create an account or sign in to comment
You need to be a member in order to leave a comment
Create an account
Sign up for a new account in our community. It's easy!
Register a new accountSign in
Already have an account? Sign in here.
Sign In Now