zaxos345 Posted July 22, 2018 Share Posted July 22, 2018 Good morning guys, it's high time i posted something here. So i am back with a model i cope for some time now. But before i post my work i would like to thank my good Christian, who is always eager to help me when i ask. The kit is known to everyone 1/48 Accurate Miniatures A-36 The aftermarkets.... As well as modex masks for ''Piggy III'' the actual Piggy... As always i begun my work from the cockpit which for this kit was wrong as Acc. Min. is based on the surviving XP-51 which was a heavily modified Mustang Mk.I, not good for the A-36. So i shaved everything out and build a new one from items from the part fret and plastic... Painted, and weathered... Next, landing gear legs... Then i glued plastic strips below the dive brakes and also glued the guns before i close the wings, i test fitted and i found it difficult to put them afterwards (sorry no image of the guns!) The small heat shrinking tubes you see on the guns is to protect them! Next i dealt with the landing lights, i closed the gap with epoxy putty, i used drills to depict the light holes, i paint them glossy black, next chrome silver, all black surrounding, next i covered them with the clear part, sanding polishing and finally masking for the paint. I forgot to take pics of all the procedure 😃 I have seen many building the A-36 model but forget to put the recognition lights to the right place under the fuselage and not below the wing, so i removed them from the wing and placed them to the right place. Unfortunately i also dont have pics of all the procedure. I drilled the holes under the fuselage, painted them gloss black, chrome silver put a drop of epoxy glue on them and afterwards i panted them with the clear colors!! it was time to glue the cockpit parts and close the fuselage... I attached the wings and treat the small gaps with tamiya putty thinned with leveling thinners next it was time for the wind screen and canopy...I separated the vacuform canopy, glued some part items for detail, masked then inside and outside and painted them. It was a PITA but i think it worth the pain. I also prepared the quickboost gun sight! Finally, i painted the inner windshield frame with Bronze Green i added the gun sight, the seat and the windshield which is painted only from the inside... I glued the windshield with cyano glue, and left it to rest, i have to close the small gaps. I am thinking to use milliput for that... That's all for now my friends....to be continued.., Hope you like it, please feel free to comment whatever you want!! Regards, John ..... 10 Link to comment Share on other sites More sharing options...
fubar57 Posted July 22, 2018 Share Posted July 22, 2018 Very, very nice. Learned something as well, thanks 1 Link to comment Share on other sites More sharing options...
Christer A Posted July 22, 2018 Share Posted July 22, 2018 What an excellent job you've done so far! I'll be sure to reference your build whenever I get around to start mine. 1 Link to comment Share on other sites More sharing options...
Azgaron Posted July 22, 2018 Share Posted July 22, 2018 Very nice work so far! Håkan Link to comment Share on other sites More sharing options...
zaxos345 Posted July 23, 2018 Author Share Posted July 23, 2018 Thanks a lot guys!! John Link to comment Share on other sites More sharing options...
zaxos345 Posted August 7, 2018 Author Share Posted August 7, 2018 Good evening guys, a little update on Miss ''Piggy III'' I needed to putty the windscreen, for that i used miliput, the white one, i think is called fine. I trimmed it with water in order to have as less sanding as possible! After that, as i had blurred the windscreen with the sanding, i brushed some fresh future and everything dissappeared! Letting the puttied windscreen to cure, i dealt with the bombs. I dissolved some tamiya putty with leveling thinner and applied it with a brush over the body of the bombs to simulate the rough texture of it, then i painted them! It was not my plan to rivet her but it seemed too plain to my eyes, so...i riveted her, i think that the outcome is much better!!! Next step, an overall inspection, cleaning and preparing her for the colors!! But she has to wait to come back from my short vacations. Thanks for your interest, John 4 Link to comment Share on other sites More sharing options...
DJJunis Posted August 7, 2018 Share Posted August 7, 2018 John, That is excellent modeling. Thanks for sharing. All the Best! Don 1 Link to comment Share on other sites More sharing options...
corsaircorp Posted August 7, 2018 Share Posted August 7, 2018 Hello John ! Excellent work, you've done here, Congratulations !! I will save it and try to do half as good when I'll start mine. I'm still searching for pics from the Yellow Scropions Sqdn in CBI Theatre.... If I did'nt find enough, I'll do a MTO one... Whatever, your Apache already a gem !! Sincerely. Corsaircorp 1 Link to comment Share on other sites More sharing options...
zaxos345 Posted August 7, 2018 Author Share Posted August 7, 2018 Thanks guys, really appreciate the comments!! John 1 Link to comment Share on other sites More sharing options...
Mikey-1980 Posted August 7, 2018 Share Posted August 7, 2018 stunning build so far, and absolutely a tutorial in filler prep and application. Didnt realise you could use a thinnner on filler putty to make it more pliable? Wonder if that should something I should apply to my future builds? what is the ratio of putty filler to thinner please? Link to comment Share on other sites More sharing options...
zaxos345 Posted August 7, 2018 Author Share Posted August 7, 2018 Hi Mikey, Thanks for your comment! I dont use a specific ratio to thin tamiya putty with leveling thinners. I put as much thinner in order to have the viscosity i want. Imagine something as a liquid putty. I do in specific areas where i want to keep the detail, so no sanding and i repeat the process untill i am happy with the final outcome. I leave the putty to dry and then with thinner and a Qtip i remove the excess!! John 1 Link to comment Share on other sites More sharing options...
Mikey-1980 Posted August 7, 2018 Share Posted August 7, 2018 Awesome, Thanks john. I'll try and pick some thinner up at the weekend and give it a bash Link to comment Share on other sites More sharing options...
zaxos345 Posted August 7, 2018 Author Share Posted August 7, 2018 3 minutes ago, Mikey-1980 said: Awesome, Thanks john. I'll try and pick some thinner up at the weekend and give it a bash Remember, for tamiya or Gunze Mr. Hobby putties you need lacquer thinners. Fo acrylic, water based putties i dont know, water maybe?? John 1 Link to comment Share on other sites More sharing options...
Gene K Posted August 8, 2018 Share Posted August 8, 2018 Thanks for a great thread, John. Appreciate the fine photographic details of your build. Gene K 1 Link to comment Share on other sites More sharing options...
zaxos345 Posted September 18, 2018 Author Share Posted September 18, 2018 (edited) Good evening lads, A little progress on ''Piggy III'' and is was time to put some paint on her. Mr. surfacer 1500 black.... First i dealt with the propeller random.... After that it was time for the underside mrpaint Neutral grey 43.... ...AK extreme metal aluminium first on the upper side, for chipping purposes, followed by AK work effects fluid... And after that, different shades of mrpaint olive drab 41 followed by chipping with a toothpick and/or a small stiff brush...I am going to lower the contrast of the aluminium...i think now, that it is not the best color for this job...any suggestions?? After that it was time for the yellow wing bands and the code munbers. A lot and patient masking to achive that...As you can see i photocopied the insignia in order to place the montex masks accurately...and yes i am very happy with the result!! The yellow is the chrome yellow paint from my favorite enamel paints, white ensign! I have a lot of work ahead with the weathering mostly, but so far so good i think!!! Hope you like it, John Edited September 18, 2018 by zaxos345 4 Link to comment Share on other sites More sharing options...
zaxos345 Posted October 11, 2018 Author Share Posted October 11, 2018 (edited) Good morning gents, a little progress with ''Piggy III''... I painted the white line on the vertical stabilizer as well as the ''P'' on both sides trying to replicate the brush leftovers. In these images you can notice some small maps i added in the cockpit and in the map case and a small family picture on the instruments panel Gloss varnish, my trusty Tamiya X-22, decals, and gloss varnish again to seal everything. The detail decals are from montex, absolutely beautiful and extremely thin ones, and the insignia from fundekals, also top notch quality from cartograph!! I also assembled the spinner with the propeller, it isn't glued yet, only there for the photoes... Nest step, wash, seal everything with semi gloss varnish, color modulation with oils and general weathering... Thanks for watching, John Edited October 11, 2018 by zaxos345 6 Link to comment Share on other sites More sharing options...
zaxos345 Posted October 21, 2018 Author Share Posted October 21, 2018 Good morning gents, a little update for miss ''PIGGY III''. I am almost at the end of the project! After the gloss i started with the wash....i tried to use different wash shades...in order not to get a uniform one... After this stage i sprayed a semi matt varnish, to seal everything and i started the weathering process using only oils, (dry brush, dot filters...etc.) I placed the exhausts and dealt with the exhaust stains, only oils here too.. As you can see i unmasked the windscreenand i put the landing gear...dont know for you but for me to place the landing on a P-51 correctly is a bit tricky!! Things to do...glue the propeller (is placed only for photos), place the antenna and the pitot tube (i ordered an aftermarket one from master barrels, as the one the kit provides i dont like it) and glue the vac canopy parts...this is doing to be tricky too!!!! That's all for now, next update will be the last one, hope you like it!! John 5 Link to comment Share on other sites More sharing options...
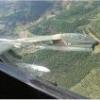
zaxos345 Posted December 9, 2018 Author Share Posted December 9, 2018 Good evening gents. I finally managed to finish this ''girl'' and I give you some pics of her(taking photos is not my strong point!!) I would like to thank you for your company and especially Christian for the info he provided to me!!! Mery holly days and health and happiness to all!! John 5 Link to comment Share on other sites More sharing options...
fubar57 Posted December 9, 2018 Share Posted December 9, 2018 A great build to follow. Well done John George Link to comment Share on other sites More sharing options...
corsaircorp Posted December 9, 2018 Share Posted December 9, 2018 Wow John ! Great and straightforward build ! Congratulations !! CC Link to comment Share on other sites More sharing options...
zaxos345 Posted December 9, 2018 Author Share Posted December 9, 2018 Thanks guys, really appreciate! John Link to comment Share on other sites More sharing options...
SandyBay Posted December 9, 2018 Share Posted December 9, 2018 I love the treatment you’ve given the paintwork, it looks very realistic 1 Link to comment Share on other sites More sharing options...
zaxos345 Posted December 14, 2018 Author Share Posted December 14, 2018 Some new photos and better i hope... 🤔🤔 Merry Christmas and Happy 2019 to all!! John Link to comment Share on other sites More sharing options...

Recommended Posts
Create an account or sign in to comment
You need to be a member in order to leave a comment
Create an account
Sign up for a new account in our community. It's easy!
Register a new accountSign in
Already have an account? Sign in here.
Sign In Now