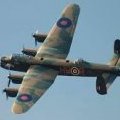
Vinnie Posted June 8, 2018 Share Posted June 8, 2018 I really enjoyed this kit. It went together very well with just enough putty work and damage repair to sticky out bits to keep it interesting. Finished with Hataka acrylics. This is also my first RFI using an airbrush, so constructive comments will be welcome. Thanks for looking. 42 Link to comment Share on other sites More sharing options...
F-32 Posted June 8, 2018 Share Posted June 8, 2018 Absolutely cracking piece of work 1 Link to comment Share on other sites More sharing options...
Beard Posted June 8, 2018 Share Posted June 8, 2018 That's very nice indeed. 1 Link to comment Share on other sites More sharing options...
goggsy Posted June 8, 2018 Share Posted June 8, 2018 Nice job, looks great in that scheme too. 1 Link to comment Share on other sites More sharing options...
jrlx Posted June 8, 2018 Share Posted June 8, 2018 Great job! The airbrushing looks immaculate. Congrats Cheers Jaime 1 Link to comment Share on other sites More sharing options...
stevej60 Posted June 8, 2018 Share Posted June 8, 2018 Superb build and finish.what a beautiful scheme too! 1 Link to comment Share on other sites More sharing options...
Unfinished project Posted June 8, 2018 Share Posted June 8, 2018 Nice work and an unusual scheme as has already been said above 👍 1 Link to comment Share on other sites More sharing options...
Corsairfoxfouruncle Posted June 8, 2018 Share Posted June 8, 2018 Great work on your Beau 1 Link to comment Share on other sites More sharing options...
FAAMAN Posted June 9, 2018 Share Posted June 9, 2018 Very nice 😎 1 Link to comment Share on other sites More sharing options...
Stew Dapple Posted June 9, 2018 Share Posted June 9, 2018 Good job Vinnie, she looks great Think you got the airbrushing nailed, too Cheers, Stew 1 Link to comment Share on other sites More sharing options...
neil5208 Posted June 9, 2018 Share Posted June 9, 2018 lovely work with the airbrush, how did you find the hakata paints to spray? 1 Link to comment Share on other sites More sharing options...
IanC Posted June 9, 2018 Share Posted June 9, 2018 Looks great. What did you use for the exhaust collector rings? 1 Link to comment Share on other sites More sharing options...
Vinnie Posted June 9, 2018 Author Share Posted June 9, 2018 6 hours ago, neil5208 said: lovely work with the airbrush, how did you find the hakata paints to spray? To be honest, while I was practising with the airbrush I tried Revell Aqua, Hataka, Humbrol, Tamiya and Mr Hobby. I didn't really find a great deal of difference between them apart from the amount of thinning required. The plus point with Hataka is that they have colours for my area of interest which is WW2. Revell paints are the most economic as they need so much thinning but they don't have the colour range. Link to comment Share on other sites More sharing options...
Vinnie Posted June 9, 2018 Author Share Posted June 9, 2018 3 hours ago, IanC said: Looks great. What did you use for the exhaust collector rings? I really wasn't sure about whether they should be brass colour or steel. After a bit of reading, rightly or wrongly I settled on steel. I mixed some Revell Aqua metallic steel with a little black which gave me a finish that I was happy with. Link to comment Share on other sites More sharing options...
russ c Posted June 9, 2018 Share Posted June 9, 2018 Really nice Far East Beau` there Vinnie, great job 1 Link to comment Share on other sites More sharing options...
Niknak Posted June 9, 2018 Share Posted June 9, 2018 Great work, 1 Link to comment Share on other sites More sharing options...
MikeR Posted June 9, 2018 Share Posted June 9, 2018 Nice! Mike. 1 Link to comment Share on other sites More sharing options...
Buzby061 Posted June 9, 2018 Share Posted June 9, 2018 Very nice, I do like aircraft in SEAC colours. Pete 1 Link to comment Share on other sites More sharing options...
Horatio Gruntfuttock Posted June 9, 2018 Share Posted June 9, 2018 That is a great job and you should be very pleased with your first airbrush efforts - I know I would be, and it is such a nice scheme. One teensy teensy point would be to check the presence of the wee bulges on the upper wings between the fuselage and nacelles - I believe these were only installed on Beaus after about RD500 - yours is a mid 300 serial so probably did not have them. But. . . I do stand to be corrected. Fine replica anyway. 1 Link to comment Share on other sites More sharing options...
Vinnie Posted June 10, 2018 Author Share Posted June 10, 2018 11 hours ago, Horatio Gruntfuttock said: That is a great job and you should be very pleased with your first airbrush efforts - I know I would be, and it is such a nice scheme. One teensy teensy point would be to check the presence of the wee bulges on the upper wings between the fuselage and nacelles - I believe these were only installed on Beaus after about RD500 - yours is a mid 300 serial so probably did not have them. But. . . I do stand to be corrected. Fine replica anyway. I think you may be correct. I'd not thought about it, but looking back at Beau images they don't appear on most examples. Do you know what they are for, btw? Link to comment Share on other sites More sharing options...
Knight_Flyer Posted June 10, 2018 Share Posted June 10, 2018 A neat build, looks like the Hataka paint worked quite well. 1 Link to comment Share on other sites More sharing options...
Vinnie Posted June 10, 2018 Author Share Posted June 10, 2018 4 hours ago, Knight_Flyer said: A neat build, looks like the Hataka paint worked quite well. Yes, I was happy with the finish. Hand brush painting with Hataka tended to be a bit hit and miss and results varied with the colour. For instance, RLM02 seemed so watery it took many careful coats to achieve an acceptable finish. RLM65 however, brush painted beautifully. With a little thinning experimenting, airbrushing with all the colours settled down to a nice finish. They do have a satin effect which I quite like but I wanted the Beau matt. Even with a diluted matt varnish, there is still a sheen there. Not sure about how it looks. What do you think? Link to comment Share on other sites More sharing options...
Knight_Flyer Posted June 11, 2018 Share Posted June 11, 2018 On 6/10/2018 at 7:06 PM, Vinnie said: Even with a diluted matt varnish, there is still a sheen there. Not sure about how it looks. What do you think? I think it looks alright. It has been said nothing is really truly matt and it's only the weathering that gives it that effect. Even came across a US Army tanker who said all of the tanks he's seen have a slight satin sheen and yes he is an armour modeller. For factory fresh the satin sheen will do. 1 Link to comment Share on other sites More sharing options...
Horatio Gruntfuttock Posted June 12, 2018 Share Posted June 12, 2018 On 6/10/2018 at 8:29 PM, Vinnie said: I think you may be correct. I'd not thought about it, but looking back at Beau images they don't appear on most examples. Do you know what they are for, btw? I am not completely sure but believe they covered some pressure devise or oil pump associated with later versions. As I mentioned , they only appeared late in the series , from about RD500-ish, and are feature on all TT versions ( the Airwaves conversion contains white metal ones to add to the wings). There was a discussion about them when the kit was first released and I think that some instructions sheets note that you need to shave them off but I have not looked at mine to check. Easier to get off than to add I believe. 1 Link to comment Share on other sites More sharing options...

Recommended Posts
Create an account or sign in to comment
You need to be a member in order to leave a comment
Create an account
Sign up for a new account in our community. It's easy!
Register a new accountSign in
Already have an account? Sign in here.
Sign In Now