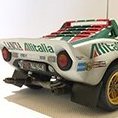
pau10wen Posted May 11, 2018 Share Posted May 11, 2018 Hi Guys Here's a first post of my current project, it will (eventually) look like a Lancia Stratos HF Rally that Sandro Munari won the 1977 Monte Carlo Rally with. I say eventually as every time I cut something off this model and re-hinge it in some way I seem to present myself with another 10 issues to solve, LOL! This is the Revell original kit, with an aftermarket Reji Model engine and a fair bit of additional material and slight artistic license from myself. A LOT of the re-hinging on this one has been possible only due to using very small 2mm diameter by 0.5mm depth (and some slightly larger sized) neodymium magnets all around the bodywork. Some to help hold body parts in place when open, some to actually hinge, as the doors were a nightmare!!! Will be more to post soon, everything is taking a long time to make/resolve/etc at the moment here are some pics of where it's at right now anyway... engine detail - I may change the air filter on top to a more square mesh sided one as per the original car more engine... rear boot detail... rear boot detail painted 11 Link to comment Share on other sites More sharing options...
Hamden Posted May 11, 2018 Share Posted May 11, 2018 Nice start I'll follow along if you don't mind? Looking forward to more of this! Roger Link to comment Share on other sites More sharing options...
pau10wen Posted May 18, 2018 Author Share Posted May 18, 2018 (edited) Thanks Roger, please do! Finally some progress, seatbelt details ready to install... Edited May 18, 2018 by pau10wen 1 Link to comment Share on other sites More sharing options...
pau10wen Posted May 18, 2018 Author Share Posted May 18, 2018 Looking at some images of the stratos, I wasn't happy with the tyre shape of the standard kit. It seemed too square compared with most images of the actual cars? So I decided that as I wanted a more slick tyre anyway, I decided to re-shape some tyres I had that fit the bill and made them more rounded to give the car more of a stance. 1 Link to comment Share on other sites More sharing options...
pau10wen Posted May 18, 2018 Author Share Posted May 18, 2018 finally for now, I've used an empty helmet that I made a casting from, and would like to re-create Sandro Munari's Helmet from the time (as far as I can tell). The only resource pic I can find that looks correct is this one... The size of the helmet is tiny so i'll have to get a close approximation of colours and logos etc. I made a start on the paint colours... and then added some detail in a general style to give the impression of the details... I've printed some details today for the name across the sides of the helmet and the Marlboro logo at the front too. I'll post more pics once these are on and I've successfully clear coated the whole thing. Possibly i'll add strap details too? 5 Link to comment Share on other sites More sharing options...
JeroenS Posted May 18, 2018 Share Posted May 18, 2018 Good job on the helmet! And you just got to love that racing "onesie" that Munari is wearing 😎 Link to comment Share on other sites More sharing options...
pau10wen Posted May 18, 2018 Author Share Posted May 18, 2018 Thanks JeroenS, very kind The onesie did make me chuckle! Never seen anything like that one before!? Very 70's!!! Another small update (I forgot to post!) - Dashboard almost finished and build detail... 5 Link to comment Share on other sites More sharing options...
keefr22 Posted May 18, 2018 Share Posted May 18, 2018 Lovely detail work going on here, I do like how you even managed to paint the padding inside the front of the helmet! I thought the same about his racesuit too! I really like your dashboard too, brings back memories of making my eyes hurt when I did one a few years back. One thing I noticed when I found a reference pic was that the row of fuses at the bottom right were different colours - it might have been a modern pic, but although my memories a bit vague,I seem to remember coloured fuses in my rally cars 40 years ago! I painted them that way just to add a bit of colour. I don't wish to hijack your thread, so let me know if you want me to take this down, but here's a pic that describes what I'm wittering on about better! I painted them silver then used Tamiya clear colours. Looking forward to seeing more on your Strat, it's coming on really nicely. Keith 3 Link to comment Share on other sites More sharing options...
pau10wen Posted May 18, 2018 Author Share Posted May 18, 2018 (edited) Hi Keith Not at all, the pic is very welcome, as are any helpful comments! I have to be honest, I've been in two minds since getting my dash to this stage that the deepened dials don't work as well as i'd hoped they would. Seeing your beautifully clean dials and dash have made me wonder whether or not to have a re-think about re-doing them. I do have a spare dash knocking around as the first attempt at disassembling the body panels went badly and I started fresh a long time ago with a replacement kit - these things sometimes happen for the best? I did want to try to resolve the sunken dials before your post, so food for thought? EDIT: I forgot to ask, would you mind me using your pic for reference re: the fuse colours? Edited May 18, 2018 by pau10wen 1 Link to comment Share on other sites More sharing options...
JeroenS Posted May 18, 2018 Share Posted May 18, 2018 14 minutes ago, pau10wen said: Seeing your beautifully clean dials and dash have made me wonder whether or not to have a re-think about re-doing them. I do have a spare dash knocking around as the first attempt at disassembling the body panels went badly and I started fresh a long time ago with a replacement kit - these things sometimes happen for the best? Paul, if there's one thing I learned in my short time on this forum: don't quit until you're happy 😉 So my advice would be: start over if you feel you can do better! 1 Link to comment Share on other sites More sharing options...
keefr22 Posted May 18, 2018 Share Posted May 18, 2018 21 minutes ago, pau10wen said: I forgot to ask, would you mind me using your pic for reference re: the fuse colours? Course not - I don't claim it's 100% accurate though! And apologies, I didn't mean to cause you more work, I think your dash looks great - don't forget you won't see a whole lot of it when its in the car. Having said that, my dials took me about 3 attempts too! Keith Edit : I forgot you were opening the doors on your car (something I wouldn't consider as I'd likely wreck the shell!) so you'll definitely see more than mine! 1 Link to comment Share on other sites More sharing options...
pau10wen Posted May 18, 2018 Author Share Posted May 18, 2018 JeroenS, you are quite right! I completely agree. I've previously completed x3 rally car models to varying levels of finish quite a while ago now. So after a loooong (many years) break from modelling I've already improved my resources, equipment and patience since even doing the dash! With all that in mind I think I'll have a look at the dials depth at least :) And keith, no need for apology. As I said, the doubt was already there my friend. I'm happy with most of the rest of the build and still have a LOT of issues to solve, but the dash has bothered me a little since I finished it. I saw an example online of someone who had done the same thing with a thinner dash that had worked very well (very obviously using a very high level of skill and detail too!) I however have definite limitations to the level of detail I can achieve on some parts of the model (through both practice, patience and resources, lol). It's more that the idea I borrowed and tried to emulate hasn't satisfied me 100%, that's all. I think the fact that the dash has been ready to glue into place for 2 months and I haven't done that yet should tell me and you all we need to know ;) Stay posted if you'd be so kind, and thanks to you both! 2 Link to comment Share on other sites More sharing options...
JeroenS Posted May 18, 2018 Share Posted May 18, 2018 Maybe something to consider: there's of course the much loved Molotow liquid chrome pen, but they also have the acrylic markers in a wide range of colours. The paint covers really well and they're very easy to use, although the 2mm tip is actually a bit larger then you would expect. The 1mm comes in less colours. Or you could use regular permanent markers to add colour. Speaking for myself, my fine motor skills are just average so for painting some parts I feel more comfortable using a "pen" than a brush. 1 Link to comment Share on other sites More sharing options...
keefr22 Posted May 18, 2018 Share Posted May 18, 2018 23 minutes ago, pau10wen said: Stay posted if you'd be so kind, I'll be here for the duration Paul! I think this will end up a spectacular Stratos, what with all those opening panels to show off all your detail work! I used to build more competion car models than anything else but haven't finished one for getting on for a decade, building aircraft instead. But I've just picked up again a Mk1 Escort transkit I started years back, so am getting back into cars. I'm going to need to sand the rust off my gloss painting "skills" soon! Good luck with re-doing the dashboard! Keith Link to comment Share on other sites More sharing options...
pau10wen Posted May 18, 2018 Author Share Posted May 18, 2018 Thanks for the tips and kind words of encouragement again there Keith! I've used some permanent markers for the helmet and a little on the dash, I didn't go as far as acrylic pens though so i'll bear them in mind. Painting was never my strongest field so the pens are great to work with so far! I've only just invested in my first airbrush and clear-coating will be a new adventure, which is why i'm starting verysmall with the helmet 😁 fingers crossed eh 1 Link to comment Share on other sites More sharing options...
Pete in Lincs Posted May 18, 2018 Share Posted May 18, 2018 8 hours ago, keefr22 said: but although my memories a bit vague,I seem to remember coloured fuses in my rally cars 40 years ago! The fuses were colour coded to show the ampage. Some sort of ceramic material with a brass strip across the front. I still have a few in the garage. Here's a picture from the bay... https://i.ebayimg.com/thumbs/images/g/FikAAOSwUM5aM82U/s-l225.jpg 1 Link to comment Share on other sites More sharing options...
keefr22 Posted May 18, 2018 Share Posted May 18, 2018 12 minutes ago, Pete in Lincs said: The fuses were colour coded to show the ampage. Some sort of ceramic material with a brass strip across the front. I still have a few in the garage. Here's a picture from the bay... https://i.ebayimg.com/thumbs/images/g/FikAAOSwUM5aM82U/s-l225.jpg Them's the ones Pete - it does then seem the clear plastic type I tried to represent on my Stratos were more modern ones! Keith 1 Link to comment Share on other sites More sharing options...
pau10wen Posted May 19, 2018 Author Share Posted May 19, 2018 19 hours ago, Pete in Lincs said: The fuses were colour coded to show the ampage. Some sort of ceramic material with a brass strip across the front. I still have a few in the garage. Here's a picture from the bay... https://i.ebayimg.com/thumbs/images/g/FikAAOSwUM5aM82U/s-l225.jpg Thanks for that Pete, I’ll use these types of more muted period styles colours! Great stuff 1 Link to comment Share on other sites More sharing options...
keefr22 Posted May 19, 2018 Share Posted May 19, 2018 5 hours ago, pau10wen said: I’ll use these types of more muted period styles colours! Good choice! 👍 Keith Link to comment Share on other sites More sharing options...
pau10wen Posted June 21, 2018 Author Share Posted June 21, 2018 THE RESCUE BEGINS! Firstly, apologies for it taking so long to re-post with anything. Family commitments, work, kids and to be honest, the scale of the job at hand to re-work the dash daunted me a little! Lol I didn't have a second dash for this kit as it turns out, so am going ahead with the only other available option, re-work the painted dash. So, wheel and driving column removed (carefully!), I've re-drilled the holes for every dial except the main large rev counter so that I can 'plug' them all to a much shallower depth that i'm happy with... and then re-apply the dial decals from the spare set I DO thankfully still have. More to follow when I can, I have a missing dial issue to sort, the stopwatches to detail, etc, etc So i'll post more quickly with updates 6 Link to comment Share on other sites More sharing options...
keefr22 Posted June 21, 2018 Share Posted June 21, 2018 Nice one! Your perserverence with re-working it has paid off big time, that looks great! Keith Link to comment Share on other sites More sharing options...
pau10wen Posted June 21, 2018 Author Share Posted June 21, 2018 Quote thanks keith! It wasn't half the job I expected it to be in the end, I've been struggling for the time to start to be honest! Need to get the whole job done ASAP, more kits on the way! 1 Link to comment Share on other sites More sharing options...
keefr22 Posted June 21, 2018 Share Posted June 21, 2018 21 minutes ago, pau10wen said: more kits on the way! Me too - just bought a cheap Impreza off flea bay as I have a decal sheet for Mark Higgins' 2007 Galway Rally car but didn't have the right Scooby kit to put them on! Keith Link to comment Share on other sites More sharing options...
PatW Posted July 2, 2018 Share Posted July 2, 2018 My favourite car on the rally stages, when I first started rally marshalling. It looks very good here too! Link to comment Share on other sites More sharing options...
Ian T Posted July 2, 2018 Share Posted July 2, 2018 Hi to all, I love the work on the Stratos, but equally impressive is the collaboration between forum members, it’s great to see. I’ll be keeping a watch on this build for sure, it was always one of my favourite cars from the 70’s. Regards Ian Link to comment Share on other sites More sharing options...

Recommended Posts
Create an account or sign in to comment
You need to be a member in order to leave a comment
Create an account
Sign up for a new account in our community. It's easy!
Register a new accountSign in
Already have an account? Sign in here.
Sign In Now