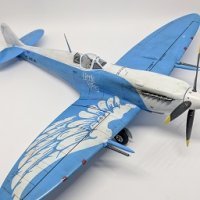
Billy T. Pilgrim Posted January 8, 2018 Share Posted January 8, 2018 Woohoo!I finished one! THE SSV NORMANDY REMEMBRANCE FLIGHT (link here for what this is.) Jacob Taylor: Hawker Hurricane Mk.I The Hurricane was chosen when research into the family tree of Jacob's wife, Brynn Cole, showed that it was the type that an ancestor of of Brynn's flew during the war. The paint scheme is chosen for Jacob and Brynn's son, Luka Shepard Cole. Overall it didn't come out too badly given the massive amount of trouble I had in the finish stages - it's not exactly my finest hour but it's acceptable. If I feel so inclined I might come back and redo it at a later stage in the project. Stuff I like: - The quality of the paint pattern. - The seams have come together really well, with no loss of detail. - The filler on the (few) fit issues has come together really well. - The decals look good. Stuff I don't like: - The cockpit. - That awful, awful gloss job. - The weathering washes. - The many issues caused by the aforementioned awful, awful gloss job. Well, I finally got one of my Mass Effect planes done, and it was a surprise outsider which got there first! I'd screwed up my main airbrush by accidentally letting a bunch of paint dry inside it, so I decided to buy a cheapo model to test out my alternate airbrush, which I hadn't used before. When I got to the shop they had one of Airfix's newest releases, the 1/48 Hurricane, so I decided to spend a little extra and buy that - it's still pretty cheap if I ruined it and I'd heard really good things about it. At that point I thought, "You know what? Sod it. I keep starting so many models and taking months to finish them. I'm gonna do this one in a weekend." At this stage I'm still experimenting with different paints, finishes, weathering processes and so on so I kind of messed up the cockpit - there's nothing wrong with it per se, but I just kind of feel like it came out a bit grey and boring. Everything went together fine, it's a nice kit with pretty good fit between parts. There were only a couple of bits that gave me issues in the actual build - there was a fairly big (about 2mm) step where the underside of the wing section met the underside of the nose. A bit of Squadron putty and a lot of sanding got that really nice and contoured, and you can't even see the join there now. You can see this area on the photo of the underside, forward of the engine air intake and the landing gear bay. Unusually for a kit of this scale, Airfix give you the option to open up the wing to show the gun bay, so I decided to do this on one of the wings. It's pretty tough to cut out the access panels without ruining them, so Airfix thought to include separate panels if you want to do this. The guns were painted dark iron and then drybrushed with silver, which worked quite well, but I'm staying away from Tamiya metallic paints from now on. The metallic particles seem really big, and the few issues Tamiya paints have seem to be magnified in their metallics. Still, with ammo boxes painted the body colour and copper ammo in the feeds, they went together alright although the fit between the guns and the ammo boxes wasn't great. On to painting the exterior. Everything got a coat of Tamiya fine surface primer, then flat green - I'm not keen on my other airbrush, as it turns out, and I'm very glad my main one is fixed. I went with the green as it's a colour that's not used as much on the other planes I have planned, and the black just because I really like that colour combination. The starburst design came from mucking about testing my new knife on some masking tape - the design isn't perfect and it leaves the tail a bit bare, but the execution is spot on, I'm really pleased with it. Once the tape was on for that, a quick coat of Tamiya flat black completed the main painting. Decals went on next with no real trouble. Couple of coats of Future went on first. I wasn't using all the RAF roundels or anything, but I did apply all the little functional "No Step" and "Fuel goes here" labels. By coincidence the pattern worked out so there wasn't any issue with a black decal on a black background or anything. I got the decals flat to the surface with Revell Decal Soft - it actually frosts up Future and makes it go all milky, but another coat of Future over the top completely eliminates that. It was at this point I got a big blob of Future under the cockpit canopy by mistake, which I was really annoyed about. Then it all went t**s up. First of all I decided to do a subtle weathering wash. Tried it with oil paint, but it was too subtle - it pretty much just wiped straight off leaving the model completely clean. Then I tried a premade Humbrol enamel wash, which made the surface hugely tacky and when I was wiping it off the flat surfaces it tended to leave more of the cotton bud on the plane than wash on the cotton bud. I eventually got most of it off. Then I put the plane down and saw it - Some chemical had reacted badly with some other chemical and eaten away the paint. There were huge patches of bare plastic where my finger and thumb had been holding either side of the tail. Thankfully there weren't any decals or pattern in the affected area, so I was able to touch it up with green seamlessly. With my main airbrush fixed, I decided to gloss coat with actual Tamiya clear gloss rather than multiple layers of Future. Christ, I hate that stuff. It's goopy and sticky and will NOT do what you want it to. So, with my airbrush covered in sticky goop I had to immediately and completely strip down and clean that while my plane collected dust and bits of crap. The gloss got everywhere, including where I didn't want it, which is why the wheel bays and gun bay look so weird in the pictures. The surface is uneven and pitted, and is generally not very good. The real life Hurricane was made of fabric stretched over wood for a large part of the fuselage and tail, so I was going to do a further matt clear coat over those parts, but at this point I decided I didn't want to mess with it any more. The last thing to do was make the aerial, which I did by taking a piece of spare sprue and melting it with a lighter until it dripped to the floor in a super-fine (and very straight) filament. I superglued this to the tail and the radio aerial, cut off the ends and gave it a coat of Vallejo black paint. It actually came off the mast just as I was preparing to take the photo, which is why it goes downward in the photos. Oh well. That's Jacob's plane, then! I'm fond of it despite the havoc wreaked by that last clear coat. 8 Link to comment Share on other sites More sharing options...
Corsairfoxfouruncle Posted January 8, 2018 Share Posted January 8, 2018 Great looking Hurricane 👍 ... Ive been using future for years never had a problem. Then again i brush it on since it self levels. Yes it slows the process down, but it works. Just an FYI ... there is also a Sci-fi/space section further down the page. In the future you might find a few more gamers and others there that may appreciate these builds, if you decide to post photo’s in that RFI. 1 Link to comment Share on other sites More sharing options...
Billy T. Pilgrim Posted January 8, 2018 Author Share Posted January 8, 2018 Thank you so much Corsair! I'm not sure what happened was to do with the Future to be honest - it's the Tamiya gloss clear I was referring to as goopy, and I think the issue with the Humbrol wash was just the wash itself. I have discovered that their brand of decal softener eats Tamiya paint, so maybe the wash does the same. These first few kits I'm posting I was muddling through so much! I brush Future on too, as I'm leery about it gumming up my nice airbrush. As far as the sci-fi section goes - I wasn't sure where to post these to start with, as they're pretty different to the other stuff I'm seeing in here, but at the same time they are WWII aircraft after all. What do you recommend - here, there or is both an option? I do have some purely sci-fi kits that I'll be putting in that section in due course, but as I say I wasn't sure about these. 1 Link to comment Share on other sites More sharing options...
Corsairfoxfouruncle Posted January 10, 2018 Share Posted January 10, 2018 @Billy T. Pilgrim ... I think you would be fine posting in either area. Here you will get views because they are indeed WW2 aircraft. I’m not sure how many members will make the video/computer gaming connection. I think you will get more views and a greater appreciation of your work in Sci-fi. due to that connection. I am making an assumption of course on the simple fact that there are probably more members in Sci-fi that would recognize and appreciate your efforts. My only advice is try not to double post in both sections. Link to comment Share on other sites More sharing options...
Billy T. Pilgrim Posted January 11, 2018 Author Share Posted January 11, 2018 Thanks, Corsair. I think what I'm going to do is keep posting RFIs and WIPs in here as it's closer to the actual subject matter, the aircraft themselves, and then just have a single post in the sci-fi forum for the whole flying Circus, which links to these and which I can update. Link to comment Share on other sites More sharing options...

Recommended Posts
Create an account or sign in to comment
You need to be a member in order to leave a comment
Create an account
Sign up for a new account in our community. It's easy!
Register a new accountSign in
Already have an account? Sign in here.
Sign In Now