2lefthands Posted May 14, 2022 Share Posted May 14, 2022 Definitely feeling your pain too Wonderful work! I assume you opted for no lights and jingles? I`ve seen somewhere in the deep net a build with pod and lights and interiour-it would be worth it i guess? 1 Link to comment Share on other sites More sharing options...
glueman Posted May 17, 2022 Author Share Posted May 17, 2022 On 5/14/2022 at 9:28 PM, 2lefthands said: Definitely feeling your pain too Wonderful work! I assume you opted for no lights and jingles? I`ve seen somewhere in the deep net a build with pod and lights and interiour-it would be worth it i guess? Thank you. I did think about adding some extra details like an interior pod bay but it would have involved building all the interior from scratch as the version I have is not at the same scale as the Moebius kit; the currently available interior sets and extras don't fit my version. Scratch building the interior would have added months if not years to an all ready long and very protracted build. 2 Link to comment Share on other sites More sharing options...
Jeddahbill Posted May 18, 2022 Share Posted May 18, 2022 Hi Glueman, Wonderful work on this ancient Lunar Models resin kit! The early release of this featured a square void in the command sphere and a very simple pod bay. With some effort, it is possible to include some details and lighting that greatly improved the appearance of the completed model. Not as good as what can be done today with the Moebius kit. Here is what I managed to do with the kit: Good Luck, Bill 5 Link to comment Share on other sites More sharing options...
Eric Mc Posted May 18, 2022 Share Posted May 18, 2022 Straight out of the movie - amazing. 1 Link to comment Share on other sites More sharing options...
glueman Posted May 25, 2022 Author Share Posted May 25, 2022 On 5/18/2022 at 3:03 AM, Jeddahbill said: Hi Glueman, Wonderful work on this ancient Lunar Models resin kit! The early release of this featured a square void in the command sphere and a very simple pod bay. With some effort, it is possible to include some details and lighting that greatly improved the appearance of the completed model. Not as good as what can be done today with the Moebius kit. Here is what I managed to do with the kit: Good Luck, Bill Thank you Bill. Your Discovery is fantastic ... amazing!!! I hope mine turns out as well as your version. In my version of the kit the command module was hollow but the shape of the void was very irregular. In places the thickness of the resin material was very thin (e.g. at the pod bay doors) but in other places very thick. Would have been quite a job to make the void the same shape everywhere. I've decided that my Discovery will be in "cruise to Jupiter" mode with all the lights switched off and everyone asleep. Pete 1 Link to comment Share on other sites More sharing options...
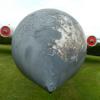
glueman Posted June 18, 2022 Author Share Posted June 18, 2022 I've recently been thinking about Shades of Grey ... Before I get banned ... it's shades of grey on the Command module ... honest. I've been following a guide on a facebook page for painting the command module which involves applying different shades of grey with sections masked before applying the next shade. The process is repeated several times to build up the different grey tones. The order I applied the paint is as follows (all are Tamiya acrylics): XF63 German grey (darkest) XF53 Neutral grey XF25 Light Sea Grey XF80 Royal light grey (lightest) The photo below shows the different greys but also scratch marks caused when I was removing the masking tape. As I knew which grey I had applied where I could spray over the region to remove the scratch marks The final should have been flat white (XF2) with a few drops of XF53. However, I over did the grey and it came out looking too grey when compared to the spine and the engine block, which are almost pure white (XF2). So I had to mask off the grey areas and apply a white coat again (bottom photo). I still think the grey areas are too obvious and so will probably apply another mist coat of flat white. Does anyone have any handy tips on how to apply a thin mist coat? My aim is to blend in the different grey tones a bit more so that they are not too obvious. Thanks 5 Link to comment Share on other sites More sharing options...
2lefthands Posted June 19, 2022 Share Posted June 19, 2022 Paint lifting is very, very frustrating. The best primer, without doubt, that i`ve used so far is Stylnyrez. IF you can shoot it through your AB and if you really made your home work degreasing the resin, it stays put. It withstand Gaffer tape, couldn`t believe it. Misting: Dilute it like normal, milky, and use some distance and a bit more pressure..painting is sometimes also very frustrating, but since you used Tamiyas acrylics, just wipe everything off with isopropyl alcohol if you`re not happy. Link to comment Share on other sites More sharing options...
2lefthands Posted June 19, 2022 Share Posted June 19, 2022 Your surfaces look quite coarse, is it the model or paint drying on its way to the model? Or dust? Link to comment Share on other sites More sharing options...
glueman Posted June 20, 2022 Author Share Posted June 20, 2022 On 6/19/2022 at 8:54 PM, 2lefthands said: Your surfaces look quite coarse, is it the model or paint drying on its way to the model? Or dust? I think it is a combination of all three ... but mostly the model surface. This is an older resin kit that has been painted before. TBH it's very frustrating at times. It looks good when I'm spraying but when dry it has the coarse texture and also with the odd dot or two of paint. 1 Link to comment Share on other sites More sharing options...

Recommended Posts
Create an account or sign in to comment
You need to be a member in order to leave a comment
Create an account
Sign up for a new account in our community. It's easy!
Register a new accountSign in
Already have an account? Sign in here.
Sign In Now