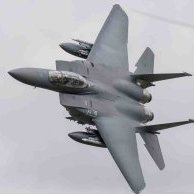
Richie B Posted January 19, 2017 Share Posted January 19, 2017 (edited) Hi, My name is Richie and I love the smell of burnt kerosene. Having spent many hours watching the real deal with a very good friend of mine and to celebrate his 50th, I thought I'd try to emulate the superb results on this site and build a model from a unit at his local airbase, Lakenheath. As way of background I suffer from: a - an over-ambitious build programme that would require the invention of time travel to complete my collection. b - a lack of resistance to nice new shiny decals (that adds to the first issue). c - an inability to recognise that OOB is just fine in most cases. d - the view that 50 Shades of Grey is the epitome of panel weathering. e - a lack of sufficient minutes in the day to fit everything in (work, family, plastic fettling etc) I am also an Optimistic 80%er. By that I mean I will endeavour to add detail/changes when it makes a noticeable difference but lack of skills / patience may ultimately limit my AMS ambition to a level of ‘Good Enough’. And so to the challenge, a 1/48 Revell F-15E. This is going to be mostly out of the box with a few embellishments along the way. In addition, I though I'd put her in flight (not literally of course) and light her up. Unfortunately this wont be a quick and dirty build (well probably dirty). Very happy for comments, suggestions, advice etc but don’t be offended if I do something different or not quite true to life, as they say art is in the eye of the beholder. Steve, happy 50th birthday and this ones for you! Game on. Edited December 23, 2017 by Richie B Re-instate photo 8 Link to comment Share on other sites More sharing options...
Val Posted January 19, 2017 Share Posted January 19, 2017 Best of luck Richie! Lakenheath is only 45mins or so down the road from me and they often train over my town. Noisy little devils! I too have this kit and intend to do a Lakenheath bird. I also suffer from all the same issues as you do! Have fun Val Link to comment Share on other sites More sharing options...
Richie B Posted January 19, 2017 Author Share Posted January 19, 2017 Thanks Val, its a 2 hour drive for me so not exactly round the corner. Glad its not just me then! 1 Link to comment Share on other sites More sharing options...
Richie B Posted April 29, 2017 Author Share Posted April 29, 2017 (edited) Well its been a while but some progress .......(a little!) As most projects start at the cockpit I decided not to buck the trend. I used the kit seats and borrowed a couple of pilots (since this one will be flying) from the stash (I think they are Hasegawa pilots). The kit seats are not that bad but I added some Eduard PE for the handles and seat belts as it also included some items for the cockpit displays. PE is not my favourite medium as it is really quite fiddly for my butter fingers and as it needs super glue it invariably sticks to everything (including me) except the bit I want it to. The Revell cockpit is really quite nice, especially if you are closing the canopy so the rest is out of the box. Mind you I had to do some 'creative' adjustments to get the pilots to fit. I'm now working on the exhausts, which again are very nice, the intakes which are less nice and the lighting. More later but hopefully not too much later!. Edited December 23, 2017 by Richie B Re-insert Images corrupted by Photobucket 7 Link to comment Share on other sites More sharing options...
Simon382 Posted April 29, 2017 Share Posted April 29, 2017 Looking good thus far. My family and me holiday in Caister most years and love the F15's doing their thang above us. Quick question if I may, the patches on the crew, decals? If so from where? Thanks in advance Link to comment Share on other sites More sharing options...
Richie B Posted May 2, 2017 Author Share Posted May 2, 2017 Thanks Simon, the patches are actually images from the internet that have been shrunk down as small as I could and then printed onto paper. The images are ok enough at normal viewing range to look like real patches and the paper is sort of scale thickness for real patches. Hope that helps! Link to comment Share on other sites More sharing options...
GordonM Posted May 2, 2017 Share Posted May 2, 2017 People keep tempting me with all sorts of loveliness from Suffolk, I've seen enough of the 'Hall and 'Heath over the last 50 years, but I'm resisting and sticking to Cambridgeshire - mainly because I'm having doubts I'll live long enough to build examples of all types from Cambs bases, plus SWMBO will kill me of I buy yet more kits to nclude all the Yank stuff! I'll just sit and watch this one..... Link to comment Share on other sites More sharing options...
Simon382 Posted May 2, 2017 Share Posted May 2, 2017 2 hours ago, Richie B said: Thanks Simon, the patches are actually images from the internet that have been shrunk down as small as I could and then printed onto paper. The images are ok enough at normal viewing range to look like real patches and the paper is sort of scale thickness for real patches. Hope that helps! Thanks and yes it does help! Simon Link to comment Share on other sites More sharing options...
Richie B Posted November 7, 2017 Author Share Posted November 7, 2017 Not exactly at the speed of light but progress nonetheless. First up was to fit the lighting and electrics. Relatively simple layout in that the fins are too thin to feed lights into and the wingtips proved the same. So lighting is reserved for the cockpits, engines and main wing lights. The airbrake housing makes a good storage area for batteries and I am experimenting with using reed switches through the engine exhausts to switch the lights on and off. Any way, with wiring installed she looks like this: Having got that part finished I sealed the fuselages together and added the intakes. They took a little while to finesse as my attempts to paint the intakes meant I assembled them out of sequence with the instructions. Next I polished the canopy then masked and glued with white glue. Hope I got the cockpit looking right as there is no going back now! I've decided to try a new technique in painting as single colour aircraft can look a bit monotonous. Black basing is a bit like all over pre-shading where you start from dark (ie black) and add more colour to get it lighter. As the black is also a primer it does 2 jobs and highlights where I need to tidy up the surface as well (that's 3 jobs then). As you can see I've also added some Alclad Steel to the tail area which I will endeavour to build up in shades as we go. More soon (ish!) 6 Link to comment Share on other sites More sharing options...
bar side Posted November 7, 2017 Share Posted November 7, 2017 Like the lighting. Are you going to put it on a stand & run the wires through it? Link to comment Share on other sites More sharing options...
Richie B Posted November 9, 2017 Author Share Posted November 9, 2017 Hi bar side, My plan is to have all the wiring and batteries internally so that you wouldn't know it was wired until you fired her up. The engines are reinforced to allow clear acrylic rods to be inserted and they will be fixed onto a base, probably wooden, to allow me to drill some holes in it. I'm using reed switches as the on/off as traditional switches are a bit bulky and require you to hide them on the aircraft somewhere. First time trying this so we shall see! Link to comment Share on other sites More sharing options...
bar side Posted November 9, 2017 Share Posted November 9, 2017 Cool, never had the nerve to bury the batteries. Mine have so far been on the ground with the cable out approximately where the gpu connects. 1 Link to comment Share on other sites More sharing options...
Vadim Posted November 9, 2017 Share Posted November 9, 2017 Great job Richie. Do you plan to have steady or flashing lights? I have a plan to build a cargo plane with cargo compartment lights, nav lights, landing lights and beacons... But I'm still at the 'thinking' stage, though the model is in my stash for 6 years now Link to comment Share on other sites More sharing options...
Richie B Posted November 11, 2017 Author Share Posted November 11, 2017 Hi chaps, Nice idea using the GPU bar side, hadn't thought of that one. Vadim, just steady on this one as I think the flashing lights are on the tails which is too thin to run cable up. I am using 3v coin batteries so they limit the amount of lights you can power up with one battery. I toyed with lighting up the MFDs but in the end decided to add flood lights to the cockpit area just to provide some overall effect. We shall see! 1 Link to comment Share on other sites More sharing options...
Richie B Posted December 23, 2017 Author Share Posted December 23, 2017 Quick update, managed to find some time to add a bit of colour to the rear end. As this is mostly metallic it calls for a coating of Alclad (and another reason for the gloss black primer). As I'd already put down a coat of Aluminium I textured the end segments to break up the tone a bit. F-15E's tend to be a bit dirtier on the underside so I've used a couple of shades (including burnt metal and dark aluminium) to try and throw in some colour contrast. Finally a bit of orange and smoke to show wear and tear. Time to cover it up and paint the rest of this bird in plain old one-shade grey. This can look pretty monotone so I'm going to try the black basing technique to break it up. After all I already have the black base! PS - Merry Christmas everybody! 5 Link to comment Share on other sites More sharing options...
Corsairfoxfouruncle Posted December 23, 2017 Share Posted December 23, 2017 This looks very good so far. I have a quick question per your lighting set-up. I was curious after seeing yours and other builders that light there models. How come no one uses fibre optic cable ? It can be bought in small diameters. I would think it would work great for lights by clear painting the tip in the appropriate colors ? Oh well just a curious thought ? Link to comment Share on other sites More sharing options...
Richie B Posted December 24, 2017 Author Share Posted December 24, 2017 Hi Corsair, I've used a couple of fibre Optics in this kit for the wing lights and they can be very useful for thin spaces. Unfortunately I have had mixed results with them as you need quite wide ones to provide any significant illumination and those are difficult to bend in tight spaces. I also find that you have to line up the fibre optics carefully to get maximum light through them. Sometimes they break in construction (my clumsiness) and then its difficult to fix. Not saying you shouldn't use them as they definitely work, but not for every occasion. 1 Link to comment Share on other sites More sharing options...
Richie B Posted January 3, 2018 Author Share Posted January 3, 2018 Just to start by saying Happy New Year everyone, hope you have a very constructive 2018! I've managed to fit in some modelling time in between the mince pies and the children's Christmas present frenzy. Having coloured the back end, I also tidied up any areas that would show under the next coat of paint (gloss primer is great for showing off all your mistakes so it took a while!) then masked off the bits I needed too. I used up some spare Alclad to highlight the raised areas such as the engine bays and then sprayed the main colour using Mr Paint Acryllics. First time I've used these and they are brilliant, nice and smooth with lovely covering ability. I was also trying out the black-basing technique (slightly modified now with the addition of the Alclad) and began mottling the initial coat on. The idea is to provide a bit of contrast against the black where you want it and help break up the sameness of a single tone of colour. I have to say that the results look pretty pleasing as a first stab. You could probably make the pattern more varied or defined depending on your preference and airbrush skills. Mine are pretty basic so I just focused on trying to leave some black near the panel lines. Its certainly more random the pre-shading and hopefully breaks up the look of having the aircraft made out of concrete when pre-shading is overdone. At this point you can add some slightly different colours (greys or even blues and browns) but sparingly with the aim of covering it all over with a blending top coat of the main colour. I'll let you know how that goes! 4 Link to comment Share on other sites More sharing options...
Alan P Posted January 3, 2018 Share Posted January 3, 2018 Good technique, well executed! Looking very good so far. 1 Link to comment Share on other sites More sharing options...
Colonel Wreck Posted January 16, 2018 Share Posted January 16, 2018 Looking great. Having recently completed a revell F-15e myself I’m very interested to see how your different technique turns out. 1 Link to comment Share on other sites More sharing options...
exdraken Posted January 16, 2018 Share Posted January 16, 2018 Nice update 1 Link to comment Share on other sites More sharing options...
Richie B Posted January 17, 2018 Author Share Posted January 17, 2018 Thanks chaps, first time of using Mr Paint paints and I'm pretty impressed. They are easy to work with (other than they are lacquers) and lay done very smooth, almost glossy. They are very thin but quite opaque which means its easy to cover areas without losing engraved detail but also easy to cover up shading! Link to comment Share on other sites More sharing options...
Colonel Wreck Posted January 17, 2018 Share Posted January 17, 2018 42 minutes ago, Richie B said: Thanks chaps, first time of using Mr Paint paints and I'm pretty impressed. They are easy to work with (other than they are lacquers) and lay done very smooth, almost glossy. They are very thin but quite opaque which means its easy to cover areas without losing engraved detail but also easy to cover up shading! I use the Mr Hobby Aqueous range. It’s the same story with those. So easy to work with and an awesome finish. They too are delicate until protected with a clear coat. But I can live with that. Now I just need to upgrade my airbrush and compressor from the crappy budget ones I got when I was learned by to airbrush to really do them justice! 💰 Link to comment Share on other sites More sharing options...
Richie B Posted February 4, 2018 Author Share Posted February 4, 2018 So, the jet is (mostly) painted at last. Having tried the black basing technique for the first time I have to admit it was a partial success but probably because of my lack of experience in it rather than anything else. My thoughts in no particular order: Working in a small pattern looks better for marbelling but requires a good paint and working close to the model. Mr Paint lacquers are excellent being thin and pretty opaque but then its quite easy to cover up any fine shading. Black basing with one colour (on black) gives variation in shade but not tone. I tried using another lighter acrylic colour for added tone but it was too light and the paint thicker than Mr Paint so had to sand it back and overpaint with a lighter shade of Mr Paint. This took out some of the marbelling effect. I ended up post-shading to add some variety and then glossed with Tamiya X-22 which evened the shades out. The end result looks a little muted in these photos and is probably not the final effect I thought I might get but should be a good background for any subsequent weathering. Next time I will go finer on the detail, use shades that are very closer to the final colour so they blend in better, use a very thin final coat and use the same type of paint ie lacquer or acrylic. Decals next! 2 Link to comment Share on other sites More sharing options...
Richie B Posted March 17, 2018 Author Share Posted March 17, 2018 This boss bird is going to be in 48FW markings based at RAF Lakenheath around 2007. The decal sheet is from Afterburner and is a good quality unlike the Revell decals which kept silvering no matter how carefully I applied them. I therefore had to raid the spares pile for stencil data Luckily there are not too many stencils which was a nice change having done the full works on a SEA camo 1/32 F-4E (you know you're in for a long haul when you have to photocopy the instruction sheet to A3 size!). Next up is some panel wash to bring some contrast to the paint scheme and then I'll probably dirty her up a little bit. I know this is the boss bird and they are generally kept clean but I'm allowing for the fact that these jets are worked hard and weathering generally makes the final scheme more interesting in my opinion. 6 Link to comment Share on other sites More sharing options...

Recommended Posts
Create an account or sign in to comment
You need to be a member in order to leave a comment
Create an account
Sign up for a new account in our community. It's easy!
Register a new accountSign in
Already have an account? Sign in here.
Sign In Now