Murray Posted January 9, 2017 Share Posted January 9, 2017 Hey guys, finally got my MiG together. The Zvezda tooling is actually turning out to be quite nice, although looking a bit rough around the edges. The kit is quite nicely detailed. The instructions and decals are awful, they don't include all the parts and the decal sheet includes no stencils and are about as thick as the box it came in. The only problem with the plastic that I have encountered is that there are no discernible roots for the wings or stabilisers so setting them correctly was tricky. Other than that only a minute amount of filler at the base of the tail and wing roots and the kit's a cracker. Seeing as the decals are as rough as they are I'm going to try wing it, and paint a scheme I seen online. This MiG is for UKscalemodeller's group build on Youtube. Ill be uploading this build video to Murrodels Thoughts/tips? Cheers! The new scheme, I roughed up what I'll paint on the kit's examples... About half of all of the wee bits... 4 Link to comment Share on other sites More sharing options...
Crossofiron1971 Posted January 9, 2017 Share Posted January 9, 2017 OOOhhhh Nice Work! 1 Link to comment Share on other sites More sharing options...
Murray Posted January 10, 2017 Author Share Posted January 10, 2017 Hey guys, working on the MiG. Managed to get a lick of paint on it. But before I had finished my airbrush (Sparmax SP-20x) decided to stop being an airbrush and started being a massive pain in my ***. So I had to tackle the daunting 4 tone camo with my old airbrush (the kind that you get in bundles with compressors) So using Ol' Spluttery, heres what I came up with... Still needs some touch up but I'm going to need to wait until I'm back from my Erasmus exchange mid February as the replacement nozzles arrive when I'm away. What do you guys think? - Cheers! 4 Link to comment Share on other sites More sharing options...
huvut76g7gbbui7 Posted January 10, 2017 Share Posted January 10, 2017 I like the colours After dirtying up as per an operational one it will look just fine. I thought that you were going to say that you brush painted it after the airbrush break! Richard (No airbrush and plenty brushes) 1 Link to comment Share on other sites More sharing options...
Murray Posted January 10, 2017 Author Share Posted January 10, 2017 5 minutes ago, Scimitar said: I like the colours After dirtying up as per an operational one it will look just fine. I thought that you were going to say that you brush painted it after the airbrush break! Richard (No airbrush and plenty brushes) Thanks man! That was my plan, to go heavy on some post shading. I was very tempted to brush paint it, bust out my stash of my thousand year old humbrol enamel tinlets. Cheers! 1 Link to comment Share on other sites More sharing options...
Killingholme Posted January 10, 2017 Share Posted January 10, 2017 'old spluttery' seems to have served you well! 1 Link to comment Share on other sites More sharing options...
HOUSTON Posted January 10, 2017 Share Posted January 10, 2017 AMAZING work Murrodels. 1 Link to comment Share on other sites More sharing options...
huvut76g7gbbui7 Posted January 10, 2017 Share Posted January 10, 2017 1 hour ago, Murrodels said: my thousand year old humbrol enamel tinlets. You mean I am not alone afterall 1 Link to comment Share on other sites More sharing options...
UKscalemodeller Posted February 20, 2017 Share Posted February 20, 2017 Wow! I haven't been on here in more than 3 years! I am liking this one Murray, especially that it has a 4 tone scheme. Have just stolen a few pictures for the next update. 1 Link to comment Share on other sites More sharing options...
Murray Posted February 28, 2017 Author Share Posted February 28, 2017 Finally managed to get some time(/motivation) to work on this again. Fixing all of the over spray was daunting, Im a bit happier with it now. Next up (pie more course work first) then spray the underside blue! 1 Link to comment Share on other sites More sharing options...
Murray Posted April 4, 2017 Author Share Posted April 4, 2017 After only literally ages and entirely too many attempts I am finally happy with the paintwork on the upper surfaces, I did of touch up on the existing paint work, then added some panel line post shading. On the darkest two tones I added highlights as the darker post shading tones didn't show up all that well. I just used the 4 base colours mixed with a bit of black and white to get the highlights and darker shades. Still looks a bit flat, although much more depth than before. After a pass with varnish to bring the finish in uniform followed by a pin wash/chipping/stains/soviet muck, I think it might turn out alright! Onto the bottom side now, wish me luck. 1 Link to comment Share on other sites More sharing options...
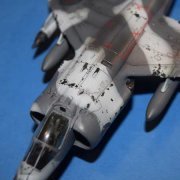
Murray Posted April 7, 2017 Author Share Posted April 7, 2017 Got some more time on this guy, there was a pin wash, some decals and an engine that I embarrassingly forgot to paint. A few places need a bit of touching up here and there. The finish needs addressed and it needs a smudge more 'deliberate' weathering. Also the undercarriage and a couple of rocket pods need sorting out but they're fiddly, then just a bit of editing and this/it's build video are done! Thanks for looking! 1 Link to comment Share on other sites More sharing options...

Recommended Posts
Create an account or sign in to comment
You need to be a member in order to leave a comment
Create an account
Sign up for a new account in our community. It's easy!
Register a new accountSign in
Already have an account? Sign in here.
Sign In Now