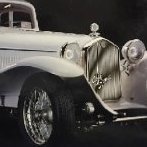
Pouln Posted February 22, 2017 Author Share Posted February 22, 2017 (edited) I did lay down some layers of primer to form a good basis for the colour layers. I have painted the lower edges, the rear inside and the front edges black, therefore I have masked these parts. The roof is also masked. That's all for now. let me know if you have questions, critique or comments Edited February 22, 2017 by Pouln 2 Link to comment Share on other sites More sharing options...
Codger Posted February 23, 2017 Share Posted February 23, 2017 Beautiful primer Poul. Gad you used the tin foil trick. Did you choose the color to brighten the red top coat? 1 Link to comment Share on other sites More sharing options...
kpnuts Posted February 23, 2017 Share Posted February 23, 2017 Looking good as always 1 Link to comment Share on other sites More sharing options...
Codger Posted February 23, 2017 Share Posted February 23, 2017 12 hours ago, Codger said: Beautiful primer Poul. Glad you used the tin foil trick. Did you choose the color to brighten the red top coat? Link to comment Share on other sites More sharing options...
Major_Error Posted February 23, 2017 Share Posted February 23, 2017 Just wonderful work! (And perfect pictures!) Thanks for sharing! 8-D 1 Link to comment Share on other sites More sharing options...
Pouln Posted February 23, 2017 Author Share Posted February 23, 2017 19 hours ago, Codger said: Beautiful primer Poul. Gad you used the tin foil trick. Did you choose the color to brighten the red top coat? Thanks, Chas. Yes, I did. Thought it would come out better than with the black or dark grey primer I have. 6 hours ago, kpnuts said: Looking good as always Thanks, Ken Link to comment Share on other sites More sharing options...
Pouln Posted February 23, 2017 Author Share Posted February 23, 2017 13 minutes ago, Major_Error said: Just wonderful work! (And perfect pictures!) Thanks for sharing! 8-D Thanks 8-D. Wondering what your first name is. Might it be something like Otto? 1 Link to comment Share on other sites More sharing options...
Major_Error Posted February 24, 2017 Share Posted February 24, 2017 11 hours ago, Pouln said: Thanks 8-D. Wondering what your first name is. Might it be something like Otto? Hi Poul! You were quite close with the double "t". Its Petter. The 8-) or 8-D is my emoticon. 8 is the glases - is the nose D or ) is the big smile or mouth Turn the screen 90* and you can se: 8-) 8-D You can also see the toung: 8-P 8-D Link to comment Share on other sites More sharing options...
Pouln Posted February 24, 2017 Author Share Posted February 24, 2017 Ok, I came to Otto based on the swedish word for 8. Welcome to the forum, Petter Link to comment Share on other sites More sharing options...
Pouln Posted February 24, 2017 Author Share Posted February 24, 2017 I mixed a bit of paint. First tried with bright red (scarlett red as Vallejo calls it), mixed with black it comes out too brownish (left 2 samples in the picture). I then used as a basis what Vallejo calls Red, which actually is a bit purple-red. I added some black, but it turned out too dark. After adding a bit more red, it came out like the last sample (two sections on the right). From what I see on the internet and in the Moore books, this comes quite close to the darker red seen on many of the AR 8C2300 cars. I will do some more testing on proper plastic and cover it with clear, but I guess I'm going to use this for the body, doors and bonnet sides. Link to comment Share on other sites More sharing options...
Pouln Posted February 24, 2017 Author Share Posted February 24, 2017 (edited) Next I started with the door handles. I used 3mm brass rod and started filing. It will be mounted on a 2mm pin which connects to a simple mechanism inside the door. I'm thinking that a slotted screw looks much like a keyhole, so the aim is to drill the 2mm pin and thread it M1.4 so it will accept the screw shown below. Here is what I did, starting with the front, then the top-view (sorry, a bit out of focus), then the backside and finally the front again with the screw inserted. Below is the result after polishing. I will plate the handle as well as the pin where it will be mounted on and the yet to be made base that goes against the door panel. The slot of the screw will be finished in black. Now I just need to scratch another one that looks exactly like this one. That's it for now. Edited February 24, 2017 by Pouln 4 Link to comment Share on other sites More sharing options...
kpnuts Posted February 24, 2017 Share Posted February 24, 2017 Superb 1 Link to comment Share on other sites More sharing options...
Pouln Posted February 24, 2017 Author Share Posted February 24, 2017 Thanks, Ken Link to comment Share on other sites More sharing options...
Roy vd M. Posted February 25, 2017 Share Posted February 25, 2017 That's one nicely carved and polished door handle. Link to comment Share on other sites More sharing options...
Pouln Posted February 25, 2017 Author Share Posted February 25, 2017 Thanks, Roy Link to comment Share on other sites More sharing options...
larchiefeng Posted February 25, 2017 Share Posted February 25, 2017 Nice job on the handle. You can also change the color of the red by changing the primer coat under it as well. You might try your color mix over a gray, for darker or white for a lighter color. The red you have on there will tend to make your red a little darker. You might already have a good color and a change of the primer could be the difference. Red, yellow and orange all have some opacity and will be affected by the undercoat. 1 Link to comment Share on other sites More sharing options...
Pouln Posted February 25, 2017 Author Share Posted February 25, 2017 Thanks, Wayne. Yep, good suggestion. I will try with different primer colours. See what the result is. Link to comment Share on other sites More sharing options...
Pouln Posted February 26, 2017 Author Share Posted February 26, 2017 As Wayne suggested, I did some testing with different mixes of paint and with different colours primer. I used the below Vallejo colours to create the mix. In the picture below I have used 4 different colours of primer (left to right (brown-red, yellow, white and grey) Top to bottom (below the black area) there are 4 dark red zones - a. 9 parts red / 1 part black b. same but with gauzy gloss coat c. 7 parts red / 1 part black with gloss coat d. same but without the gloss coat I brushed on four layers of the colour and where applicable 2 layers of gloss coat. In this picture the colours col\me out a bit more bright than actual. Conclusion, the red on grey primer is indeed a bit darker than on the other primers. The 7 to 1 mix is a bit too dark for my taste. I think I will go for the 9 to 1 mix and as the difference in primes is not really apparent I will stay with the brown-red primer. Link to comment Share on other sites More sharing options...
roymattblack Posted February 26, 2017 Share Posted February 26, 2017 (edited) Under red, I only ever use white primer. It gives the red a real 'punch'. Mind you, whatever you decide I'm sure it will look great. Edited February 26, 2017 by roymattblack Link to comment Share on other sites More sharing options...
Rwa66 Posted February 26, 2017 Share Posted February 26, 2017 Great work on the door handle, very nice touch. Regards Richard. Link to comment Share on other sites More sharing options...
Pouln Posted February 26, 2017 Author Share Posted February 26, 2017 I did some more work on the bright stuff. I made the bezels for the door handles. I also scratched the driver side rear view mirror. First I needed to take some plastic off the doors. I scratched the second door handle and the bezels. They are not 100% equal but as they are not next to each other, it will not be noticed. I created the rear view mirror with my lathe. The pictures show much more scratches that can be seen in real life, so I think I will polish a bit more before I plate the parts. This is how it looks on the doors Well, that's i for now. Comments, question and or critical notes are always welcome. I have a question for you guys. What best to use for the actual mirror surface? 1 Link to comment Share on other sites More sharing options...
Pouln Posted February 26, 2017 Author Share Posted February 26, 2017 14 minutes ago, roymattblack said: Under red, I only ever use white primer. It gives the red a real 'punch'. Mind you, whatever you decide I'm sure it will look great. Thanks, Roy. Much appreciated. Link to comment Share on other sites More sharing options...
Pouln Posted February 26, 2017 Author Share Posted February 26, 2017 12 minutes ago, Rwa66 said: Great work on the door handle, very nice touch. Regards Richard. Thanks, Richard. 1 Link to comment Share on other sites More sharing options...
Jnkm13 Posted February 27, 2017 Share Posted February 27, 2017 Poul, I'm not sure if it's good enough as a mirror effect for you, but there are highly reflective chrome or metal stickers that might work. I am using some for the Bentley i am using, will post some photos of it later. Regards, Jeremy Link to comment Share on other sites More sharing options...
Pouln Posted February 27, 2017 Author Share Posted February 27, 2017 Thanks, Jeremy. I'd be interested to see the results. In the mean time I did a search on the web and saw one interesting option. The suggestion was to use a piece of a computer fixed disk. The platters inside form perfect mirrors. Only thing is that they are too thick and therefore need thinning. I think I'm going to try and see if it can be done. That would be the second part of a fixed disk that I use in this model. The alu used for the window winders also come from it. Link to comment Share on other sites More sharing options...

Recommended Posts
Create an account or sign in to comment
You need to be a member in order to leave a comment
Create an account
Sign up for a new account in our community. It's easy!
Register a new accountSign in
Already have an account? Sign in here.
Sign In Now