Stickframe Posted January 27, 2021 Share Posted January 27, 2021 This is a fascinating build - masterfully prepared, truly remarkable, and very interesting to see. Looking back to the top of this page, and the comment about the pins located at the ends of the spring packs - is very interesting. As shown in your prototype photos, they are certainly there, which is indeed surprising, as with compression, it seems as though the pack would attempt (cause a reaction) to shear them off. On the other hand, if they only connect the return from the lower leaf and go through a single, thicker "helper" spring, there might/must be: 1) enough room between the pin/bolt and the rest of the pack to allow some(horizontal) flexibility to occur with compression, without shearing the pin(s); and (2) very little movement (horizontally with compression) of the helper spring relative to the lower spring. Ok then. Sorry to be discussing an "old" question, but it made me wonder how it works! It's great that your build goes into such detail that this discussion is even relevant, if no longer timely. Cheers Nick 1 Link to comment Share on other sites More sharing options...
Pouln Posted January 27, 2021 Author Share Posted January 27, 2021 Hi Nick, no problem that your comments refers to a topic that was discussed some month ago. No apologies needed. I must say that before this discussion happened, I never gave it a thought. Since then I am paying more attention to the leaf spring mounting methods used in those days by car manufacturers. It appears that Alfa was not the only one who did it like this. As these cars are still around, it apparently works.. Link to comment Share on other sites More sharing options...
Toftdale Posted January 27, 2021 Share Posted January 27, 2021 I've only recently joined the Forum so I have never seen this topic before. I knew I was thoroughly enjoying reading the tread (and have picked up several tips and alot of inspiration along the way). What I had not realised until I finished reading it was just how long I have spent looking at it! Thank you for posting - Andy 2 Link to comment Share on other sites More sharing options...
Pouln Posted January 27, 2021 Author Share Posted January 27, 2021 You’re welcome, Andy. Glad that this thread gave you some inspiration and glad to hear that you are enjoying reading through all these pages. 2 Link to comment Share on other sites More sharing options...
Pouln Posted January 31, 2021 Author Share Posted January 31, 2021 Alright gents, a little bit of progress here. I finished the wiper motor and switch assembly Next I scratched a rearview mirror that will be mounted on top of the dashboard I have a large heavy stamp that will form a nice rounded backside for the mirror. That servers 2 purposes. First, it looks much more like a real mirror and second it provided the needed space to solder it on a pin. A long time ago I showed in this thread that I used a disk platter for mirror surfaces. Diskplatter are quite thick so back then I turned it to a usable size. From this, using the saw, I took a regtangualar piece and formed it such that it will fit the mirror. I rechromed the whole thing with Molotow chrome, which is drying right now. Pictures will come later. I also formed a bezel for the mirror which will be used to mount the mirror on top of the dashboard. Next, lightning. I have been pushing this forward because of the delicateness of the leds I have. They are so very very small and the wires are so very very thin that they break just by looking at them. I threaded the leds through shrink tube (just over 1.5mm diameter). I can’t thread them from the wire ends because a resistor is soldered on one of the wires, which I’d rather not remove (soldering this thin wires is not fun). The leds are really small so I was able to push 3 leds (6 wires) through the thrink tube. To give an idea about the size of the leds These leds were mounted inside the tail lights I made some time ago. I glued th shrink tube to the underside of the tail light to make sure that the wires are adequately supported. One tail light done. One to go. That’s it for now. Thanks for watching. Feel free to comment or ask questions if you like. 8 Link to comment Share on other sites More sharing options...
Ghost69 Posted January 31, 2021 Share Posted January 31, 2021 Hello Lots of minutiae, nice tricks, a beautiful achievement. Bravo, I am looking forward to the next step. Manu Link to comment Share on other sites More sharing options...
Codger Posted January 31, 2021 Share Posted January 31, 2021 Delicious Poul.... Link to comment Share on other sites More sharing options...
Pouln Posted January 31, 2021 Author Share Posted January 31, 2021 47 minutes ago, Ghost69 said: Hello Lots of minutiae, nice tricks, a beautiful achievement. Bravo, I am looking forward to the next step. Manu Thanks Manu. Much appreciated. 18 minutes ago, Codger said: Delicious Poul.... Thanks, Chas. Glad you like it 2 Link to comment Share on other sites More sharing options...
Pouln Posted February 1, 2021 Author Share Posted February 1, 2021 Gents, Thanks for all the likes and comments. It is much appreciated and, more important, motivating. I promised some final pictures of the rear view mirror. Here they are. And mounted on the top of the dashboard top I'm now working on the rest of the lights that need to be installed. Also preparing for the final painting and gloss coating of the body (yippee 🤨, that will keep me busy for quite some time). Thanks for watching. 8 Link to comment Share on other sites More sharing options...
FunkyChiken Posted May 31, 2021 Share Posted May 31, 2021 Sweet baby Jesus, your build is amazing...! 1 Link to comment Share on other sites More sharing options...
Codger Posted May 31, 2021 Share Posted May 31, 2021 2 hours ago, FunkyChiken said: Sweet baby Jesus, your build is amazing...! -And updates long overdue................ 1 1 Link to comment Share on other sites More sharing options...
larchiefeng Posted June 1, 2021 Share Posted June 1, 2021 Poul, I was just catching up on some of my reading on the forum and saw the section about your LED’s. I can’t tell which type of LED’s that you are using here but, back when I was building the Mercedes I wound up using SMD LEDs. They come in different sizes like regular, nano and pico and they also have different color rendering like cool and soft white. I used the pico to light up the dash lights, tail lights and marker running lights. I used the nano for the headlights. They worked great and were very easy glue down. Your build is looking great! I’m starting to go back and catch up with my Pocher building friends in hopes of getting some motivation to jump start my stalled build. 2 Link to comment Share on other sites More sharing options...
Pouln Posted June 10, 2021 Author Share Posted June 10, 2021 On 6/1/2021 at 12:55 AM, Codger said: -And updates long overdue................ You might be right, Chas 😝 On 6/2/2021 at 1:43 AM, larchiefeng said: Poul, I was just catching up on some of my reading on the forum and saw the section about your LED’s. I can’t tell which type of LED’s that you are using here but, back when I was building the Mercedes I wound up using SMD LEDs. They come in different sizes like regular, nano and pico and they also have different color rendering like cool and soft white. I used the pico to light up the dash lights, tail lights and marker running lights. I used the nano for the headlights. They worked great and were very easy glue down. Your build is looking great! I’m starting to go back and catch up with my Pocher building friends in hopes of getting some motivation to jump start my stalled build. Yes, I'm using the same. Pretty small ones that will fit everywhere. Link to comment Share on other sites More sharing options...
silver911 Posted June 10, 2021 Share Posted June 10, 2021 Welcome back stranger...you have been greatly missed Ron 1 Link to comment Share on other sites More sharing options...
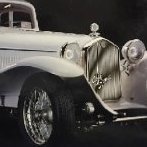
Pouln Posted June 10, 2021 Author Share Posted June 10, 2021 I have not been sitting here doing nothing, but I got a bit distracted. I'm working on 2 CNC devices (a portal milling machine (if that is the correct term in english) and a CNC lathe. That is taking up quite much of my time, but, the whether being bad for almost the whole spring, I could not do any painting. Last week I put on the gloss on the body. Results are quite nice (although the pictures below might make you think otherwise. That's what you get with pictures. In real life, the result makes me happy enough to keep it as it is. Picture below shows that I need to do a tiny bit of patching up. Of course I needed to see how it looked with the doors on. More to follow. 2 hours ago, silver911 said: Welcome back stranger...you have been greatly missed Ron Thanks, Ron. I do hope that I'm not really a stranger yet... 1 Link to comment Share on other sites More sharing options...
Pouln Posted June 10, 2021 Author Share Posted June 10, 2021 To follow up, on mt previous post: Of course I needed to see how it looked with the doors on. And to finish up, I made a mockup of the whole body (without the wings though) So, quite a bit of progress. Next I will be working on the inside. Will keep you posted of course. Don't think I will be fined for speeding, because I also have a lot to do on my CNC machines. I'll show what I have been doing with those later on. You might think, why on earth is he spending time on those. Well, on that other (american) model building forum there is a guy who has spent years on dreawing the 8C 2300 engine in every detail he could get. He is not finished yet but I will be using his drawings to machine a scale model of the engine (at least I hope). Anyway, that's it for now. Thanks for watching and do comment if you feel the need to. Would be much appreciated. 4 Link to comment Share on other sites More sharing options...
Codger Posted June 10, 2021 Share Posted June 10, 2021 Yes I need to. Great to see you back, even on part-time basis. A nice, rich Alfa - type red. Laying down beautifully. A monumental task to machine your own 8C engine from drawings and sure to be bound for a museum. Give us peeks at that when you start will ya?? C Link to comment Share on other sites More sharing options...
Pouln Posted June 10, 2021 Author Share Posted June 10, 2021 2 hours ago, Codger said: Yes I need to. Great to see you back, even on part-time basis. A nice, rich Alfa - type red. Laying down beautifully. A monumental task to machine your own 8C engine from drawings and sure to be bound for a museum. Give us peeks at that when you start will ya?? C Sure will do that. There is one big issue. This guy Tom, working on the drawings, does not have original drawings of the engine to refer to. So he is using pictures to get measurements. He contacted Alfa Romeo to ask for a copy of the engine drawings. The answer was that they lent these out many years ago and never received them back. Can’t imagine that they had only one set of drawings and sent those out. Anyway, Tom’s drawing (luckily in digital format), might not lead to components that fit together to make a complete engine. But the only way to know that is to build the engine based on the drawings. That’s why he would be very pleased to see someone build it. It will be some time before the machines are ready, so I’m thinking to start with the 3D printer, print the outer shell of the engine and the peripheral components and see how things will fit. Anyway, before that I do need to finish this build. I think it is time to do so. 😏 Link to comment Share on other sites More sharing options...
Pouln Posted June 10, 2021 Author Share Posted June 10, 2021 On 5/31/2021 at 10:29 PM, FunkyChiken said: Sweet baby Jesus, your build is amazing...! Thanks FC. Glad you like it. Link to comment Share on other sites More sharing options...
Codger Posted June 10, 2021 Share Posted June 10, 2021 6 minutes ago, Pouln said: The answer was that they lent these out many years ago and never received them back. Can’t imagine that they had only one set of drawings and sent those out. Anyway, before that I do need to finish this build. I think it is time to do so. 😏 As with all things Italian, anything is possible with my countrymen. Now this last makes me very happy.... Link to comment Share on other sites More sharing options...
Pouln Posted June 10, 2021 Author Share Posted June 10, 2021 2 hours ago, Codger said: Now this last makes me very happy.... You want to see an end to this never ending story? I guess I do too, so if you do not see any updates, it is because I’m busy 😉 Link to comment Share on other sites More sharing options...
Jo NZ Posted June 11, 2021 Share Posted June 11, 2021 6 hours ago, Pouln said: Sure will do that. There is one big issue. This guy Tom, working on the drawings, does not have original drawings of the engine to refer to. So he is using pictures to get measurements. He contacted Alfa Romeo to ask for a copy of the engine drawings. The answer was that they lent these out many years ago and never received them back. Can’t imagine that they had only one set of drawings and sent those out. Well if they did, the information must be still available. After all, Jim Stokes Workshops makes brand new engines.... 2 Link to comment Share on other sites More sharing options...
larchiefeng Posted June 11, 2021 Share Posted June 11, 2021 I have a three volume set on Alfa 2300 but, I’m not sure that it has a complete engine breakdown. As I recall the set was about $250 and it pretty much just has the history of every Alfa 2300. I will pull them out tomorrow and see if there’s any specific engine drawings. I remember that when I was researching the Alfa Monza I saw that the engine was painted no single specific color. I asked Dave Cox about that and he told me that when it came to things like engine and components paint, the mechanics just grabbed a bucket of paint that had the most in it and brush painted the engine that color. You have to remember that this was 1930’s Italy and they just used what they had. The color of the engine wasn’t as important as making it run! 2 Link to comment Share on other sites More sharing options...
Pouln Posted June 11, 2021 Author Share Posted June 11, 2021 11 hours ago, Jo NZ said: Well if they did, the information must be still available. After all, Jim Stokes Workshops makes brand new engines.... Yes, I’ve seen that. Maybe they were the ones that “lend” the drawings😉 Or they measured every single bit of an original engine. Link to comment Share on other sites More sharing options...
Pouln Posted June 11, 2021 Author Share Posted June 11, 2021 9 hours ago, larchiefeng said: I have a three volume set on Alfa 2300 but, I’m not sure that it has a complete engine breakdown. As I recall the set was about $250 and it pretty much just has the history of every Alfa 2300. I will pull them out tomorrow and see if there’s any specific engine drawings. I remember that when I was researching the Alfa Monza I saw that the engine was painted no single specific color. I asked Dave Cox about that and he told me that when it came to things like engine and components paint, the mechanics just grabbed a bucket of paint that had the most in it and brush painted the engine that color. You have to remember that this was 1930’s Italy and they just used what they had. The color of the engine wasn’t as important as making it run! Hi Wayne, I have the same set (if you refer to the Moore books). It does not contain these drawings. All the reference pictures of the engine do show all kind of painted and unpainted engines. I think that the material used for the engine even differs between race and non-race versions. Link to comment Share on other sites More sharing options...

Recommended Posts
Create an account or sign in to comment
You need to be a member in order to leave a comment
Create an account
Sign up for a new account in our community. It's easy!
Register a new accountSign in
Already have an account? Sign in here.
Sign In Now