JeroenS Posted August 13, 2020 Share Posted August 13, 2020 Very good finish to my eyes. Very smooth. 1 Link to comment Share on other sites More sharing options...
silver911 Posted August 13, 2020 Share Posted August 13, 2020 Looks to be 1:1 standard to me mate. Ron Link to comment Share on other sites More sharing options...
Alpha Juliet Posted August 13, 2020 Share Posted August 13, 2020 This build is EPIC! I'm not sure which photos are of the model and which are real! Amazing! Link to comment Share on other sites More sharing options...
Andy J Posted August 13, 2020 Share Posted August 13, 2020 Very nice indeed great work 👍 Link to comment Share on other sites More sharing options...
Pouln Posted August 13, 2020 Author Share Posted August 13, 2020 Thanks, guys. Much appreciated. Link to comment Share on other sites More sharing options...
Pouln Posted August 13, 2020 Author Share Posted August 13, 2020 2 hours ago, Alpha Juliet said: This build is EPIC! I'm not sure which photos are of the model and which are real! Amazing! That’s easy to answer. The real body of this car is long lost. The car was converted to a spider long ago and the body was presumably scrapped. Having said that, glad you like the results. Link to comment Share on other sites More sharing options...
Totally Mad Olivier Posted August 14, 2020 Share Posted August 14, 2020 On 14/07/2020 at 21:17, CrazyCrank said: Mirror polish Indeed!! First time I see your thread, Poul, it is really beautiful and I look forward to see more! Cheers, O 1 Link to comment Share on other sites More sharing options...
Pouln Posted August 14, 2020 Author Share Posted August 14, 2020 1 hour ago, Totally Mad Olivier said: Indeed!! First time I see your thread, Poul, it is really beautiful and I look forward to see more! Cheers, O Thanks Olivier. Did some more polishing on the doors. In the pictures you can see that the surface is not completely flat. Details are shown merciless using the digital camera. 2 Link to comment Share on other sites More sharing options...
Codger Posted August 14, 2020 Share Posted August 14, 2020 Finer grits above 4000 will remove the nits and scratches. Then apply clear in dustless area and leave alone. Color will get more vibrant and surface glass-like. 3 Link to comment Share on other sites More sharing options...
Pouln Posted August 14, 2020 Author Share Posted August 14, 2020 1 minute ago, Codger said: Finer grits above 4000 will remove the nits and scratches. Then apply clear in dustless area and leave alone. Color will get more vibrant and surface glass-like. Thanks, Chas. Contemplating whether I will do that, or leave it alone. Without “digital eyes” it isn’t looking bad at all. Link to comment Share on other sites More sharing options...
larchiefeng Posted August 14, 2020 Share Posted August 14, 2020 This is a slippery slope. Your first two pictures the paint looks perfect and it’s only the last picture that you can see the orange peel in your paint job. To get it totally flat you might have to add another coat of paint to build some layers before sanding it down to a flat finish without the bumps in the paint that, is the orange peel. I went through this with my Mercedes and it took a lot paint and a long time to get it right. The more you sand the color coat the more chances you have of burning through the color to the layer underneath. As long as you can keep from doing that you will be fine. I had a lot of times when I was almost perfect and then I hit the primer and then had to spray the color again. In the end I was able to get the black smooth and flat and then I sprayed the clear and started the process over again. I think that it took me months to get it where I wanted it and, if I had it to do all over again I would use a different type of paint. So, like I said it becomes a matter of what looks good to you and how much work you want to put into it. Like Chas suggested, maybe you just smooth it out the best you can with 4000 grit and spray the clear and live with any small imperfections. Nobody else is going to see them but you. 1 Link to comment Share on other sites More sharing options...
Andy J Posted August 14, 2020 Share Posted August 14, 2020 I've had a look at the part in question and offer the following advice for your consideration. I would use 4000,5000, 6000 and then finally 7000 grit wet and dry. If the paint has a matt sheen to it all over after the sanding your home and dry. After every grade check for any area's that appear to have either a semi gloss or gloss sheen to them these are the low points and will stand out. Once you have the matt sheen all over the surface gentle polishing will give you the finish your looking for. However polishing can leave multiple scratches if applied to heavily so the alternative is another clear coat on top of the matt paint which would be my choice. This process is called colour sanding and it works. However you could simply leave it as it stands it's your choice just thought I'd throw in an option that works though as always where paint is concerned there's a risk involved but the rewards can be very effective indeed 🙂 Link to comment Share on other sites More sharing options...
larchiefeng Posted August 14, 2020 Share Posted August 14, 2020 So, I went back and read the two previous pages of your thread and it looks like you already know what to do. It’s only one door and everything else is looking perfect so I would just do what you have to do to get it to same quality as everything else that you’ve done. It’s really looking great! When you set a standard for yourself you want to maintain it. It’s only paint and if it takes a repaint, no big deal you can do it! Link to comment Share on other sites More sharing options...
Pouln Posted August 14, 2020 Author Share Posted August 14, 2020 6 hours ago, larchiefeng said: This is a slippery slope. Your first two pictures the paint looks perfect and it’s only the last picture that you can see the orange peel in your paint job. To get it totally flat you might have to add another coat of paint to build some layers before sanding it down to a flat finish without the bumps in the paint that, is the orange peel. I went through this with my Mercedes and it took a lot paint and a long time to get it right. The more you sand the color coat the more chances you have of burning through the color to the layer underneath. As long as you can keep from doing that you will be fine. I had a lot of times when I was almost perfect and then I hit the primer and then had to spray the color again. In the end I was able to get the black smooth and flat and then I sprayed the clear and started the process over again. I think that it took me months to get it where I wanted it and, if I had it to do all over again I would use a different type of paint. So, like I said it becomes a matter of what looks good to you and how much work you want to put into it. Like Chas suggested, maybe you just smooth it out the best you can with 4000 grit and spray the clear and live with any small imperfections. Nobody else is going to see them but you. Thanks, Wayne. That is exactly why I am contemplating to leave it alone. I do not wish to burn through the final layers, so if I am going to polish I will lay a new layer of gloss first. Actually, like Chas said, it would be best if it then could do without another polish, which I managed to achieve on the bonnet tops. Link to comment Share on other sites More sharing options...
Pouln Posted August 14, 2020 Author Share Posted August 14, 2020 5 hours ago, Andy J said: I've had a look at the part in question and offer the following advice for your consideration. I would use 4000,5000, 6000 and then finally 7000 grit wet and dry. If the paint has a matt sheen to it all over after the sanding your home and dry. After every grade check for any area's that appear to have either a semi gloss or gloss sheen to them these are the low points and will stand out. Once you have the matt sheen all over the surface gentle polishing will give you the finish your looking for. However polishing can leave multiple scratches if applied to heavily so the alternative is another clear coat on top of the matt paint which would be my choice. This process is called colour sanding and it works. However you could simply leave it as it stands it's your choice just thought I'd throw in an option that works though as always where paint is concerned there's a risk involved but the rewards can be very effective indeed 🙂 Hi Andy, first of all thank you for your advice. I fear that I will burn through the paint at places, before I have a complete flat surface. Therefore, if I’m going for a really shiny finish I will need to lay another gloss layer and then start the process you mention, or, which would be best, make sure that I have a smooth, shiny and flat finish after spraying this layer. Anyway, I will need to think this through a bit more. 1 Link to comment Share on other sites More sharing options...
Pouln Posted August 14, 2020 Author Share Posted August 14, 2020 1 hour ago, larchiefeng said: So, I went back and read the two previous pages of your thread and it looks like you already know what to do. It’s only one door and everything else is looking perfect so I would just do what you have to do to get it to same quality as everything else that you’ve done. It’s really looking great! When you set a standard for yourself you want to maintain it. It’s only paint and if it takes a repaint, no big deal you can do it! Thanks, Wayne. That’s exactly it. The rest is looking really great, so the doors (both need dome additional work) should be of the same standard (at least I feel this need). So, between yours, Andy’s and Chas’ advice, I feel additional treatment is needed. Link to comment Share on other sites More sharing options...
Andy J Posted August 14, 2020 Share Posted August 14, 2020 1 minute ago, Pouln said: Thanks, Wayne. That’s exactly it. The rest is looking really great, so the doors (both need dome additional work) should be of the same standard (at least I feel this need). So, between yours, Andy’s and Chas’ advice, I feel additional treatment is needed. You have the skills and knowledge required, make a plan be confident and go for it 👍 😉 1 Link to comment Share on other sites More sharing options...
Pouln Posted August 14, 2020 Author Share Posted August 14, 2020 3 minutes ago, Andy J said: You have the skills and knowledge required, make a plan be confident and go for it 👍 😉 I will show the results of my skills and knowledge in due time.🥴 Link to comment Share on other sites More sharing options...
Codger Posted August 14, 2020 Share Posted August 14, 2020 9 hours ago, Codger said: Finer grits above 4000 will remove the nits and scratches. Then apply clear in dustless area and leave alone. Color will get more vibrant and surface glass-like. Once more I need apologize for not stating clearly what I meant to say to be helpful. This is what has worked well for me. To remove texture from lacquered surfaces, I wet color sand using grits from 4000 all the way to 12,000 - as though I were leaving that as the 'polished' surface. The key is to remove all hint of scratches which Poul has discovered above. If starting at 4000 was too fine, I went back down to 3200 or so, then all the way back up. I do not burn through the color to the primer because I never use the more aggressive (lower number) grits. here's the result of a tedious wet-sand session (with dishsoap) and yes the guest bath sink has been my secret workplace. This is punishable by death by the property mistress. Note the pinkish residue of Duplicolor in the water. And yes, these ultra fine grits certainly remove paint texture: After a scratch-free, uniformly dull surface is achieved (with no burned-through edges) then one or two coats of clear are applied in as dust-free a condition as possible because you don't want to sand or polish the clear. That would remove the hard reflections and vibrant colors it produces if you've layed down a good flat (meaning NO TEXTURE) coat. I have achieved this with spray cans on these large surfaces but Andy has an excellent method of thinning his clear coats and getting a glass-like finish using airbrush. This is what works for me and the other gents have achieved excellent results with their methods. Poul I do not blame you if you leave well enough alone. It can be very daunting work. 5 1 Link to comment Share on other sites More sharing options...
larchiefeng Posted August 15, 2020 Share Posted August 15, 2020 All of this sanding on a color coat and yes, even on clear coats is really dependent upon the type of paint used, how it is applied and how much is actually on the model. In my case, I made a huge mistake by using the Testors Model Masters enamel! This was the beginning of my problems and what dictated everything that came after. The problems are far too many to go into here and I documented them all in the Mercedes thread. Lacquer and acrylics and some of the new two part formulas that lay down a flat finish color coat and then are finished with a clear coat are the way to go. You can get the color coat on pretty thin and then build up with the clear. You get a smooth color coat on then build up your clear coats. I don’t even start sanding the clear until I have at least three coats on. I want to make sure that I can get the orange peel sanded flat on the clear before I polish it out. This is where I disagree with Chas, as long as you have a good base color coat the more clear coats is where you are going to get the depth of the paint color from. And, if you have orange peel on your clear coat you won’t have a mirror finish. Airbrush application is going to be a pretty small amount of paint and little loss of detail. Spray cans are going to be a little heavier coats. This is where the amount of paint on the model will vary depending on how heavy you spray the paint. Temperature and humidity also play a part in how the goes down as well. The only other gremlin is the place it gets painted and, all I’m thinking about here is dust particles. So, lots of variables to consider before the sandpaper or polish even comes out. I think dust is the biggest wild card. Chas has a point but accidents happen when sanding and this is what works for him. What I said at the beginning is what works best for me. The biggest issue when sanding is, if you catch an edge or some molded detail and accidentally sand the paint off the high spots, things happen. This is where the hood side louvres come to mind. You can pretty much control pressure and grit on a flat surface, it’s the raised stuff where you can get into trouble. The only thing that I did was to use some low tack tape and mask over those potential accidents waiting to happen when I am sanding spots like that. Sorry, I didn’t really mean to be so long winded. 3 Link to comment Share on other sites More sharing options...
JeroenS Posted August 15, 2020 Share Posted August 15, 2020 It's all very interesting to read. The methods vary a little bit so I guess it's a matter of what you're most comfortable with. I haven't found a suitable subject yet but I would like to achieve a "perfect" finish on a model one time. Not on a truck 🙂 1 Link to comment Share on other sites More sharing options...
Roy vd M. Posted August 15, 2020 Share Posted August 15, 2020 Highly interesting exchange of points of views regarding sanding / polishing lacquer vs clear coat. Following along! 1 Link to comment Share on other sites More sharing options...
PROPELLER Posted August 15, 2020 Share Posted August 15, 2020 As usual, I'm going to speak as an iconoclast... These paint jobs are awesome. But. I always do love the "but"... Remember you are working on 1930,s cars and at this time paints was not the same as today! Very deep colors for the luxury's cars, ten layers or more was not rare of course without varnish, but (one more a time) for the racing cars just a couple layers, the weight must not be forgotten! Now, you can hang me! Dan. 1 2 Link to comment Share on other sites More sharing options...
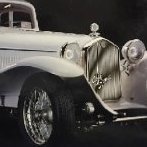
Pouln Posted August 15, 2020 Author Share Posted August 15, 2020 1 hour ago, PROPELLER said: As usual, I'm going to speak as an iconoclast... These paint jobs are awesome. But. I always do love the "but"... Remember you are working on 1930,s cars and at this time paints was not the same as today! Very deep colors for the luxury's cars, ten layers or more was not rare of course without varnish, but (one more a time) for the racing cars just a couple layers, the weight must not be forgotten! Now, you can hang me! Dan. No reason to. Great to see all this input. It is clear that all of you have found a method that work for you. Setting the goal you want to achieve is probably the most important step to take. From that you derive the method to achieve your goal. In my case, I know that at a certain point in time this car had a very shiny finish. Proof of that is a picture in the Simon Moore books (Copyrighted material - courtesy of Simon Moore, so I will remove the picture as soon as the copyright owner requests me to). This picture was taken in 1949. and after a following restauration: as you can see, there are quite some differences to the car done during the later restauration (running lights are changed, direction indicators on the sides added, quarter windows added, a nice flashy/swinging radiator screen. Chrome surround for front window only on 3 sides, no leather rooftop). Anyway, the object was to show that this car was once a shiny beautifull car. My model should turn out quite shiny and I will lend some details from both versions shown here, but also from how it was before WWII, when it was black over white and had a straight radiator screen as well as wings that did not meet each other in front of the radiator. Anyway, much to be learned from this discussion, so thanks for all the input. 4 Link to comment Share on other sites More sharing options...
PROPELLER Posted August 15, 2020 Share Posted August 15, 2020 1 hour ago, Pouln said: From that you derive the method to achieve your goal. I totally agree. My apologies, I omitted to say that! Thanks Paul! We are working for our own pleasure... Dan. 1 Link to comment Share on other sites More sharing options...

Recommended Posts
Create an account or sign in to comment
You need to be a member in order to leave a comment
Create an account
Sign up for a new account in our community. It's easy!
Register a new accountSign in
Already have an account? Sign in here.
Sign In Now