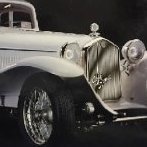
Pouln Posted December 12, 2016 Share Posted December 12, 2016 (edited) A number of weeks ago I warned you guys that I had started the build of my AR Coupe and that I would be posting a WIP here. Well, it is happening. Upfront, this will not be anywhere near what some of you are displaying here, but I will learn and maybe even master some techniques along the way. I've done some ootb building 40-35 years ago. I'did build up quite a stash of kits, mostly 1:24 scale, I have sold most of them over the past few years and replaced them with 1:8 and one 1:12 (Bentley). I was planning to start when I was going to be retired in a few years, but, well.... Britmodeller happened and I couldn't wait anymore. Back in 1996 I ran into Pocher and actually only the AR Coupe Elegant. A local shop had a number of boxes for what now would be $100. I bought 3, sold one immediately which more than paid for the three kits. I sold the second a few years back for about 20 times what I paid for it. This is the story of what happens to the third kit. I didn't open the box until 2008 or 9. Started the chassis and the engine. I also did the wheels back then, but after that left it until this year. I'm taking pictures but not enough, so apologies for that. As said, this one is not going to perfect, but feel free to comment anytime. I'm here to learn as much as possible. Just one other thing, english is not my mother tongue, so bear with me if I'm not understandable. Here it goes Edited March 21, 2019 by Pouln 2 Link to comment Share on other sites More sharing options...
Mpfiend Posted December 12, 2016 Share Posted December 12, 2016 I'm looking forward to seeing your progress Poul. Regards Keith. Link to comment Share on other sites More sharing options...
roymattblack Posted December 12, 2016 Share Posted December 12, 2016 Another Pocher - and one we haven't seen built. Great stuff. Link to comment Share on other sites More sharing options...
Schwarz-Brot Posted December 12, 2016 Share Posted December 12, 2016 This is going to be beautiful. Will follow. Link to comment Share on other sites More sharing options...
CrazyCrank Posted December 12, 2016 Share Posted December 12, 2016 Hurrah ! another Pocherman...I hope a lot of scratch building in addition to OOB Link to comment Share on other sites More sharing options...
Dr. Fiat Posted December 12, 2016 Share Posted December 12, 2016 Oooh this is gonna be a good one! Popcorn is ready.... Link to comment Share on other sites More sharing options...
Codger Posted December 12, 2016 Share Posted December 12, 2016 Glad you're posting this Poul. Much to be learned for Pocherphiles. Link to comment Share on other sites More sharing options...
Roy vd M. Posted December 12, 2016 Share Posted December 12, 2016 (edited) Not much of a chauvinist, I'm still very interested to see how a fellow countryman will tackle one of these beauties. It's an opportunity to follow this from the very start (almost). People who start modeling tend to think that the smaller a scale, the more difficult the build is. Usually comparing 1/72 versus 1/24 I always say that statement isn't true because the larger the scale the more details you're going to want to add. From what I have seen on this forum Pocher kits are the ultimate proof that my theory is correct (for once)... I have no illusion at all that these 1/8 cars are any less difficult to put together than a 1/144 plane. You can hyperdetail the tiny plane just like you can hyperdetail the large car. In Codger's Rolls Royce thread I read something interesting about the current pricing of Pocher sets. Roymattblack mentioned there that a Pocher may cost a significant sum... but the amount of joy it brings and the amount of time you're spend on this kit all make up for it. I understand his remark in such way that the 'hourly rate' of building a Pocher kit is actually very reasonable. This Alfa Romeo is a lovely model and I am much looking forward to seeing your build reports that will hopefully include a bit of scratchbuilding. Edited December 12, 2016 by Roy vd M. 4 Link to comment Share on other sites More sharing options...
roymattblack Posted December 12, 2016 Share Posted December 12, 2016 1 hour ago, Roy vd M. said: Roymattblack mentioned there that a Pocher may cost a significant sum... but the amount of joy it brings and the amount of time you're spend on this kit all make up for it. I understand his remark in such way that the 'hourly rate' of building a Pocher kit is actually very reasonable. This Alfa Romeo is a lovely model and I am much looking forward to seeing your build reports that will hopefully include a bit of scratchbuilding. That is just so true. Pocher kits are funny-money. No denying it but compared to the 20-30 smaller kits you could build in the same time, they are quite reasonable. If you've ever been tempted by a 'workshop challenge' - buy a Pocher. Be warned though. Once you do, there's no going back. Roy. 1 Link to comment Share on other sites More sharing options...
Pouln Posted December 12, 2016 Author Share Posted December 12, 2016 (edited) Thanks guys. Happy to be received with such enthousiasm. Yes I will not build it out of the box. Last year I bought a little Unimat 3 lathe with milling attachment and have used it to scratch breathers for the valve covers. I also saw on the Paul Koo DVD one picture of an engine that had a different setup for the connection between the engine and the generator. That was actually the first item that I scratched and the first item I made on my new old equipment using the indexing device. I would now do it a bit different to get better ans sharper fins on the thing, but for a first I was not unhappy. breathers: I also immediately bumped into the perks and quirks of Pocher kits. The engine top was, welll let's say, out of specs. Not just a bit but really badly warped and a hole on one side. Had to do a lot to it to get in a somewhat usable shape. To date the valve covers are not completely parallel, bus as this is a model that will have a closed engine compartment for the greater part of its life, I decided to let it stay as it is. Did I tell you that this is already the third time I'm building this engine? First time a number of years back I did without painting anything. Stopped when I came to the engine top. Second time beginning of last year, I took everything apart and decided that the thing needed paint. So I painted the chassis and the engine parts after taking it apart. Didn't come to Britmodeller yet and did not nearly do enough to level sink holes that exist on the engine in abundance. I also did not have the Paul Koo DVD yet. You are now witnessing the 3rd try. Here's a pic where you clearly can see the sink holes on the engine side. Don't mind the rest as nothing is fixed permanently here. Now it looks like: Well, that's it for today I hope you like it. More to follow. Edited December 12, 2016 by Pouln 4 Link to comment Share on other sites More sharing options...
Codger Posted December 12, 2016 Share Posted December 12, 2016 Sure do like it. Big-time machine work makes a huge difference. Glad you're going several levels up... 1 Link to comment Share on other sites More sharing options...
Endeavor Posted December 12, 2016 Share Posted December 12, 2016 I do like it. It looks like you are off to a great start! Do Simon Moore's books have helpful information about or photos of this coupe? In particular, I'm wondering what the wheelbase was and whether it had front chassis rails and front spring mounting points like the Monza or like the Spyder. It appears that this may be the only Pocher Alfa whose fenders will not require a great deal of modification. Please keep the photos coming. Link to comment Share on other sites More sharing options...
larchiefeng Posted December 13, 2016 Share Posted December 13, 2016 This is a good example of the warp on the Alfa cylinder head that needs to be corrected. I agree with the rest; this will be a new and different build of a Pocher. Link to comment Share on other sites More sharing options...
rjfk2002 Posted December 13, 2016 Share Posted December 13, 2016 That is a nasty warp. Looks almost partially melted. I hope you can save it. I like what you did with the engine block - looks like the real thing. What brand did you use? Link to comment Share on other sites More sharing options...
Pouln Posted December 14, 2016 Author Share Posted December 14, 2016 (edited) If you mean the paint, I use Vallejo Model Air paint mostly. This is gun metal colour. Yes, Simon More has been invited to a ride in this specific AR several times. He has included a few colour pics and some B/W pics of the car. Don't know if I can include the here. Don't want any copyright issues on my back. It is chassis number 2211053, originally it was a spider by Zagato on short chassis, originally sold to Scuderia Ferrari. They entered it in the 1932 24 Hours of Spa under race number 38. It actually won the race driven by Brivio and Siena. Anyway, that probably answers the question regarding the chassis rails and the front springs. It was never meant to be a coupe to begin with Come to think of it, maybe I too need to scrap the Coupe body as being non original ;-). It has exchanged many hands in the first few years and when it was sold on the 23rd of January 1935 license records show that it was rebodied to a coupe (Touring). The body number however showed that it was a 1932 body, so it was definitely not built for his specific car. Apparently there is a lot of mystery around this car. It has been in the UK and there it was known as a Castagna Coupe. Possibly it was again rebodied by Castagna but the jury is still out (possibly never to be found again.. It came to the UK in 1936 (registration DKM 311) and nothing is known during the rest of the pre-war years. But one Guy Griffiths bought the car, which actually was to be scrapped in the 2nd week of the war for...... drumroll 2 pound 10! He swapped it with someone else for a Brenobar motorized bicycle, which he sold for 5 pound a few days later. Amazing stories in this book. Anyway, the Pocher Coupe is resembling the body as it was seen in 1970's (and recorded by Simon Moore). Earlier it had a two tone body with black wings and black bonnet top. The wings were differently formed too as they came down to meet each other in the center in front of the radiator. This was executed in quite swinging, wavy form. As the pictures from this era are BW, it is impossible to determine what the other colour was. Later on it got a new radiator grill that was curved (later to be exchanged to a flat almost upright radiator grill. After the two-tone period it appeared to have undergone an upgrade in the early 60's. It then had uni-tone body in red with black (leather?) top. So much for history. Now what to do about colours? I'm leaning toward black wings and a black bonnet top, with grey or darkred for the rest of the car. And of course a black leather top. Edited December 14, 2016 by Pouln 1 Link to comment Share on other sites More sharing options...
Pouln Posted December 14, 2016 Author Share Posted December 14, 2016 (edited) Ok on with the build. I bought some stuff and now I have choices to make. On one of the pictures above you can see the brass cover at the bottom of the engine. It is a bit too small so I'm not going to use it. Edited December 19, 2016 by Pouln Link to comment Share on other sites More sharing options...
Pouln Posted December 14, 2016 Author Share Posted December 14, 2016 I scratched a new distributor bottom on the lathe and updated the distributor cap (apologies for the quality of the pictures) As you can see above I allowed some engine grime to collect at the bottom near the sparkplugs. I also made sure that we would not have oilspills later on. Few steps further: Next picture shows the copper seaal between the compressor house and its base. I created that by using a copper wire, drilling 2 holes at the back of the compressor housing, bending the end of the wire and put it in one hole, pulling the wire around the housing and inserting it in the other hole after which I fixed it with a bit of Cyano. After that I flattened the outside surface of the wire a bit. I've used some different metallic paints on the components, painted the bolts at the bottom in brass (totally unnatural of course, but did it to get some colour). Boltheads on the compressor were painted black. Th pipe from the waterpump upwards has a weird stance so I changed that (gave me troubles with the inlet manifold later on). I also painted some levers, needles and other stuff on the carburator in brass. Ok, that's it for today. Any questions or comments, let me know. 8 Link to comment Share on other sites More sharing options...
harveyb258 Posted December 15, 2016 Share Posted December 15, 2016 Nice work Pouln! Have never watched a Pocher build from the start[live, so to speak], so I'm looking forward to following this one! Bring it on!! Cheers, H Link to comment Share on other sites More sharing options...
Mpfiend Posted December 15, 2016 Share Posted December 15, 2016 Nice progress Poul. Keith Link to comment Share on other sites More sharing options...
Pouln Posted December 15, 2016 Author Share Posted December 15, 2016 thanks guys. Have been working on the exhaust manifolds. I started with the metal ones I bought. They were way too shiny. I added real copper seals at the cooler side of the manifolds and bolted them together with the exhaust pipe headers (hope I have the terminology right). Next I started on oil lines. This is an interpretation and thus may or may not exist on real cars. I used solder wire to form them, scratched some clamps to hold them. 2 Link to comment Share on other sites More sharing options...
Pouln Posted December 15, 2016 Author Share Posted December 15, 2016 Some more pictures of scratched parts. Here is an overview of the engine sofar: I've added a bit of colour to the exhaust manifolds as I thought they were a bit too bland. I also connected the tacho cable to the left valve cover. Next up was the petrol (gas) tank. I made new side covers to hide the seam from the eye. The latter part will be totally invisable but I still thought that it needed something extra. Hence the nails. Well, that's it for the day. I hope you like it. If you have questions, comments or critique, just let me know. 2 Link to comment Share on other sites More sharing options...
Codger Posted December 15, 2016 Share Posted December 15, 2016 (edited) Poul, I very much like that you produced parts as 'interpretation' of 1:1 parts in the absence of hard reference to actually duplicate parts. Further, you made realistic clamps and fasteners which would certainly 'work' in a 1:1 situation. All lends a very detailed, life-like look. Your block lines are very similar to the solder-based oil feed lines attached to my block sides, which were taken from 1:1 reference. Combined with your machined parts, it's terrific detail. Just try to keep your level of patina or usage consistent over the whole of the engine and chassis. Very nice to see this lovely car come to life. EDIT: Forgot to ask; what is the source of the spark wires and various similar cables? - they look great and are unique among Pocher builds. Edited December 15, 2016 by Codger 1 Link to comment Share on other sites More sharing options...
kpnuts Posted December 15, 2016 Share Posted December 15, 2016 Looking great my friend I'm sure this will be another superb build, will be watching from now on. Link to comment Share on other sites More sharing options...
Pouln Posted December 15, 2016 Author Share Posted December 15, 2016 (edited) Thanks Chas, for your kind words. The source of the wires? I visit Sweden a few times per year as my son lives there. Both in Malmö and in Stockholm there are hobby shops called Slöjd Detaljer. These carry what would be translated into spun tinwire. It is very thin tin wire that is wound around a pliable kernal. They have it in several colours and two thicknesses. http://www.slojd-detaljer.se/kategorier/skapande-pyssel/smyckestillverkning/tenntradsbroderi/spunnen-tenntrad-pid2747 The site is in swedish, but there is a button at the bottom to switch to english. Come to think of it, I also bought very thin leather cord (0,5 and 1 mm) there. you will see it later in this build. Hope this helps. Edited December 15, 2016 by Pouln 1 Link to comment Share on other sites More sharing options...
Pouln Posted December 15, 2016 Author Share Posted December 15, 2016 Thanks, KPnuts Link to comment Share on other sites More sharing options...

Recommended Posts
Create an account or sign in to comment
You need to be a member in order to leave a comment
Create an account
Sign up for a new account in our community. It's easy!
Register a new accountSign in
Already have an account? Sign in here.
Sign In Now