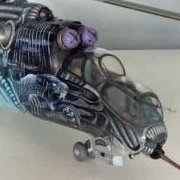
techniquest Posted August 3, 2016 Share Posted August 3, 2016 This was one heck of a project. It's the Mil-35 Hind of the Czech Air Force from this year's tiger meet in Spain, known as the 'Alien Tiger'. The kit is built OOB except for the addition of some wiring/plumbing on the main rotor mechanism; and all the markings are hand-painted except for the tiger's head, the side door, the small 'alien tiger' logo on the left side of the tail, and the Mil-35/24V titling. The Czech roundels and numbers are from the kit/spares. I used Halfords rattle cans for the basic black/grey background and then a combination of acrylics and enamels with a variety of small brushes for the alien designs. I found the fit to be pretty good which is just as well, as I departed from normal practice and completed much of the artwork before assembling the model - including the fuselage halves. I'm happy to answer any questions and receive your comments & critiques; but for now, here it is. 35 Link to comment Share on other sites More sharing options...
raguk Posted August 3, 2016 Share Posted August 3, 2016 A true masterpiece, and a work of art. Captures the look of the real airframe well. Thanks for posting. RG 1 Link to comment Share on other sites More sharing options...
Soloturk Posted August 3, 2016 Share Posted August 3, 2016 Not a fan of choppers either civil or military but that is a bloody good model! Can't believe that is hand painted, especially as it's done with the 3D effect as per the real thing, something I'm not sure I could do! A work of art you should be proud of 1 Link to comment Share on other sites More sharing options...
Low flyer Posted August 3, 2016 Share Posted August 3, 2016 Extraordinary piece of modelling and painting 1 Link to comment Share on other sites More sharing options...
Reini78 Posted August 3, 2016 Share Posted August 3, 2016 wow, you´re a great artist! splendid work 1 Link to comment Share on other sites More sharing options...
Widow 65 Posted August 3, 2016 Share Posted August 3, 2016 Fantastic! 1 Link to comment Share on other sites More sharing options...
Parabat Posted August 3, 2016 Share Posted August 3, 2016 You painted that by hand?! Phenomenal! I would love to see more photos, this is truly a masterpiece. 1 Link to comment Share on other sites More sharing options...
keefr22 Posted August 3, 2016 Share Posted August 3, 2016 That is just fantastic!! I agree with Parabat, more (& bigger!) piccies please! Stunning paintjob!! Keith 1 Link to comment Share on other sites More sharing options...
DDELK Posted August 4, 2016 Share Posted August 4, 2016 Beautiful. Did you have to do a lot of touch up when you joined the pieces, especially since you painted them first.. Absolute masterpiece and something to be very proud of. You have all the bragging rights on this one.. Dave U.S🇺🇸 1 Link to comment Share on other sites More sharing options...
techniquest Posted August 4, 2016 Author Share Posted August 4, 2016 Here are a couple more photos of my 'Alien Tiger'. Thanks for the very kind comments DDELK, I was lucky in that I didn't have a great deal of touching up to do when I put the main pieces together. The wings/tanks were painted, varnished and assembled as separate substructures before gluing to the main body, as were the gun and turret and the under-nose substructure. The canopy section was also completed and painted prior to fitting. The two fuselage halves, however, required some additional paintwork after a little putty and sanding across the top and the boom; and the detail painting along the centre section was done after joining in order to achieve symmetry. The entire helicopter was finished before I started working on the main rotor, which can be removed. 4 Link to comment Share on other sites More sharing options...
exdraken Posted August 4, 2016 Share Posted August 4, 2016 (edited) a very impressive model! looks like the artist of the real one himself just did it again in smaller scale! where did you have all the necessary reference from? I 've not yet seen too many clear photos of this one! interesting way of how you did it ! an thanks for the additional photos! more always welcome Edited August 4, 2016 by exdraken 1 Link to comment Share on other sites More sharing options...
techniquest Posted August 4, 2016 Author Share Posted August 4, 2016 where did you have all the necessary reference from? I 've not yet seen too many clear photos of this one! There are a lot of photos out there on the web if you search around; plus I had the advantage of a friend, who went to the tiger meet, sending me some high quality close-ups. Link to comment Share on other sites More sharing options...
F4u Posted August 4, 2016 Share Posted August 4, 2016 You are certainly talented that is a superb Hind. Great work. Guy 1 Link to comment Share on other sites More sharing options...
Suprastar3000 Posted August 4, 2016 Share Posted August 4, 2016 I read "Halford's rattle can" then wasn't quite expecting that! Not sure to call that art or modeling, either way my flabber is gasted. 1 Link to comment Share on other sites More sharing options...
DennisTheBear Posted August 4, 2016 Share Posted August 4, 2016 You're having a go, aren't you? Hand painted? I think you should change the title of this thread to one word, that being: SUPERB! DennisTheBear 1 Link to comment Share on other sites More sharing options...
redcap Posted August 4, 2016 Share Posted August 4, 2016 WOW - How different is that! A real head turner at shows or in any collection I would imagine. I have this same kit in the stash so how did you find the build experience overall? Gary 1 Link to comment Share on other sites More sharing options...
Radleigh Posted August 4, 2016 Share Posted August 4, 2016 Looking forward to seeing this!! Looks great. 1 Link to comment Share on other sites More sharing options...
upnorth Posted August 5, 2016 Share Posted August 5, 2016 That's simply amazing! 1 Link to comment Share on other sites More sharing options...
techniquest Posted August 5, 2016 Author Share Posted August 5, 2016 I have this same kit in the stash so how did you find the build experience overall? I'd read about there being some major fit issues, but I didn't have any of those. You need to study the instructions carefully as they're not very clear diagrams, and make sure that all the components for the interior substructure are properly trimmed and securely in place as the joining of the outside main body around the internal section is by far the trickiest part. The locator pins are almost like a snaptite model and once everything is connected up, getting it apart again is really difficult, so do plenty of dry-fitting and practicing - especially around the engine exhausts. That being said, I enjoyed the build and didn't find any major problems and I was particularly pleased with the fit of the canopy. Link to comment Share on other sites More sharing options...
Parabat Posted August 5, 2016 Share Posted August 5, 2016 Love the extra pictures, that is a stunner! Brilliantly executed. Possibly the best special scheme I have ever seen. Link to comment Share on other sites More sharing options...
hillstar Posted August 6, 2016 Share Posted August 6, 2016 WOW!!! My model of the year so far! Thanks for sharing! Link to comment Share on other sites More sharing options...

Recommended Posts
Create an account or sign in to comment
You need to be a member in order to leave a comment
Create an account
Sign up for a new account in our community. It's easy!
Register a new accountSign in
Already have an account? Sign in here.
Sign In Now