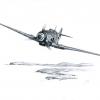
Johnmodeller Posted July 7, 2016 Share Posted July 7, 2016 (edited) I have just finished the Eduard 1/48 Focke Wulf Fw 190D-9 Profipack. THE AERIAL WIRE WILL GO ON NEXT YEAR TO COMPETE AT THE AUSTRALIAN MODEL EXPO. A finicky kit, but the finished result is superb and very much worth it. The spiral spinner decal was a bit of a mess to put on, but in the end it bedded down well with some micro sol and set. Underwing staining was done with Mig's Panel washes and provided a realistic effect. (I don't know why some of the decals look as if they have silvered- they haven't, as it must be the light. I have checked it, and they are void of silvering...) I would like to dedicate this build to all of the JG 301 Wilde Sau pilots of WW2. Thanks, John Edited July 7, 2016 by Johnmodeller 8 Link to comment Share on other sites More sharing options...
Caerbannog Posted July 7, 2016 Share Posted July 7, 2016 Nice scheme and good work. Strange with the light effect that looks as if some decals have silvered - but who cares if it is only on the pictures. René 1 Link to comment Share on other sites More sharing options...
Reini78 Posted July 7, 2016 Share Posted July 7, 2016 nice paintwork 1 Link to comment Share on other sites More sharing options...
Duncan B Posted July 7, 2016 Share Posted July 7, 2016 Good job. I know what you mean about it being a finicky build but as you say there results are with it. Duncan B 1 Link to comment Share on other sites More sharing options...
Parabat Posted July 7, 2016 Share Posted July 7, 2016 Good work, always nice to see another Fw190 on here. 1 Link to comment Share on other sites More sharing options...
polo1112 Posted July 7, 2016 Share Posted July 7, 2016 Fantastic !!! 1 Link to comment Share on other sites More sharing options...
Johnmodeller Posted July 8, 2016 Author Share Posted July 8, 2016 Nice scheme and good work. Strange with the light effect that looks as if some decals have silvered - but who cares if it is only on the pictures. René nice paintwork Good job. I know what you mean about it being a finicky build but as you say there results are with it. Duncan B Good work, always nice to see another Fw190 on here. Fantastic !!! thanks mates, it's been my first eduard Fw 190 build, and turned out to be harder than I thought, but the results are pretty nice Cheers, John Link to comment Share on other sites More sharing options...
fewr9fkr9595 Posted July 8, 2016 Share Posted July 8, 2016 Good effort there John, especially on the paintwork like others have said. Some good airbrushing there with nice tight camo demarcations. Like you say the eduard kits are tricky (even more so if you try to build them 'closed' - been there done that) but ultimately worth it... A couple of points for improvement if i may, some for this build but also your future builds in general - to take your kits to the next level and make the most of your good paint work, spend a bit more time on cleaning up your sprue/tree/runner attachment points and seams, for example in the last pic several are visible; On the nose cowl infront of the cowl flaps, On the botttom edge of the gun cowl (above red circle decal, On top the engine support bearer (inside gun bay, to the right of the red circle decal), On the leading edge of wing next to gun camera etc. And then also where it looks like you have painted the wheels first then cut them off the sprues - could do with a touch up. Or cut them off, sand mould seam & clean up then mount them on a toothpick to paint. Whilst on the wheels, they seem to cant in a bit. IIRC there is a diagram in instructions showing angle of wheels when fitted. A trick for 190's is to support plane under wings and glue the wheels on and get them to set in the air at the correct angle and dry before putting weight on them and then resulting in mis-alignment. Fw190 wheels aren't perpendicular to the u/c legs... Hope this helps, I have tried to be as constructive as possible, and as i said your paintwork is very good, and a couple of improvements next time can take a good build into an excellent one 👍🏻 1 Link to comment Share on other sites More sharing options...

Recommended Posts
Create an account or sign in to comment
You need to be a member in order to leave a comment
Create an account
Sign up for a new account in our community. It's easy!
Register a new accountSign in
Already have an account? Sign in here.
Sign In Now