Suprastar3000 Posted June 18, 2016 Share Posted June 18, 2016 Welcome to my first WIP thread. So, here it goes,... De Havilland Mosquito from Tamiya with David Brown tug. Not 100% sure if I'm building FB MkVI of 143 Squadron (Sea grey with yellow spinner) or FB MkVI of 487 Squadron (like the box) This will be to replace an old model I brush painted years ago,... now in an effort to modernize the collection with airbrushed versions. Also here, I have a neat little resin David Brown tractor I'll be building today. This should complement the Mossie very well. 1 Link to comment Share on other sites More sharing options...
Suprastar3000 Posted June 18, 2016 Author Share Posted June 18, 2016 (edited) The David Brown tractor is getting on nicely, which was relatively painless. Not done too many resin models so superglue isn't a strong point of mine. This will be painted RAF blue when complete. Edited June 18, 2016 by Suprastar3000 5 Link to comment Share on other sites More sharing options...
Mottlemaster Posted June 18, 2016 Share Posted June 18, 2016 Looks interesting . Have you drawn a plan of your diorama ? Link to comment Share on other sites More sharing options...
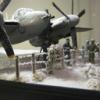
Suprastar3000 Posted June 18, 2016 Author Share Posted June 18, 2016 (edited) Its actually a re-make with "improvements." to an existing diorama I have. The original models on the diorama were completed many moons ago. Now, I have recently started airbrushing and want to remake my old efforts. During which time I want to also make improvements and swap the US tractor for an more historically correct british version. The ground crew and accessories will also be re-made. Snow needs reapplying and I want to build the new Mosquito with hatches open where possible. Oh, and ladder down. Pretty much the only thing I will keep from the old diorama is the austin tilly. The was quite a resent addition anyway. Heres a picture of the original Edited June 18, 2016 by Suprastar3000 5 Link to comment Share on other sites More sharing options...
Troy Smith Posted June 18, 2016 Share Posted June 18, 2016 The David Brown tractor is getting on nicely, which was relatively painless. Not done too many resin models so superglue isn't a strong point of mine. This will be painted RAF blue when complete. I'd double check this, ....I know there was a a thread on this.. quick google... ah, yes this one http://www.britmodeller.com/forums/index.php?/topic/234907984-raf-ground-equipment/ The RAF ground equipment from that time should be in Standard Camoflage Colour 2 (SCC 2) a Brown Colour (not aircraft Dark Earth!) which was a Army vehicle colour. All RAF WW2 vehicles and ground eqipment used it as a base colour post 1941 until 1944 when UK Olive Drab (different to US OD) appeared on new vehicles. I assume that any new GE was also painted this colour, but usually the policy was that the Brown was still used until stocks ran out. I don't think RAF GE was "camoflaged" I haven't seen anything to suggest otherwise, but it was just left in the SCC2 base colour, but I could be convinced otherwise with Photo evidence! I believe that there were still lots of SCC2 painted equipment around in 1948 when the RAF reverted back to Blues. White Ensign produce SCC2.It is perhaps a little light than it should be, but looks ok as it gives a "scale effect" quite nicely. Selwyn Mixes for all these British paints are here from Mike Starmer, http://www.mafva.net/other%20pages/Starmer%20camo.htm this lower colour on this Churchill is S.C.C.2 For S.C.C. 15 OD, Tamiya mix for British SCC 15 Olive DrabThose of you wishing to paint late war British vehicles may find this latest mix easier to make up than the previous mix, it is slightly lighter and more accurate too. Mix 5 pts XF81 + 1 pt XF58 +1 pt XF71. HTH T Link to comment Share on other sites More sharing options...
Magua87 Posted June 19, 2016 Share Posted June 19, 2016 Excellent diorama. I'm intrigued by your modeler's tool kit! Link to comment Share on other sites More sharing options...
Suprastar3000 Posted June 19, 2016 Author Share Posted June 19, 2016 (edited) hah hah thanks. I don't have the luxury of a study or studio,.. so the dinning room table is my only space. Everything needs to be easily moved when the wife shouts "GET THE DAM TABLE CLEAR". I can't close the box lids with the glues and paints sitting upright. So, I didn't want to lay the paints and glues down on their sides as the liquids would dry around the top seals making them difficult to open. The answer was to modify the bottom of the boxes, so they sit at 45 degrees. This prevents the paints pooling in the lids and also allows for easy accessibility when sitting at my desk. Also,.. I can't stand a messy work space,.... I need some order in my life. Edited June 19, 2016 by Suprastar3000 Link to comment Share on other sites More sharing options...
Suprastar3000 Posted June 27, 2016 Author Share Posted June 27, 2016 Regrettably I haven't had too much time to spend on this model,.. but over the weekend I quickly put together the engine fairings, wheels and the bomb bay. The kit is really a delight to put together so can't fault Tamiya. Fuel tanks painted red with a bit of weathering and a light wash,..... but nothing too fancy until I get the sides together. Sides are just held together checking for fit, so excuse the panel lines. Wheels painted, but needing weathering and dirt/oil wash. Need a few different shades of metal and chrome I think too. I noticed the instructions show a silver colour of the wheels bays, but the internet shows quite a few examples with interior green. I've gone for this as the contrast with the silver undercarriage looks better IMHO so there we go,.... not much to show, but a bit of progress is better than none at all. 3 Link to comment Share on other sites More sharing options...
phildagreek Posted June 27, 2016 Share Posted June 27, 2016 Looking good! Link to comment Share on other sites More sharing options...
Suprastar3000 Posted July 7, 2016 Author Share Posted July 7, 2016 Thanks Phil Made little progress this week. Seat belts made from tamiya tape as the decals looked too flat. Little of this detail will be seen as I'm planning on covering the top of the cockpit glass with a light dusting of snow. Fuselage sides are together with cockpit done and weathered. Also did a dirt wash on the wheels picking out the tyre tread. Again these will be mostly covered in snow. 2 Link to comment Share on other sites More sharing options...
phildagreek Posted July 7, 2016 Share Posted July 7, 2016 Sharp looking! Link to comment Share on other sites More sharing options...
Suprastar3000 Posted July 24, 2016 Author Share Posted July 24, 2016 A little further down the production line we go,.... Pre-shaded and base coat down. Under side looks ok, but I think I'll need some aftershade on the top side. Oil and grim look pretty good on the wheels,.. so I think I'll finally leave that alone. Cockpit area is nothing like as detailed as some of the models on this forum, but I'm reasonably happy with the look considering my abilities (or lack of). The open access door is the main key to the detail as the cockpit glass may have sooo much snow on it, little detail will show through. The exhaust staining was done today too. Looks more subtle in real life. That was terrifying to do free-hand with the airbrush,.. for me a newbie at airbrushing,... but turned out ok. 1 Link to comment Share on other sites More sharing options...
BigMouthStrikesAgain Posted July 25, 2016 Share Posted July 25, 2016 Cracking work, look forward to seeing more of this. Link to comment Share on other sites More sharing options...
Suprastar3000 Posted July 25, 2016 Author Share Posted July 25, 2016 Thank you sir Link to comment Share on other sites More sharing options...
Grey Beema Posted July 25, 2016 Share Posted July 25, 2016 Exhaust staining looks fine. I subtle wash in the panel lines might also help it pop. But take a close look at exhaust staining (any Merlin engined aircraft will do), I think it's a mix of dark grey, brown and a bit of light grey from running the engine lean.. Link to comment Share on other sites More sharing options...
Suprastar3000 Posted July 25, 2016 Author Share Posted July 25, 2016 Cheers for the info. I'll do the panel lines with a wash after the decals are fitted. Lots to do between then and now though. Nice idea with the grey tones on the exhaust staining. Maybe I could do that with chalk dust. Don't think I could handle the nerve of using the airbrush again. Thanks Link to comment Share on other sites More sharing options...
Suprastar3000 Posted July 31, 2016 Author Share Posted July 31, 2016 Decals on and wash complete. Just cockpit glass, few small parts and rockets to go on,.. and then weathering. Gave the model 3 good coats of gloss varnish but the decals still left silvering around the edge. A bit disappointed with that,.. but I guess it happens from time to time. Now applied matt varnish that has disguised the silvering a tiny bit. 2 Link to comment Share on other sites More sharing options...
Biggles87 Posted July 31, 2016 Share Posted July 31, 2016 I like the original diorama, the light snow covering is very realistic. Shame about the silvering on the decals, had you thought about cutting around the code letters then trying to soak off the film? Perhaps a heavier coat of snow is called for this time around. Cheers John Link to comment Share on other sites More sharing options...
Grey Beema Posted July 31, 2016 Share Posted July 31, 2016 Try floating the decals onto wet Johnsons Klear that usually gets rid of the silvering on troublesome decals.. Link to comment Share on other sites More sharing options...
Suprastar3000 Posted July 31, 2016 Author Share Posted July 31, 2016 (edited) I like the original diorama, the light snow covering is very realistic. Shame about the silvering on the decals, had you thought about cutting around the code letters then trying to soak off the film? Perhaps a heavier coat of snow is called for this time around. Cheers John Hi John, Thanks for the reply on the diorama. I've seen some very realistic snow models on here that I'm aiming to replicate but time will tell if I can get closer to realism on this dio. Yea, Its a shame about the decals. If I'm brave enough I might try painting inside of the letters over the silvering. Thats the only option I have now the transfers are locked in between clear coat and matt varnish. In the future I'll try cutting the excess film off. Edited July 31, 2016 by Suprastar3000 Link to comment Share on other sites More sharing options...
Suprastar3000 Posted July 31, 2016 Author Share Posted July 31, 2016 Try floating the decals onto wet Johnsons Klear that usually gets rid of the silvering on troublesome decals.. Really. wow. Never heard of the technique before. I would be scared to get run marks, finger prints and other imperfections in the Klear whilst working on the decal. Might give that a go on some spare plastic parts when I get a moment. Thanks for the tip. Link to comment Share on other sites More sharing options...
Grey Beema Posted August 1, 2016 Share Posted August 1, 2016 Have a piece of tissue/kitchen roll ready. Twist it into a point and use this to wick away Klear from around the side of the decal.. Link to comment Share on other sites More sharing options...
The Spadgent Posted August 1, 2016 Share Posted August 1, 2016 Looking great, Pitty about those decals but you can't really notice it. I built one of these before I became a member on BM, it was a pleasure to build, I used a hairy stick at the time and have always thought about going back and doing an airbrushed one. I think you made up my mind. Keep up the good work. John. Link to comment Share on other sites More sharing options...
Suprastar3000 Posted August 1, 2016 Author Share Posted August 1, 2016 (edited) Thanks for the tips and advise guys. Much appreciated. "hairy stick" LOL. That made me chuckle. Must say, this Mosquito was a joy to build. One of my favourite kits so far,.. so If your considering building another John,.. go for it. Tonight I'm going to try and attempt to carefully paint OVER the silvered decal edges. Will first try on a inconspicuous area and see if it improves. Luckily the roundels are fine. The ghosting only happened on the identification letters,.. so painting around those will be difficult but not impossible. Fingers crossed. Edited August 1, 2016 by Suprastar3000 1 Link to comment Share on other sites More sharing options...
The Spadgent Posted August 2, 2016 Share Posted August 2, 2016 Eek. Good luck with the paint over. Sounds scary. Link to comment Share on other sites More sharing options...

Recommended Posts
Create an account or sign in to comment
You need to be a member in order to leave a comment
Create an account
Sign up for a new account in our community. It's easy!
Register a new accountSign in
Already have an account? Sign in here.
Sign In Now