Tzulscha Posted April 23, 2016 Share Posted April 23, 2016 Iwo Jima I created this piece some while ago for the father of a good friend of mine. His father is the last survivor of his battalion and I thought a small dioramic scene might be an appropriate gift. He was the flamethrower for his squad....... Base is the usual chunk of blueboard Construction follows my usual technique of hotwire cutting foam to whatever shape suits my needs. It is glued together with carpenters glue. When the glue is dried, the base is cut to its final shape with a hotwire and textured with a butane lighter. This smooths the surface and also gives a nice plastic "skin" for the base. The figures are tacked together temporarily. A pin has been added to each one to hold them upright. After making some basic shapes for foot prints and the like, I sloshed on a bit of base colour. Something I learned as a stage trick is painting my edges black, the idea being to make the eye ignore them t Some fine sand, some dried grass crumbled up, a few tufts of beach grass... Basic poses fixed and some base colours on the guys. At about this point some one reminded me that the sand on Iwo Jima is volcanic and BLACK! D'oh Start again. Okay, black sand... Just so it's not dead black a light mist of lit tan for highlighting. Some dead grass stems looked appropriate Okay, the ground cover really pops against the sand now. Miscellaneous bits and bobs of equipment. That Marine green kinda stands out don't it? Sorry the pix are so small. I had posted this on a free hosting forum some time ago and these are the only copies I can find. They look better from a distance any way 20 Link to comment Share on other sites More sharing options...
Ozzy Posted April 23, 2016 Share Posted April 23, 2016 Good save with the sand, the figures look fantastic. Who made the figures? Link to comment Share on other sites More sharing options...
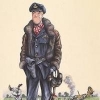
Tzulscha Posted April 23, 2016 Author Share Posted April 23, 2016 Good save with the sand, the figures look fantastic. Who made the figures? The figures are pretty much right out of the box with the one addition of gunslings and helmet straps from either Techstar or Toms model works, I can't remember which. 2 Link to comment Share on other sites More sharing options...
eddiesolo Posted April 25, 2016 Share Posted April 25, 2016 I like this, looks so simple and that is the key, sometimes less is more-a lovely snippet of action. Great work. Si:) Link to comment Share on other sites More sharing options...
phildagreek Posted April 26, 2016 Share Posted April 26, 2016 Link to comment Share on other sites More sharing options...
Firefly Posted June 1, 2016 Share Posted June 1, 2016 It looks so much better on the black sand. Link to comment Share on other sites More sharing options...
krow113 Posted June 2, 2016 Share Posted June 2, 2016 How did you do the black sand? Looks great. Link to comment Share on other sites More sharing options...
Tzulscha Posted June 2, 2016 Author Share Posted June 2, 2016 (edited) How did you do the black sand? Looks great. A little PVA glue, some sand and a blast from a can of Tamiya flat black. A mist of light tan out of the airbrush to finish. Sprayed at an angle it's just enough to give a bit of texture and contrast. The ground litter is dead grass out of the back yard. Side note: If you are using natural ground cover like sand and leaves and grass and junk, ALWAYS microwave the stuff. It dries the stuff out, preserves colour and makes sure no giant beetles or the like erupt from the ground to attack your soldiers. Thanks for all the nice comments guys! Edited June 2, 2016 by Tzulscha Link to comment Share on other sites More sharing options...
Flag_overlord Posted June 3, 2016 Share Posted June 3, 2016 A little PVA glue, some sand and a blast from a can of Tamiya flat black. A mist of light tan out of the airbrush to finish. Sprayed at an angle it's just enough to give a bit of texture and contrast. The ground litter is dead grass out of the back yard. Side note: If you are using natural ground cover like sand and leaves and grass and junk, ALWAYS microwave the stuff. It dries the stuff out, preserves colour and makes sure no giant beetles or the like erupt from the ground to attack your soldiers. Thanks for all the nice comments guys! Thanks for the tip about microwaving natural ground stuff, any advice how long for and what power? Also what colour did you use for the uniforms, please? Link to comment Share on other sites More sharing options...
Tzulscha Posted June 4, 2016 Author Share Posted June 4, 2016 Thanks for the tip about microwaving natural ground stuff, any advice how long for and what power? Also what colour did you use for the uniforms, please? Hey Flag-overlord. Uniform colour started as Testors 1164 Flat OD green. A little black wash to do shadows and outline equipment. A little light grey drybrush for high lighting. As for microwaving the ground cover.. hmm well I dunno. Not very long as a heap of grass will catch fire if you leave it in too long.. Set it for about a minute and keep an eye on the stuff. Dry stuff will only take a few seconds but wet green stuff will only take a little longer since water absorbs microwave radiation REALLY well. Sand and dirt will depend on what they are actually comprised of. Basically keep an eye on it and stir it up every few seconds until it's dry eh? Oh, paper plates may keep the wife off your back. If the microwave explodes, just stop there. BTW never slice a grape almost in half and put it in the microwave.... Link to comment Share on other sites More sharing options...

Recommended Posts
Create an account or sign in to comment
You need to be a member in order to leave a comment
Create an account
Sign up for a new account in our community. It's easy!
Register a new accountSign in
Already have an account? Sign in here.
Sign In Now