SJLR_1 Posted June 2, 2016 Share Posted June 2, 2016 Very neat work, will look amazing with paint! 1 Link to comment Share on other sites More sharing options...
Flashman Posted June 3, 2016 Share Posted June 3, 2016 Great work so far, I'm currently working on the Tamiya challenger 1 so am looking forward to the painting stage! 1 Link to comment Share on other sites More sharing options...
OwenEldridge Posted June 20, 2016 Author Share Posted June 20, 2016 I just received "Shot and Captured" in the mail. Incredible photos. Several great photos of 11B as well. Thanks for the recommendation John_W. 2 Link to comment Share on other sites More sharing options...
Gremlin56 Posted June 21, 2016 Share Posted June 21, 2016 Amazing build Owen, should look fantastic when you get some paint on 1 Link to comment Share on other sites More sharing options...
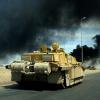
OwenEldridge Posted October 10, 2016 Author Share Posted October 10, 2016 (edited) I've finally got some paint on 11B. The model was basecoated/preshaded/modulated with Tamiya Nato Green, Black Green, and Dark Green. While I let this dry for a few days I mixed up my own British desert yellow sand color using about six different Tamiya paints until I got it just about right (to my eyes). The model looks more green in these photos than it does in person, but my lighting wasn't cooperating today so I think that's the best I'll get for now. I gave the model a coat of hairspray in the areas I would be depicting the scratches present in the photos of the real 11B. I've viewed several hundred wartime photos of the Challenger 2 in Iraq over the course of this build and I've found that 11B appears to have the least amount of chipping and fading of any of the Challengers that served in Operation Telic 1. This makes for somewhat of a boring model if weathering is everything to you, but I'm going for historical accuracy on this one rather than an attempt to use every weathering product in my modeling arsenal. Not surprisingly, something that was intended to be a quick project using a kit that essentially falls together has turned into a drawn out rivet counting fest. I'm currently trying to decide if I should attempt to depict a few extra details such as: 1. A rectangular box mounted to the top of the right armor skirt (The Eduard PE set supplies this) 2. The large camouflage tarp draped on the front and sides of the tank 3. An orange and white (air identification?) square draped on the rear of the turret 4. A canvas cover on the roll of wire near the jerry cans So unless I decide to add these extra details, my Challenger 2 is now painted and ready for the final weathering phases. Edited October 10, 2016 by OwenEldridge 9 Link to comment Share on other sites More sharing options...
Widow 65 Posted October 10, 2016 Share Posted October 10, 2016 Well, that is one cracking Chally 2, the colour is spot on as is the little areas of wear. Fantastic work 1 Link to comment Share on other sites More sharing options...
Hamden Posted October 11, 2016 Share Posted October 11, 2016 That's a really stunning Chally, colour looks right to me Roger 1 Link to comment Share on other sites More sharing options...
4509davidb Posted October 20, 2016 Share Posted October 20, 2016 Hi, Looking great - did you thin the Mr Surfacer 500 or just go neat? I have a £10 airbrush waiting for to do this on my kit. Thanks David 1 Link to comment Share on other sites More sharing options...
Bullbasket Posted October 21, 2016 Share Posted October 21, 2016 I'm a bit late to this build but I've run through your posts and I can see that there has been a lot of work gone into this. I especially like the side skirts. John. 1 Link to comment Share on other sites More sharing options...
OwenEldridge Posted October 25, 2016 Author Share Posted October 25, 2016 On 10/20/2016 at 11:42 AM, 4509davidb said: Hi, Looking great - did you thin the Mr Surfacer 500 or just go neat? I have a £10 airbrush waiting for to do this on my kit. Thanks David Used out of the bottle at 40 psi. Here's an article explaining the technique: http://www.armorama.com/modules.php?op=modload&name=Sections&file=index&req=viewarticle&artid=382 2 Link to comment Share on other sites More sharing options...

Recommended Posts
Create an account or sign in to comment
You need to be a member in order to leave a comment
Create an account
Sign up for a new account in our community. It's easy!
Register a new accountSign in
Already have an account? Sign in here.
Sign In Now