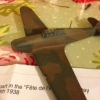
Buddyboy12 Posted February 2, 2016 Share Posted February 2, 2016 Hi all, since my wife got me my first plastic kit a 1/24 Hurricane kit for Christmas i seem to have gone a bit model mad! I thought the big kit should wait until i have practised a bit and developed a few basic skills so i got myself a small a 1/72 hurricane (new tool i think) lots of Humbrol products (What my local shop stocks so will give that a go), watched lots of You tube and also picked up the airfix lifeboat from a charity shop for £8!! Also got my Dads old Airbrush rig out of his loft as i wanted to try spray painting as well. Anyhoo i was not going to post anything on here but i thought what the hell, i have not seen any negative comments only good constructive ones so im thinking i can only get better by putting it out there. Well i cant say its a been a quick build and i have not finished it yet but here are some pics to show the story so far. I am quite pleased with it so far but my next move is to put a coat of Humbrol clear over it before i can put the decals on, I have read a few negative things about clear so am a bit nervous so am going to do some test pieces first! Untitled by andrewbudd2, on Flickr Unti Untitled by andrewbudd2, on Flickr Untitled by andrewbudd2, on Flickr Untitled by andrewbudd2, on Flickr Untitled by andrewbudd2, on Flickr Untitled by andrewbudd2, on Flickr Untitled by andrewbudd2, on Flickr Untitled by andrewbudd2, on Flickr Untitled by andrewbudd2, on Flickr Untitled by andrewbudd2, on Flickr Untitled by andrewbudd2, on Flickr Untitled by andrewbudd2, on Flickr Untitled by andrewbudd2, on Flickr Untitled by andrewbudd2, on Flickr Untitled by andrewbudd2, on Flickr Untitled by andrewbudd2, on Flickr Untitled by andrewbudd2, on Flickr Untitled by andrewbudd2, on Flickr Untitled by andrewbudd2, on FlickrUntitled by andrewbudd2, on Flickr Really struggled spraying the Aluminium paint for some reason it was coming out really rough but the other colours were alot better.(this is why im practicing lol) The canopy is not glued on yet as i am not sure if i should leave on when i gloss it. thanks for looking and any help is greatly received Andy 10 Link to comment Share on other sites More sharing options...
stevej60 Posted February 2, 2016 Share Posted February 2, 2016 Great work so far Andrew,best I always leave the glazing off until the kit is glossed,decalled and matt coated especially in this scale,silver is a difficult paint to spray or brush with practice and experimentation with different types you'll be happier with the result's are you using Humbrol acrylics or enamels? as I say great start look forward to the rest. Link to comment Share on other sites More sharing options...
PhantomBigStu Posted February 2, 2016 Share Posted February 2, 2016 First kit, pretty good going, most of mine don't look that good..... 1 Link to comment Share on other sites More sharing options...
FZ6 Posted February 2, 2016 Share Posted February 2, 2016 Looking good so far to me.I wish my first build was this good! Keep up the good work. I've got one of these I'm working on and it's been an enjoyable build so far. Regards, Mark Link to comment Share on other sites More sharing options...
Twobad Posted February 3, 2016 Share Posted February 3, 2016 That's really not bad for a first go. I'm from the school that says put the fixed glazing on and mask it off before you spray, otherwise you get an obvious join which isn't there in reality. As for the 1:24 kit: I built that not so long ago and it needs a fair amount of attention to the fit and finish of parts to get a good result. The moulds are old and not all you could hope for. Diligence and perseverance are the order of the day. 1 Link to comment Share on other sites More sharing options...
Winenut Posted February 3, 2016 Share Posted February 3, 2016 Absolutely cracking. Terrific first build and post. Every kit is a chance to experiment and try new techniques and to learn....... which is the great part of our hobby Have fun and enjoy! Link to comment Share on other sites More sharing options...
bobster Posted February 3, 2016 Share Posted February 3, 2016 Superb build, you are on your way. I would now leave the canopy off while you apply a gloss coat. Check the gloss is compatible with your paint or crazing may occur, I know from experience that acrylic varnish over an enamel medium does not go well! Best rule of thumb is don't mix enamel and acrylic mediums. Apply the decals over a gloss coat to prevent silvering of the transparent part of the decals. I also recommend using microset and microsol on the decals as it will bed the decals down onto the surface. Once a matt coat is applied, the decals will look painted on. Rob. Link to comment Share on other sites More sharing options...
Darby Posted February 3, 2016 Share Posted February 3, 2016 Keep practising no matter what. To say it's a first build it's a good start. Link to comment Share on other sites More sharing options...
Stew Dapple Posted February 3, 2016 Share Posted February 3, 2016 That's looking good Andrew Regarding the slightly rough finish to the Aluminium paint, it looks like some of the paint may have dried before it hit the model, which can leave a 'gritty' finish - I'm guessing you sprayed it? I'd suggest lowering the air pressure a little if your compressor allows it, and perhaps thinning the paint a little more (water or isopropyl for acrylics, white spirit or celluose thinners for enamels). If it's any consolation it still happens to me and probably most of us on here at some time or another. Also another vote for either fixing and masking the canopy or leaving it off until the varnish is applied over the transfers, varnish loves to ruin transparencies. Cheers, Stew Link to comment Share on other sites More sharing options...
Leonl Posted February 3, 2016 Share Posted February 3, 2016 Excellent start. I wish my first looked as good. I always leave canopies off until the very end. If you do put it on before make sure it's well masked and away from any superglue as it will make your canopy go foggy... I've leant the hard way Link to comment Share on other sites More sharing options...
mixup_1 Posted February 3, 2016 Share Posted February 3, 2016 Well done Andy!! This is a great wee first build for a newbie! I suspect you may have a bit of natural talent there!! Look forward to future posts! Also what Rob said, get yourself some Microsol and Microset, great stuff! Keep up the good work and keep having fun! Thanks for sharing! Pearse Link to comment Share on other sites More sharing options...
DaveCromie Posted February 3, 2016 Share Posted February 3, 2016 Nice work Andrew! Metallic paints can be a pain in the neck to spray. I took LOTS of advice from threads on here before even trying it and still wind up with an occasional "gritty" finish. Practice, practice, practice seems to be the way forward and asking for help on here never goes wrong. Cheers DC Link to comment Share on other sites More sharing options...
Buddyboy12 Posted February 4, 2016 Author Share Posted February 4, 2016 Thanks all for your kind comments. I started this with the idea that it was all for practice but am pleased with how it's gone so far and now don't want to muck it up! Lol Superb build, you are on your way. I would now leave the canopy off while you apply a gloss coat. Check the gloss is compatible with your paint or crazing may occur, I know from experience that acrylic varnish over an enamel medium does not go well! Best rule of thumb is don't mix enamel and acrylic mediums. Apply the decals over a gloss coat to prevent silvering of the transparent part of the decals. I also recommend using microset and microsol on the decals as it will bed the decals down onto the surface. Once a matt coat is applied, the decals will look painted on. Rob. I got some Decalfix yesterday form my local ( very much humbrol stocking) shop. Im guessing it's the same sort of thing to microsol/set? What is the difference between sol & set? Andy Link to comment Share on other sites More sharing options...
PhantomBigStu Posted February 4, 2016 Share Posted February 4, 2016 sol softens the decal for application, the set, well sets the decal in place 1 Link to comment Share on other sites More sharing options...
Buddyboy12 Posted February 8, 2016 Author Share Posted February 8, 2016 (edited) Well it was all going so well........ Sticking Decals on is not as easy as it looks! (For me anyway lol) Gave the Hurri a few light coats of Humbrol clear and left it 24 hours to go off before I started on Decal application. Here started some issues including - 1) Decalfix seems to have stripped the Clear gloss off leaving the matt paint surface. 2) where any Decalfix was not wiped of straight away its left a sticky residue. 3) Couple of the Decals not quite aligned properly. 4) Most anoying one of the rear registration no's folded over itself and i could not recover it Not sure its worth trying to get a new decal for it, might just chalk it up to "experience" and move on! Will put another couple of coats of clear on tonight to seal it up (Im hoping this will hide the Bits the Decalfix has screwed up as well) Is this a common thing with Decalfix? I think i may be trying to get some Microsol/set from the web! Just dont really want to waste the Decalfix! Untitled by andrewbudd2, on Flickr Untitled by andrewbudd2, on Flickr Untitled by andrewbudd2, on Flickr Untitled by andrewbudd2, on Flickr I have got mixed feelings about the next bit " the weathering" as its the bit i relly want to learn as thats what brings it to life but i have absolutely no idea where to start! You tube is my friend i guess! Any hints or tips / resource's would be gratefully received! Cheers Andy Edited February 8, 2016 by Buddyboy12 3 Link to comment Share on other sites More sharing options...
FalkeEins Posted February 8, 2016 Share Posted February 8, 2016 ..no need to go overboard and do everything on your first build. .that looks absolutely fine! Perhaps a bit of a pinwash in the ailerons/elevators or similar. That particular machine was in a coronation review line-up or presented to the king (or similar IIRC) so would have looked quite smart I'd suggest.. Link to comment Share on other sites More sharing options...
Buddyboy12 Posted February 10, 2016 Author Share Posted February 10, 2016 Well i have had a go at a panel wash tonight after FalkeEins suggestion of not running before i can walk! Was not really sure what colour to use and there was a pretty limited choice at my local shop but i went for a Dark Brown Enamel wash from Humbrol. I am pleased with this on the top surfaces but not sure about the bottom. I would have liked a black wash for the Aluminium part but there was none available. What is the consensus on wash colour when its spread over 3 different base colours use one or mix? Should i use brown wash for the undercarriage arms or should i get the oil & grime humbrol wash? Anyway take a look see what you think! Advice gratefully received! Untitled by andrewbudd2, on Flickr Untitled by andrewbudd2, on Flickr Untitled by andrewbudd2, on Flickr Untitled by andrewbudd2, on Flickr Untitled by andrewbudd2, on Flickr Sorry lighting is not very good! Cheers Andy 2 Link to comment Share on other sites More sharing options...
Brandy Posted February 11, 2016 Share Posted February 11, 2016 That is VERY impressive for a first build! Ian Link to comment Share on other sites More sharing options...
Buddyboy12 Posted February 11, 2016 Author Share Posted February 11, 2016 Thank you Limeypilot that is very kind. Link to comment Share on other sites More sharing options...
bull-nut Posted February 12, 2016 Share Posted February 12, 2016 (edited) Nice looking Hurri, I love these new tool Airfix kits, the fit is often right up there with Tamiya. With regards to Humbrol Clear and Decalfix. Humbrols Youtube video guide says to thin Decalfix a little with water when applying over clear, since they are both Ammonia based products. Edited February 12, 2016 by bull-nut Link to comment Share on other sites More sharing options...
Ascoteer Posted February 12, 2016 Share Posted February 12, 2016 For a first build that's not half bad. I've never been able to get on with Decalfix so I feel your pain. I'm really rather 'old skool' and a big fan of microset/microsol. 1 Link to comment Share on other sites More sharing options...
Buddyboy12 Posted February 12, 2016 Author Share Posted February 12, 2016 Nice looking Hurri, I love these new tool Airfix kits, the fit is often right up there with Tamiya. With regards to Humbrol Clear and Decalfix. Humbrols Youtube video guide says to thin Decalfix a little with water when applying over clear, since they are both Ammonia based products. Ahh that was probably the issue with the Decalfix then! Will give the water a go next time! Thanks Bull-nut Link to comment Share on other sites More sharing options...
Buddyboy12 Posted February 20, 2016 Author Share Posted February 20, 2016 (edited) Well Finally managed to get down the model shop to get some Matt Varnish (Humbrol) to finish of the Hurricane, rightly or wrongly i went for the Enamel version over the acrylic one as i was unsure how it would react over the enamel washes i had put on?!? Anyway seemed to go on ok other than it created what i can only describe as cobwebs in places so not sure if i did something wrong but overall i don't think its to bad. After that finally glued the canopy in place and put the lights on so calling it done! Really happy with it as a first attempt and a lot of lessons learned! Think i have caught the bug! Straight onto no 2 i think! Another Hurricane 1/24 this time, my xmas pressie! Just wanted to say thanks for all the kind words and advice on here it really has helped! Will do a ready for inspection and paste the link here. http://www.britmodeller.com/forums/index.php?/topic/234997979-172-airfix-hurricane-mk1-my-first-build/ Cheers Andy Edited February 20, 2016 by Buddyboy12 Link to comment Share on other sites More sharing options...
robw_uk Posted February 27, 2016 Share Posted February 27, 2016 Nice. I have the same build waiting on my desk (starter kit build so different decals). Hope I get close to this finish. Link to comment Share on other sites More sharing options...

Recommended Posts
Create an account or sign in to comment
You need to be a member in order to leave a comment
Create an account
Sign up for a new account in our community. It's easy!
Register a new accountSign in
Already have an account? Sign in here.
Sign In Now